How to Velvet Chicken: The Restaurant Secret You Need to Know
You know the feeling. You decide to make a healthy chicken stir-fry at home. You chop your veggies with artistic precision, you whip up a sauce that smells divine, and then… you cook the chicken. You end up with sad, dry, slightly rubbery nuggets that make you question all your life choices. Meanwhile, the chicken from your favorite local Chinese restaurant is so tender, so juicy, so silky it practically melts in your mouth. What is this sorcery?!
It’s not sorcery, my friend. It’s a technique. A brilliant, simple, and frankly game-changing technique. I’m here to show you a culinary secret weapon, and when it comes to velvet chicken how to is the only question you need answered to permanently banish dry chicken from your kitchen. Get ready to level up your stir-fry game forever.
Why This Technique Is a Total Game-Changer
So, why should you bother with this extra step? Is it really worth it? Let me ask you this: do you enjoy eating delicious food?
This isn’t just a recipe; it’s a foundational technique that will improve every single stir-fry you ever make. Velveting creates a microscopic, protective coating around each piece of chicken. This magical layer locks in all the moisture, ensuring the meat stays incredibly tender and juicy, even when blasted with the high heat of a wok.
The result is chicken with a texture that is, well, velvety. It’s succulent, smooth, and absorbs sauce like a dream. Plus, it’s ridiculously easy and uses ingredients you probably already have. IMO, the 30 minutes of marinating time is a small price to pay for stir-fry perfection. Your family and friends will think you’ve been taking secret cooking classes.
The Velveting Ingredient Lineup


The beauty of this technique is its simplicity. You don’t need anything fancy to create this magic.
- 1 lb (450g) Boneless, Skinless Chicken: Breasts or thighs work equally well. The real magic is in the technique, not the cut.
- 1 Large Egg White: This is the foundation of our velvet coating. Just the white, save the yolk for a sneaky carbonara later.
- 1 tbsp Cornstarch: The “velvet” in velvet chicken. It creates that silky-smooth protective layer.
- 1 tbsp Shaoxing Wine (or Dry Sherry): This adds a classic, savory depth of flavor. If you have neither, you can use rice vinegar or even just skip it.
- 1/2 tsp Kosher Salt: To season the chicken from the inside out.
- 1 tsp Vegetable Oil or other neutral oil: Helps keep the chicken pieces from sticking together.
The Tools for Your Velveting Victory
No specialized gear required. You’ve got this.
- Medium Mixing Bowl: To marinate your chicken in.
- Whisk or a pair of chopsticks: For whipping that egg white into shape.
- Sharp Knife and Cutting Board: For slicing your chicken like a pro.
- Wok or a Large Pot: To blanch the chicken in. A wider surface area is your friend here.
- Slotted Spoon or a Spider Strainer: Absolutely essential for quickly and safely removing the chicken from the hot liquid.
The Step-by-Step Guide to Silky Chicken Nirvana
Ready to change your stir-fry life? It’s way easier than you think. We’ll be using the “water velveting” method, which is cleaner, easier, and uses less oil than the deep-frying method some restaurants use.
Step 1: Prep Your Chicken
First things first, slice your chicken. You want thin, uniform, bite-sized pieces. The most important part? Slice the chicken AGAINST the grain. Look for the little lines (muscle fibers) running through the meat and cut perpendicular to them. This shortens the fibers and is your first step towards tender chicken.
Step 2: The Magical Marinade
In your mixing bowl, whisk the egg white until it’s light and foamy. You’re not making a meringue, just breaking it up and getting some air in there.
Now, whisk in the cornstarch, Shaoxing wine, and salt until you have a smooth, slightly thick slurry. Add the sliced chicken and the teaspoon of oil to the bowl. Get in there with your hands (or a spoon, if you must) and make sure every single piece of chicken is evenly coated in the marinade.
Step 3: Let it Marinate

Cover the bowl and let the chicken marinate in the fridge for at least 30 minutes. This is not a suggestion; it’s a requirement. This time allows the marinade to penetrate the meat and start its tenderizing magic. You can leave it for up to a few hours if you need to.
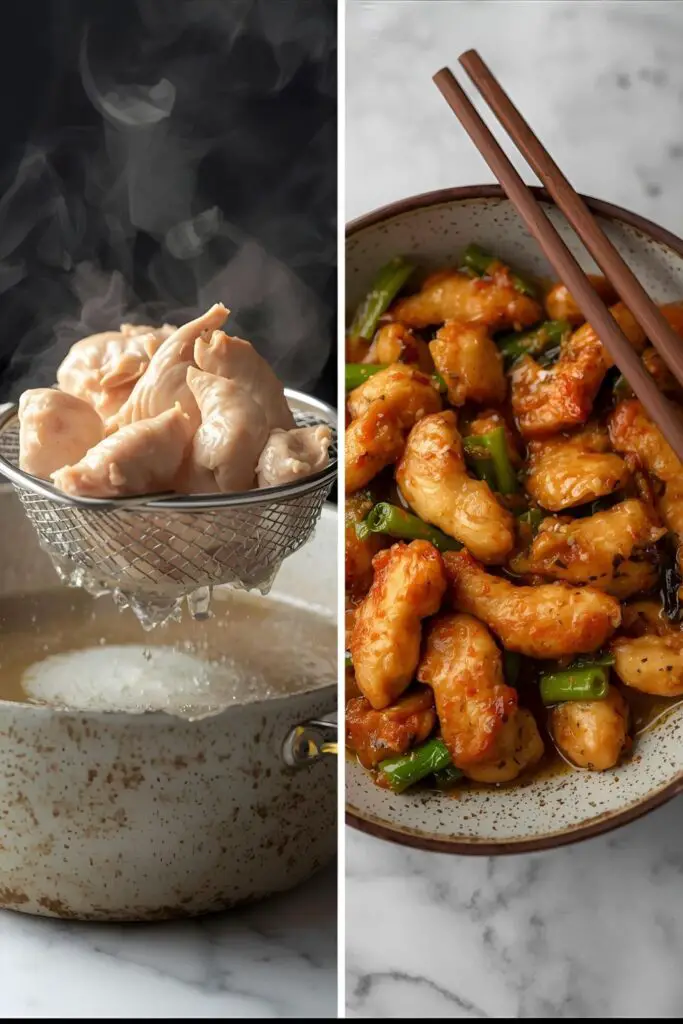
Step 4: The Blanching Bath (aka The Pass-Through)
Fill your wok or large pot with about 6-8 cups of water and bring it to a GENTLE SIMMER. I’m serious. You want small, lazy bubbles, not a raging, rolling boil. A furious boil will rip the coating off your chicken and overcook it in seconds.
Once the water is simmering gently, add your marinated chicken pieces one by one, or slide them in gently from the bowl. Use chopsticks or a spoon to separate them immediately so they don’t clump together.
Let them cook for just 45-60 seconds, or until the chicken turns opaque and is about 80% cooked through. It will be pale and might look a little unappetizing, but trust the process.
Step 5: The Grand Finale
Using your slotted spoon or spider strainer, immediately remove the chicken from the water and let it drain well. That’s it! Your chicken is now officially “velveted” and ready to be the star of your favorite stir-fry. Just add it to your wok during the last minute or two of cooking to heat it through and coat it in sauce.
Calories & Nutritional Info
This is more of a technique than a full recipe, so the info is for the chicken itself. This is based on a 4 oz (112g) serving of velveted chicken breast:
- Calories: Approximately 180-200 kcal
- Protein: A solid 28g
- Fat: Around 5g
- Carbohydrates: Roughly 2g
- Note: Because we’re water-velveting instead of deep-frying, this is a lean, mean, protein-packed machine. It’s a fantastic way to prep healthy and delicious chicken.
Common Mistakes to Avoid (Don’t Ruin the Velvet!)

You’re so close to perfection. Don’t stumble at the finish line.
- Using Boiling Water: If your water is at a rolling boil, you’ll have a bad time. The violent bubbles will tear off that delicate cornstarch coating and you’ll just be… boiling chicken. Keep it at a gentle, lazy simmer.
- Crowding the Pot: Don’t just dump a giant clump of marinated chicken into the pot. It will merge into one giant chicken monster. Add the pieces in batches if you have to, ensuring they have room to swim freely.
- Slicing WITH the Grain: I know I said it before, but it bears repeating. Slicing with the grain results in long, tough muscle fibers, which leads to chewy chicken. Always, always slice against the grain.
- Skipping the Marinade Time: That 30-minute marinade is where the magic is seeded. Be patient. The silky texture is your reward.
Variations & Customizations
This technique is a launchpad. Now, where will you take it?
- Velveted Beef or Pork: This exact same technique works wonders on thin slices of beef (like flank steak) or pork loin. It’s the secret to tender beef and broccoli, too!
- Spicy Chili-Garlic Chicken: Once your chicken is velveted, toss it into a stir-fry with a fiery sauce made from sambal oelek, garlic, ginger, and a touch of soy sauce.
- Velveted Tofu (The Veggie Swap): You can totally do this with tofu! Press a block of firm or extra-firm tofu well, cut it into cubes, and gently toss it in the same marinade. Blanch it for about 60-90 seconds. It creates an amazing texture that soaks up sauce beautifully.
Frequently Asked Questions (All Your Velveting Queries, Answered)
1. What does velveting actually do to the chicken? It creates a protective barrier that seals in the chicken’s natural moisture. The cornstarch and egg white form a coating that protects the delicate meat from the harsh, direct heat of the wok, resulting in a much more tender and juicy texture.
2. Is water velveting or oil velveting better? For home cooks, water velveting is almost always better. It’s less messy, uses way less oil, and is healthier. Oil velveting can give a slightly richer result but it’s a lot more fuss.
3. I’ve heard you can use baking soda to velvet chicken. Is that true? Yes, that’s another velveting method called “alkaline velveting.” A short marinade in a baking soda solution tenderizes the meat by raising its pH. It’s effective but can sometimes leave a slight chemical taste if not rinsed properly. The egg white/cornstarch method is more about texture and is, in my opinion, more foolproof.
4. How long do you actually cook the chicken during the velveting process? Barely any time at all! Just 45-60 seconds in the simmering water is usually enough. You’re just blanching it to set the coating and par-cook the meat. It will finish cooking in your main dish.
5. Can I velvet other meats besides chicken? Absolutely! This technique is fantastic for thin slices of pork, beef, and even shrimp. For shrimp, you only need to blanch them for about 30 seconds until they just start to turn pink.
6. Do I need to rinse the chicken after blanching it? Nope! Don’t you dare. That silky coating is the entire point. Just drain it well in your slotted spoon or strainer and it’s ready to go.
7. Why is my velveting coating falling off in the water? Two likely culprits: your water was boiling too aggressively, or your marinade was too thin (maybe not enough cornstarch or too much liquid). Ensure a gentle simmer and a marinade that nicely coats the chicken without being runny.
Final Thoughts
You are now in possession of one of the greatest kitchen hacks of all time. You have the power to transform the humble chicken breast into a culinary masterpiece. No longer will you suffer the indignity of a dry stir-fry. Go forth and velvet everything!
Seriously, try this once, and you will never go back. Your wok is waiting. Your taste buds are ready. Go make the best stir-fry of your life. You’ve earned it.