How to Decorate Christmas Cookies Like a Pro (Even if You’re a Mess)
Ah, the holidays. A time of joy, family, and the annual tradition of staring at a tray of naked, undecorated sugar cookies with a sense of impending doom. You’ve seen the pictures on Pinterest: perfect, intricate little works of art that look like they were decorated by elves with PhDs in fine arts. Then you look at your own supplies—a tub of frosting, some questionable sprinkles—and resign yourself to another year of “abstract” designs. But what if I told you it doesn’t have to be this way? Today, my friend, we are tackling how to decorate christmas cookies without having a complete meltdown.
Let’s be real, it might be August in Khulna and the only snow is in our imaginations, but it’s never too early to get a head start on holiday domination. Forget the stress. We’re breaking down the basics into easy, manageable steps. This isn’t about creating museum-quality masterpieces; it’s about having fun and making cookies that look as good as they taste. Ready to unleash your inner cookie artist?
Why This “Recipe” Is the Gift That Keeps on Giving
Why should you dive into the sparkly, sometimes-sticky world of cookie decorating? Let me give you the holly jolly details.
First, it’s a tradition in the making. There’s something magical about gathering around a table covered in icing and sprinkles. It’s a fantastic way to create memories with family and friends, even if half the sprinkles end up on the floor.
Second, you create edible works of art. A beautifully decorated cookie is more than just a snack; it’s a gift. A plate of these is the ultimate “I care about you enough to spend time making something beautiful” gesture. It’s way better than a gift card, IMO.
Finally, it’s surprisingly therapeutic. There’s a certain zen to be found in the simple, repetitive motion of piping a perfect line or flooding a cookie with glossy icing. It’s a creative outlet where you get to eat your mistakes. What could be better?
The Decorator’s Palette (Your “Ingredients”)

To create your festive masterpieces, you need the right materials. Think of this as your art supply list, but everything is edible.
- The Canvas: 1 batch of your favorite cut-out sugar cookies or gingerbread cookies, baked and completely cooled. I cannot stress the “cooled” part enough.
- The “Paint” (Your Icing):
- Royal Icing: The classic choice. It dries hard and matte, making it perfect for detailed designs and for stacking or packaging cookies. You can make it with meringue powder or use a quality store-bought mix.
- Simple Glaze Icing: A quick mix of powdered sugar, a little milk, and a dash of corn syrup. It gives a lovely translucent shine but doesn’t dry as hard as royal icing.
- Buttercream Frosting: For a softer, fluffier, less precise (but equally delicious) approach. Perfect for kids!
- The Colors: Gel food coloring is your best friend. A tiny drop provides vibrant color without thinning your icing. Red, green, and white are the classic go-tos.
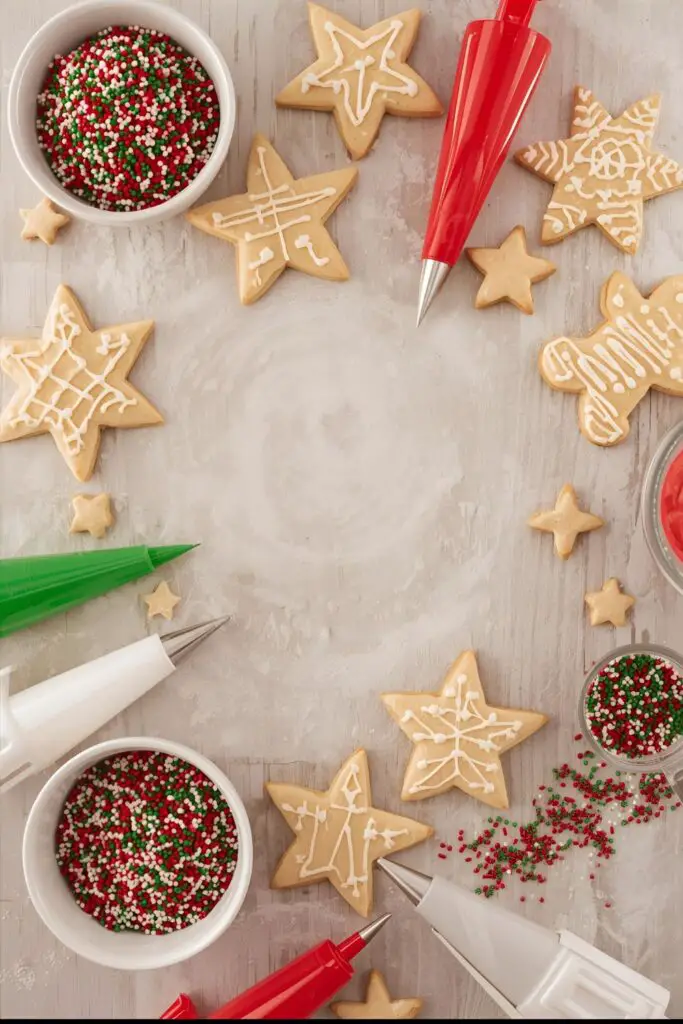
- The Bling (Sprinkles!):
- Sanding sugar for a sparkly finish.
- Nonpareils for tiny dots of color.
- Jimmies and holiday-themed sprinkle mixes (think tiny trees and snowflakes).
- Edible glitter for that extra-festive shimmer.
Your Elf Workshop (Tools & Gadgets)
You don’t need to be a professional pastry chef with a thousand gadgets. Here are the basics to get you started.
- Piping Bags: Disposable ones make cleanup a breeze. In a pinch, a sturdy Ziploc-style bag works too.
- Piping Tips: Not strictly necessary, but they help a lot. A few small round tips (sizes 2 and 3) are perfect for outlining and details. A star tip is great for festive borders.
- Couplers: Little plastic thingies that let you switch piping tips on the same bag of icing. A real time-saver!
- A Scribe Tool or Toothpicks: Absolutely essential for spreading icing into tight corners and popping pesky air bubbles.
- Small Bowls and Spoons: For mixing up your different icing colors.
- Parchment Paper or Wax Paper: To cover your work surface and for practicing your piping skills.
Step-by-Step: Three Easy Designs to Make You Look Like a Pro
Ready to get decorating? We’ll start with the basics using royal icing, the most common choice for detailed designs.
First, a Word on Icing Consistency…
For royal icing, you’ll generally need two consistencies:
- Outline (or Piping) Consistency: Thick, like toothpaste. It should hold its shape when you pipe a line.
- Flood Consistency: Thinner, like honey or shampoo. When you drizzle a ribbon of it back into the bowl, it should disappear back into the surface in about 15-20 seconds. Add water a tiny bit at a time to thin your icing.
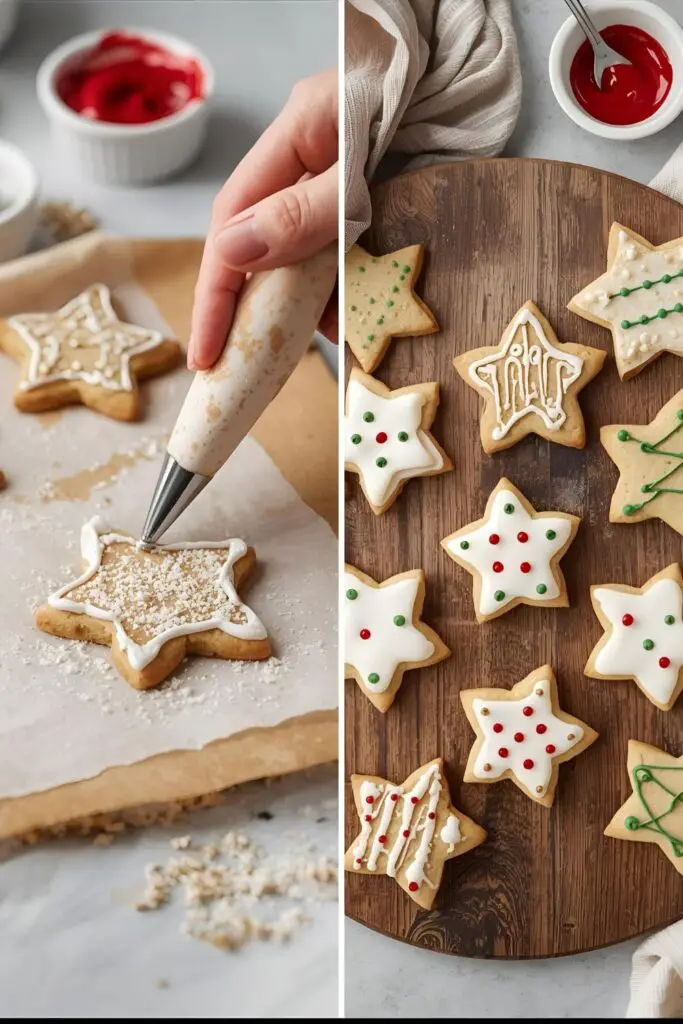
Design 1: The Simple Flood & Sprinkle (Beginner Level)
This is the perfect starting point. It’s easy, fast, and always looks festive.
- Outline the Cookie: Using your outline consistency icing in a piping bag, pipe a thin border around the entire edge of your cookie. This creates a “dam” to hold in the flood icing.
- Flood the Cookie: Switch to your flood consistency icing. Gently squeeze the icing into the center of your outlined cookie. Use your scribe tool or a toothpick to nudge the icing into all the corners.
- Sprinkle with Abandon: While the flood icing is still wet, go to town with your favorite sprinkles. They’ll stick to the wet icing and look amazing. Let it dry!
Design 2: The Wet-on-Wet Polka Dot (Intermediate Fun)
This technique looks fancy but is surprisingly simple.
- Outline and Flood: Just like in Design 1, outline your cookie and immediately flood it with your base color.
- Add the Dots: While the flood icing is still wet, take a piping bag with a contrasting color of flood consistency icing and pipe small dots directly onto the wet base.
- Watch the Magic: The dots will magically sink into the base, creating a perfectly smooth, flat polka dot pattern. You can even drag a toothpick through the dots to create little hearts or swirls!
Design 3: The Snowy Christmas Tree (A Little Fancier)

This involves layering, which requires a bit of patience.
- Flood the Tree: Outline and flood your Christmas tree-shaped cookie with green flood icing. Now, the hard part: let this layer dry completely for at least a few hours until it’s hard to the touch.
- Pipe the Garland: Using a white outline consistency icing, pipe a decorative zig-zag or a swirling “garland” across the dry green base.
- Add the Ornaments: While the white garland is still wet, you can add tiny nonpareils or other small sprinkles to look like ornaments. You can also pipe small dots of different colored icing for ornaments. Let it all dry!
Calories & Nutritional Info (It’s a Cookie. Let’s Not Overthink It.)
You’re adding sugar on top of a sugar cookie. Let’s just embrace it.
- Serving Size: 1 decorated cookie
- Estimated Calories: More than an undecorated cookie. Let’s say… +30 to 50 calories, depending on your love for icing and sprinkles.
- Nutritional Value: 100% of your daily recommended dose of festive cheer.
Common Mistakes to Avoid (Save Your Cookies from a Holiday Fiasco!)
- Decorating Warm Cookies: I will say this until I’m blue in the face. If you try to ice a warm cookie, you will end up with a sad, melted, sugary puddle. Your cookies must be completely, totally, stone-cold.
- The Wrong Icing Consistency: This is the #1 problem for beginners. If your outline icing is too thin, it will run. If your flood icing is too thick, it won’t smooth out. Test your consistencies on a piece of parchment paper first!
- The Dreaded Color Bleed: This happens when you try to pipe a dark color (like red) right next to a light color (like white) before the first color has had a chance to dry a bit. Give your outlines a few minutes to set before flooding next to them.
- Impatience During Drying: Royal icing takes time to harden completely. Trying to stack or bag your cookies too early will result in smudges, dents, and tears. Let them dry, uncovered, for at least 6-8 hours or overnight.
Variations & Customizations (Your Cookie, Your Rules!)
The designs above are just the beginning!
1. The Minimalist Chic Cookie
Less is more! Use only white royal icing. Outline a snowflake cookie and then add delicate piped details and some elegant silver sanding sugar. So classy.
2. The “Ugly Sweater” Extravaganza
Embrace the chaos! Use bright, clashing colors like lime green and hot pink. Pipe on goofy patterns, zig-zags, and an absurd amount of sprinkles. These are always a huge hit.
3. The Simple Buttercream & Sprinkle
If royal icing feels too intimidating, just use a simple buttercream! It won’t dry hard, but it’s delicious and easy for kids. Use a star tip to pipe a festive rosette in the middle of a cookie and top with sprinkles. Done!
FAQ: Your Cookie Conundrums, Answered

Let’s clear up some common decorating questions. 1. What is the absolute best icing for decorating cookies that need to be stacked or packaged? Royal icing. It dries hard like a candy shell, which protects your beautiful designs. Buttercream will always stay soft and will smudge.
2. How do I know if my royal icing is the right consistency? For outline icing, it should be thick like toothpaste. For flood icing, use the “15-second rule”: draw a line through the icing in your bowl with a knife. It should take about 15 seconds for the line to completely disappear.
3. Can I use store-bought frosting in a tube? You can, and it’s great for kids! Just know that it won’t dry hard, so the cookies will need to be stored in a single layer.
4. Seriously, how long does royal icing take to dry? It depends on the thickness of your icing and the humidity in your environment, but plan for at least 6-8 hours, or ideally, overnight. Yes, really.
5. How do I prevent my piping bag from exploding? Don’t overfill it! Fill your bag only about two-thirds of the way full. You can also use a rubber band or a bag tie to secure the top.
6. My hands are so shaky! How can I pipe straight lines? Try resting your piping wrist on your other hand to stabilize it. You can also rest your forearms on the edge of the table. And remember, practice makes progress!
7. How do I store my beautifully decorated cookies? Once the icing is completely dry, store them in a rigid, airtight container at room temperature. You can stack them with layers of parchment or wax paper in between. They should last for about a week.
Final Thoughts
You did it! You’ve braved the world of piping bags and sprinkles and emerged a true cookie artist. You now possess the skills to transform a simple sugar cookie into a festive masterpiece. Remember, the goal is to have fun and create something delicious. So go forth, get your festive bake on, and spread some joy, one beautifully decorated cookie at a time. And don’t worry if some of them look a little… abstract. The “ugly” ones still taste just as good!