Ever find yourself craving that crispy, golden-brown goodness of fried chicken but maybe, just maybe, you’re trying to avoid swimming in a pool of oil? Yeah, me too. That’s where the glorious invention of oven fried chicken swoops in to save the day (and your arteries, a little bit). This isn’t some sad imitation, my friend. We’re talking about chicken that’s unbelievably crispy on the outside, juicy on the inside, and doesn’t require you to break out the industrial-sized bottle of cooking oil. Skeptical? You should be. But trust me on this one.
This oven fried chicken delivers all the satisfaction of traditional fried chicken without the guilt (okay, maybe slightly less guilt). It’s easier to make, less messy, and still packs a serious flavor punch. Plus, you can tell yourself it’s “healthier.” Win-win-win, right? So, are you ready to experience fried chicken nirvana without the deep fryer drama?
Why This Oven Fried Chicken Is Basically a Miracle
Still not convinced that you can achieve fried chicken perfection in your oven? Let me enlighten you.
First, it’s surprisingly crispy. The secret lies in a few key techniques we’ll get to, but trust me, you’ll get that satisfying crunch with every bite. Who needs a vat of oil when you’ve got a well-seasoned coating and a hot oven?
Second, it’s way less messy. No more oil splatters all over your stovetop! Your oven contains the action, making cleanup a breeze. Hallelujah for that, am I right?
Finally, it’s still incredibly flavorful. We’re not skimping on the seasonings here. This chicken gets coated in a delicious blend of spices that will make your taste buds sing.
The Crispy Crew (Ingredients)
Here’s what you’ll need for this oven-baked delight.
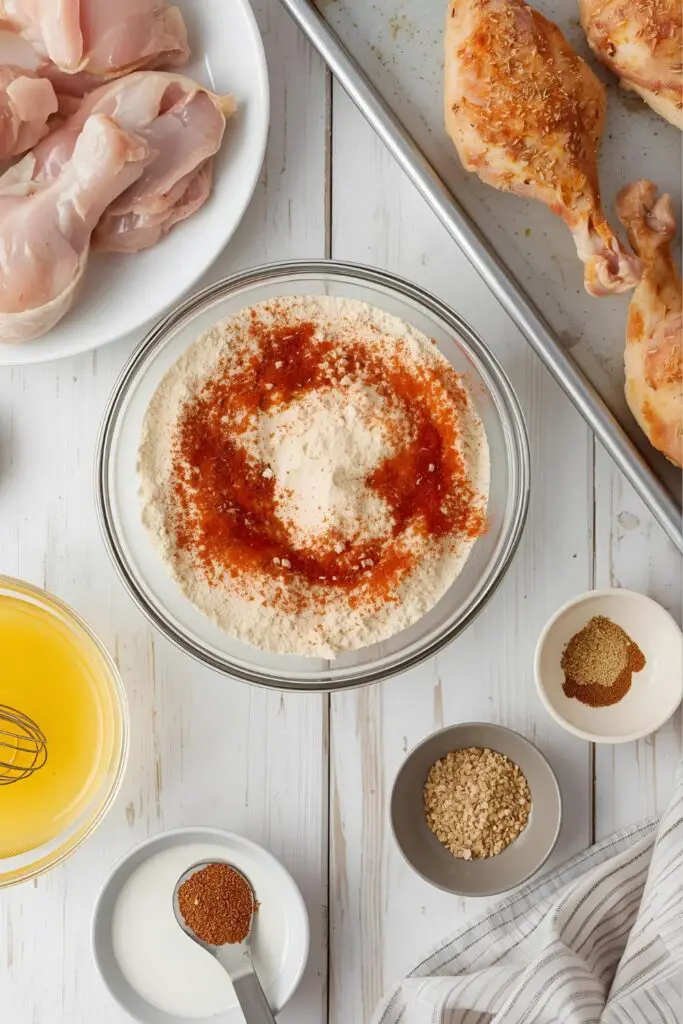
- Chicken Pieces: About 2-3 pounds (drumsticks, thighs, wings, or breasts, bone-in and skin-on work best for flavor and moisture).
- All-Purpose Flour: 1 ½ cups. The base of our crispy coating.
- Seasoned Salt: 1 tablespoon. Adds a good base of flavor.
- Paprika: 2 teaspoons (smoked paprika adds a nice touch!). For color and a bit of smoky depth.
- Garlic Powder: 1 teaspoon. Essential for savory goodness.
- Onion Powder: 1 teaspoon. Another flavor booster.
- Dried Thyme: ½ teaspoon. A subtle herb that complements chicken beautifully.
- Black Pepper: 1 teaspoon. Freshly ground, if you’re feeling fancy.
- Eggs: 2 large. Our binding agent.
- Milk or Buttermilk: ½ cup. Adds moisture to the egg wash and helps the coating stick. Buttermilk will give a slightly tangier flavor – your call!
- Vegetable Oil or Melted Butter: ¼ cup. We’re not deep-frying, but a little fat helps with browning and crispiness.
Your Oven Fried Arsenal (Tools & Kitchen Gadgets)
Keep it simple, folks.
- Large Bowl: For mixing the dry ingredients.
- Shallow Dish or Plate: For the egg wash.
- Baking Sheet: For baking the chicken.
- Wire Rack: To place on the baking sheet. This allows air to circulate and helps the bottom of the chicken get crispy too – trust me, it’s worth the extra step.
- Tongs: For flipping the chicken.
- Measuring Cups and Spoons: For precise ingredient ratios.
Step-by-Step: Let’s Get Crispy!
Time to transform that raw chicken into golden perfection.
Step 1: Preheat and Prep
Preheat your oven to 400°F (200°C). Place the wire rack on top of your baking sheet. This elevated surface is key to crispy bottoms!
Step 2: Season the Chicken (Optional but Recommended)
Pat your chicken pieces dry with paper towels. This helps the coating adhere better. You can sprinkle them lightly with some extra seasoned salt and pepper if you want to get a head start on flavor.
Step 3: Whisk the Dry Coating
In the large bowl, whisk together the all-purpose flour, seasoned salt, paprika, garlic powder, onion powder, dried thyme, and black pepper. Make sure everything is evenly combined. This is where the magic happens, flavor-wise.
Step 4: Prepare the Wet Coating
In the shallow dish or plate, whisk together the eggs and milk or buttermilk until well combined.
Step 5: The Coating Ritual
Now for the fun (and slightly messy) part. Take one piece of chicken at a time and dredge it thoroughly in the flour mixture, making sure it’s completely coated. Then, dip it into the egg wash, letting any excess drip off. Finally, dredge it again in the flour mixture, pressing it on firmly to create a good, even coating. This double coating is a pro tip for extra crispiness.
Step 6: Arrange on the Rack
Place the coated chicken pieces on the prepared wire rack on the baking sheet, making sure they aren’t touching. This allows for even cooking and air circulation for maximum crispiness.
Step 7: Add the Fat for Browning
Drizzle the vegetable oil or melted butter evenly over the coated chicken. This helps it get that beautiful golden-brown color and crispy texture.
Step 8: Bake to Golden Glory
Bake in the preheated oven for 45-60 minutes, or until the chicken is cooked through and the skin is golden brown and crispy. The exact time will depend on the size and type of chicken pieces you’re using.
Step 9: Flip for Even Crispiness
About halfway through the baking time (around 25-30 minutes), carefully flip the chicken pieces with your tongs to ensure they cook evenly and get crispy on all sides.
Step 10: Rest (If You Can Wait That Long!)
Once the chicken is cooked through (an internal temperature of 165°F or 74°C), remove it from the oven and let it rest on the wire rack for a few minutes before serving. This helps the juices redistribute, resulting in more tender chicken.
Step 11: Devour!
Serve your glorious oven fried chicken immediately and bask in the crispy, flavorful goodness.
Calories & Nutritional Info (Let’s Be Honest, It’s Still Chicken)

While oven frying is a bit healthier than deep frying, it’s still chicken with a coating. Here’s a rough estimate:
- Serving Size: 1 piece of chicken (e.g., a drumstick or thigh)
- Estimated Calories: 250-350 calories (depending on the piece and amount of coating)
- Key Nutrients:
- Protein: High (from the chicken)
- Fat: Moderate (less than deep-fried, but still present)
- Carbohydrates: From the flour coating.
- Nutritional Note: Oven fried chicken is a good source of protein. The calorie and fat content will vary depending on the cut of chicken and how much coating you end up with.
Common Mistakes to Avoid (Don’t End Up with Soggy Sadness)
Achieving crispy oven fried chicken isn’t rocket science, but a few common missteps can lead to less-than-perfect results.
- Not Drying the Chicken: Excess moisture prevents the coating from sticking and getting crispy. Pat that chicken dry!
- Not Using a Wire Rack: The bottom of the chicken can get soggy if it sits directly on the baking sheet. Use a wire rack for air circulation!
- Crowding the Baking Sheet: Overcrowding will steam the chicken instead of allowing it to crisp up. Give your chicken some space! Use two baking sheets if necessary.
- Not Coating Evenly: Make sure every part of the chicken is well-coated with the flour mixture. Be thorough with your dredging!
- Not Adding Enough Fat: A little oil or butter helps with browning and crispiness. Don’t skip this! Drizzle that fat!
- Underbaking: Nobody wants raw chicken. Ensure the internal temperature reaches 165°F (74°C).
- Not Flipping: Flipping ensures even cooking and crisping on all sides. Don’t forget to flip!
Variations & Customizations (Spice It Up!)
Want to put your own spin on this crispy classic? Here are a few ideas.
1. Spicy Oven Fried Chicken
Add some cayenne pepper, hot sauce powder, or a pinch of chili flakes to your flour mixture for a fiery kick.
2. Herbaceous Oven Fried Chicken
Mix in some extra dried herbs like rosemary, oregano, or sage into your flour mixture for a more complex flavor profile.
3. Gluten-Free Oven Fried Chicken
Use a gluten-free all-purpose flour blend and ensure all your other ingredients are also gluten-free. The method remains the same.
FAQ: Your Oven Fried Chicken Conundrums Solved
Let’s tackle those crispy chicken questions.
1. Can I use boneless, skinless chicken breasts? You can, but they tend to dry out more easily in the oven. If you use them, consider brining them first and reduce the baking time slightly.
2. Can I marinate the chicken before coating it? Yes, marinating can add extra flavor and moisture. Just make sure to pat the chicken very dry before coating.
3. Can I use different types of oil? Yes, any neutral cooking oil with a relatively high smoke point will work, such as canola oil, vegetable oil, or avocado oil. Melted butter adds great flavor but has a lower smoke point, so watch it carefully.
4. How do I keep the chicken crispy after it’s cooked? Place the cooked chicken on a wire rack uncovered. Covering it will trap steam and make it soggy.
5. Can I double the recipe? Absolutely! Just make sure you don’t overcrowd your baking sheets. You might need to bake in batches.
6. What are some good dipping sauces for oven fried chicken? Classic choices include ranch dressing, honey mustard, BBQ sauce, or a spicy mayo.
7. Can I reheat leftover oven fried chicken and still have it be crispy? Reheating can be tricky for maintaining crispiness. The best way is to reheat it uncovered in a preheated oven at a lower temperature (around 300°F or 150°C) for about 15-20 minutes, or until heated through.
Final Thoughts
So there you have it! Crispy, flavorful oven fried chicken that won’t leave you feeling like you need a nap (or a cardiologist). It’s a fantastic way to enjoy a classic favorite with a little less oil and a lot less mess. Now go forth, preheat that oven, and prepare to impress yourself (and maybe your dinner guests). And hey, don’t be surprised if you find yourself making this way more often than you thought you would. It’s just that good. 😉