Why This Recipe Is… Well, a Thing
Okay, let’s be real. This isn’t winning any Michelin stars. But hear me out on why canning peppers and wieners might actually be your jam (pun intended… almost).
First off, it’s a fantastic way to preserve a surplus of peppers. Did your garden go wild with bell peppers? Did you find a killer deal at the local market in Khulna? Canning them is a smart way to avoid food waste.
Secondly, it’s undeniably convenient. Need a quick, no-fuss meal? Pop open a jar, heat it up, and BAM! Dinner is served. It’s the ultimate pantry staple for those “I can’t be bothered to cook” nights.
Finally, it’s a taste of nostalgia for some. For many folks, this combo brings back memories of childhood camping trips or simple, hearty meals. It’s comfort food in a jar, even if that comfort is… debatable to some.
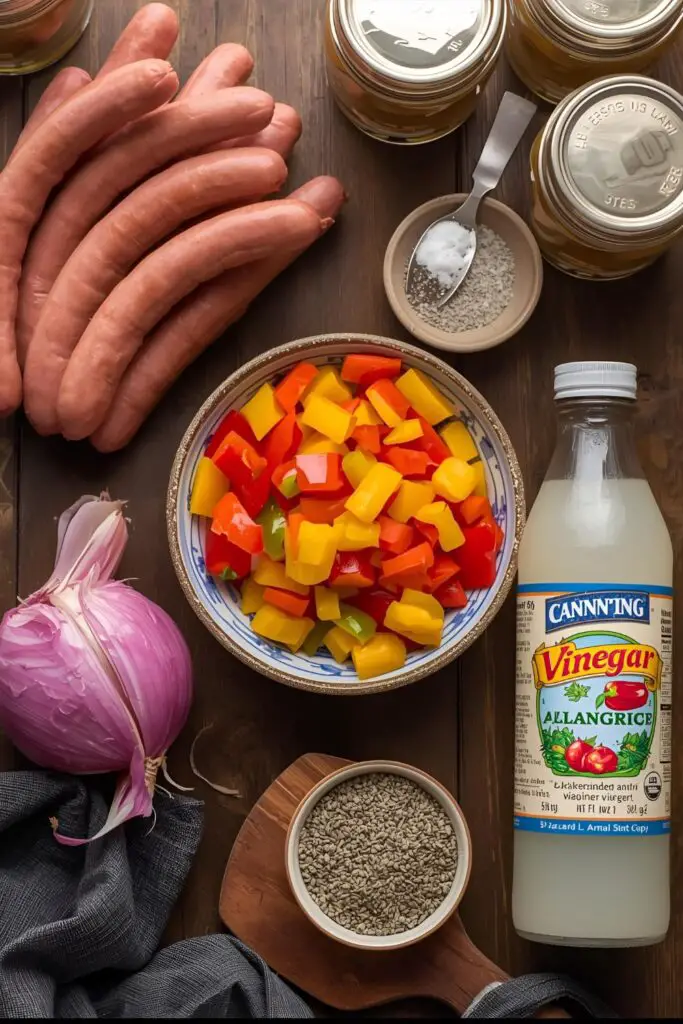
The Canning Crew (Ingredients)
Alright, let’s gather our players for this canned performance.
- Wieners (Hot Dogs): About 2 pounds. You can use beef, pork, chicken, or even those… other kinds. Just make sure they’re good quality (as good as hot dogs get, anyway).
- Bell Peppers: About 3-4 cups, chopped into 1-inch pieces. Use any color or a mix for visual appeal. Local Khulna markets will have plenty of seasonal options.
- Onion: 1 medium, chopped. Adds a bit of flavor depth.
- Canning Liquid:
- Water: 4 cups
- White Vinegar (5% acidity): 1 cup. This is crucial for safe canning!
- Sugar: 2 tablespoons (optional, for a touch of sweetness)
- Salt: 1 teaspoon (also optional, enhances flavor)
- Optional Flavor Boosters: Garlic cloves (2-3, minced), celery seed (½ teaspoon), mustard seed (½ teaspoon).
The Canning Command Center (Tools & Kitchen Gadgets)

Canning requires specific equipment for safety. Don’t skimp on these!
- Water Bath Canner with Lid: A large pot with a rack to hold jars.
- Canning Jars with Lids and Rings: Pint or quart jars. Make sure they are clean and have no chips or cracks.
- New Canning Lids: The flat part with the rubber seal. Single-use only for proper sealing.
- Canning Rings: The screw-on bands that hold the lids in place during processing. Reusable.
- Jar Lifter: A specialized tool for safely lifting hot jars. Trust me, you don’t want to drop a scalding jar of wieners.
- Wide-Mouth Funnel: Makes filling jars much easier and less messy.
- Ladle: For safely pouring hot liquid into jars.
- Bubble Remover/Headspace Tool: A plastic or wooden tool for removing air bubbles and measuring headspace. A chopstick works in a pinch, but be gentle.
Step-by-Step: The Wiener-Pepper Preservation Project
Let’s get these peppers and wieners into their forever homes (aka, jars).
Step 1: Prep the Peppers and Onions
Wash your bell peppers thoroughly. Remove the seeds and membranes, and chop them into roughly 1-inch pieces. Chop the onion as well. Set them aside in a bowl.
Step 2: Prep the Wieners
You have a couple of options here. You can leave the wieners whole (if using pint jars and shorter wieners), cut them into 1-inch pieces, or even slice them in half lengthwise and then into chunks. Choose your wiener destiny.
Step 3: Make the Canning Liquid
In a large saucepan, combine the water, white vinegar, sugar (if using), and salt (if using). If you’re using any of the optional flavor boosters like garlic or seeds, add them now. Bring the liquid to a rolling boil over medium-high heat.
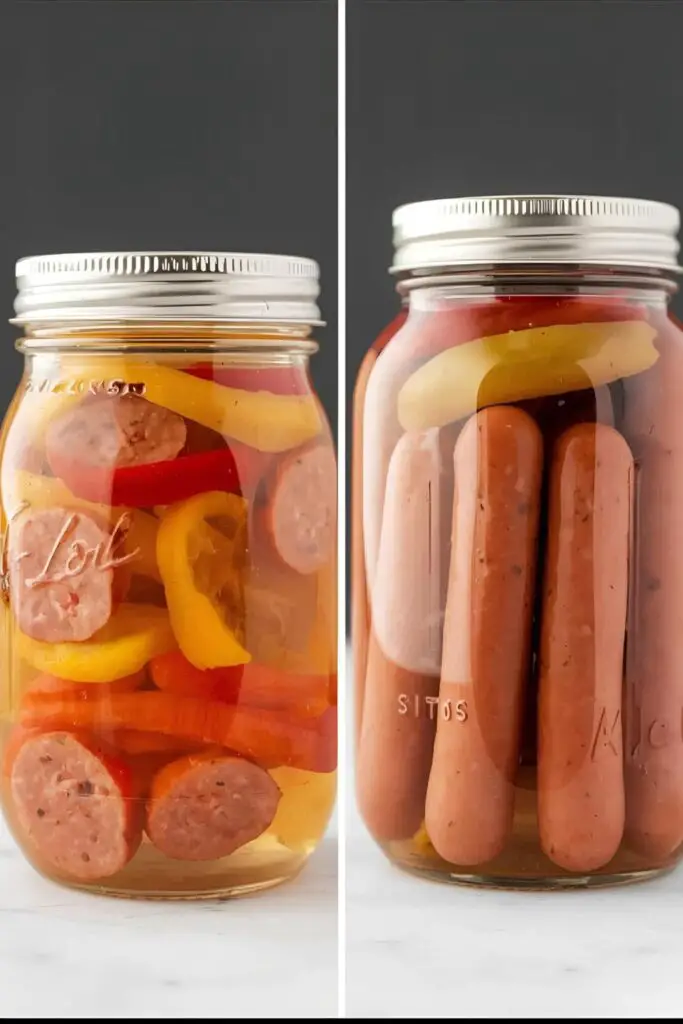
Step 4: Pack the Jars
Make sure your canning jars are clean and warm. You can sterilize them by simmering them in hot water for 10 minutes. Keep them in the hot water until you’re ready to fill them. Heat your lids in a separate saucepan of simmering (not boiling!) water.

Using the wide-mouth funnel, pack the hot jars with the chopped peppers and onions, and the prepared wieners, leaving about 1 inch of headspace (the space between the top of the food and the rim of the jar). Don’t pack them too tightly; the canning liquid needs to circulate.
Step 5: Add the Hot Liquid
Using the ladle, carefully pour the boiling canning liquid over the solids in each jar, again leaving 1 inch of headspace. Make sure all the solid ingredients are submerged in the liquid.
Step 6: Remove Air Bubbles
Insert the bubble remover/headspace tool (or a clean chopstick) down the sides of each jar to release any trapped air bubbles. Gently slide it around the inside of the jar. Adjust the headspace if necessary by adding more hot liquid or removing some solids.
Step 7: Wipe the Rims and Apply Lids
Use a clean, damp cloth to wipe the rims of the jars thoroughly. Even a tiny bit of food residue can prevent a proper seal. Place a heated lid on each jar, centering it. Screw on a canning ring until it is fingertip-tight – not too loose, not too tight.
Step 8: Process in a Water Bath Canner
Place the filled jars on the rack inside your water bath canner. Make sure the water level is at least 1 inch above the tops of the jars. If not, add more boiling water. Bring the water to a rolling boil and process for 20 minutes for pint jars and 25 minutes for quart jars. Start timing when the water reaches a full rolling boil.
Step 9: Cool and Check Seals
Once the processing time is up, carefully remove the jars from the canner using the jar lifter and place them on a towel-lined surface, leaving at least an inch of space between them. Let the jars cool completely for 12-24 hours. As they cool, you should hear a “pop” sound as the lids seal.

After the jars have cooled, check the seals. The center of the lid should be slightly concave (curved downwards) and should not flex up and down when you press on it. If any jars didn’t seal properly, you can either reprocess them with new lids within 24 hours or store them in the refrigerator and use them within a few days.
Remove the canning rings and store the sealed jars in a cool, dark place. Label them with the date and contents.
Calories & Nutritional Info (Buyer Beware)
Let’s be honest, we’re not exactly dealing with a health food here. This is more about preservation and convenience.
- Serving Size: About 1 cup (drained solids)
- Estimated Calories: This will vary greatly depending on the type of wieners you use. Expect a significant amount of calories, fat (likely saturated), and sodium.
- Key Nutrients: Well, you’ll get some vitamins and minerals from the peppers. The wieners… are mostly processed meat.
- Nutritional Note: Consume in moderation. This is not your go-to for a balanced meal, but it’s a shelf-stable option when you need one.
Common Mistakes to Avoid (Don’t Poison Yourself!)
Canning safety is serious business. Don’t mess around!
- Insufficient Acidity: White vinegar is crucial for safe water bath canning of low-acid foods like peppers and (let’s be real) wieners. Do not reduce or omit the vinegar.
- Not Enough Headspace: Too little headspace can prevent a proper seal and cause jars to explode during processing. Always leave the recommended 1-inch headspace.
- Using Damaged Jars or Lids: Chips, cracks, or previously used lids can compromise the seal. Inspect your jars and always use new lids.
- Short Processing Time: Under-processing can lead to spoilage and potentially dangerous bacteria growth. Process for the full recommended time.
- Forgetting to Remove Air Bubbles: Trapped air bubbles can prevent a good seal and affect the food quality. Take the time to debubble.
- Improper Cooling: Cooling jars too quickly can cause them to crack. Let them cool naturally at room temperature.
Variations & Customizations (Spice It Up… Or Not)
Feeling adventurous? Here are a few ways to tweak this… unique… recipe.
1. Spicy Wiener Fiesta
Add some sliced jalapeños or other hot peppers along with the bell peppers for a fiery kick. Remember, the spice level will intensify during canning.
2. The Sweet and Tangy Twist
Increase the sugar in the canning liquid to ¼ cup for a sweeter, more pickled flavor. You could also add a tablespoon of tomato paste for a richer sauce.
3. The “Everything But the Kitchen Sink” Jar
Throw in other vegetables you have on hand, like sliced carrots or zucchini, along with the peppers and onions. Just make sure the peppers make up the majority of the vegetables to ensure safe acidity levels.
FAQ: Your Wiener-Pepper Wonders (and Worries) Answered
Let’s tackle some of those burning questions you probably have right now.
1. Is it safe to can wieners at home? Yes, when done correctly and following safe canning practices with the proper amount of acid (vinegar) and processing time in a water bath canner. Follow this recipe and reputable canning guidelines.
2. Can I use different types of sausages? This recipe is specifically for wieners. Other types of sausages may have different densities and fat contents, which could affect processing times and safety. It’s best to stick to wieners for this recipe.
3. How long will canned peppers and wieners last? Properly sealed and stored jars should last for at least 1-2 years in a cool, dark place. However, the quality of the wieners may degrade over a longer period.
4. How do I serve canned peppers and wieners? Heat them up in a saucepan or microwave. They’re great on their own, over rice, or even on a bun for a… unique… twist on a hot dog.
5. Can I skip the sugar and salt in the canning liquid? Yes, the sugar and salt are optional flavor enhancers. The water and vinegar are the crucial components for safe canning.
6. What if my canned peppers and wieners look cloudy? Cloudiness can sometimes occur due to minerals in your water or starch from the vegetables. As long as the jars are properly sealed and there are no signs of spoilage (foul odor, bulging lid, mold), it is usually safe to eat. However, if you are unsure, it’s always best to err on the side of caution and discard it.
7. Why did my jars lose liquid during processing? This can happen due to air bubbles not being fully removed or from over-packing the jars. Make sure to leave the correct headspace and thoroughly debubble. Slight liquid loss is usually okay as long as the food remains submerged.
Final Thoughts
Well, there you have it. You now possess the knowledge to transform humble peppers and wieners into shelf-stable sustenance. Will this become your go-to gourmet meal? Probably not. But in a pinch, or for a taste of that… specific… nostalgia, you’ll have jars of this ready to roll.
So go forth, can with confidence (and maybe a touch of amusement), and embrace the wonderfully weird world of home-canned peppers and wieners. And hey, if your friends raise an eyebrow, just tell them it’s a vintage recipe making a comeback. They don’t need to know all the details. 😉