How to Make Chocolate Snowflakes (The Easiest Dessert Hack Ever)
Let’s be honest. You’ve baked a perfectly lovely cake or whipped up a batch of cupcakes. They taste amazing, but they look a little… naked. A bit plain. You could slap on some sprinkles, sure. Or, you could unleash your inner dessert artist and create something truly magical that will make everyone think you’re a culinary wizard. What is this sorcery, you ask? My friends, I’m going to teach you how to make chocolate snowflakes, and I promise it’s easier than finding a matching pair of socks.
Forget complicated sugar work or fussy fondant. We’re talking about pure, delicious chocolate, piped into delicate, beautiful shapes that will instantly elevate any dessert from simple to showstopper. Ready to turn your kitchen into a winter wonderland of edible art?
Why This “Recipe” Is Your New Secret Weapon
So, why should you bother piping tiny, intricate chocolate shapes when you could be, you know, eating the dessert already? Oh, let me count the ways this technique will change your life (or at least your dessert game).
First, the “WOW” factor is off the charts. Seriously. Place one of these delicate, lacy snowflakes on top of a simple cupcake or a mug of hot cocoa, and you’ve instantly created a masterpiece. Prepare for a chorus of “You made that?!” Yes, you did, you magnificent creator, you.
Second, it requires basically one ingredient. Yes, one. Chocolate. That’s it. No long, complicated shopping list. No searching for obscure ingredients in the back of the baking aisle. Just good old, reliable chocolate.

Finally, it’s ridiculously fun and creative. It’s like drawing, but your pen is a bag of melted chocolate and your canvas is a sheet of parchment paper. It’s a low-stakes, high-reward craft project where you get to eat your mistakes. What’s not to love?
The Super-Simple “Ingredient” List
This might be the shortest ingredient list you’ve ever seen for a recipe article.
- Chocolate: About 1 cup of chocolate chips or chopped chocolate. Here’s the breakdown:
- For Beginners (The Easy Route): Compound Chocolate or Candy Melts (white, milk, or dark). These are designed to melt smoothly and harden quickly without any fuss. They are your best friend for a stress-free experience.
- For Flavor Aficionados (The Pro Route): Good-quality real chocolate (like Ghirardelli or Guittard). This will taste significantly better, but it can be softer at room temperature. For a true “snap,” you’d need to temper it, but for simple decorations, you can often get away without it.
- Optional Bling:
- Edible glitter
- White nonpareils or sprinkles
- Pearl or silver luster dust
The Artist’s Toolkit
You don’t need a professional pastry setup for this. Just a few key items.
- Piping Bag: A disposable or reusable piping bag is ideal. In a pinch, a sturdy Ziploc-style sandwich bag will absolutely work.
- Parchment Paper or a Silicone Baking Mat: An absolute must-have. This is what you’ll pipe your snowflakes onto.
- Baking Sheet: To provide a flat, stable surface for your parchment paper and for easy transport to the fridge.
- Microwave-Safe Bowl: For melting your chocolate.
- Spatula: For stirring.
- Snowflake Templates (Optional, but SUPER helpful): You can find hundreds of free snowflake patterns online. Just print out a sheet of various designs to use as your guide.
Step-by-Step to Edible Winter Wonderland
Ready to create some chocolate magic? Follow these simple steps.
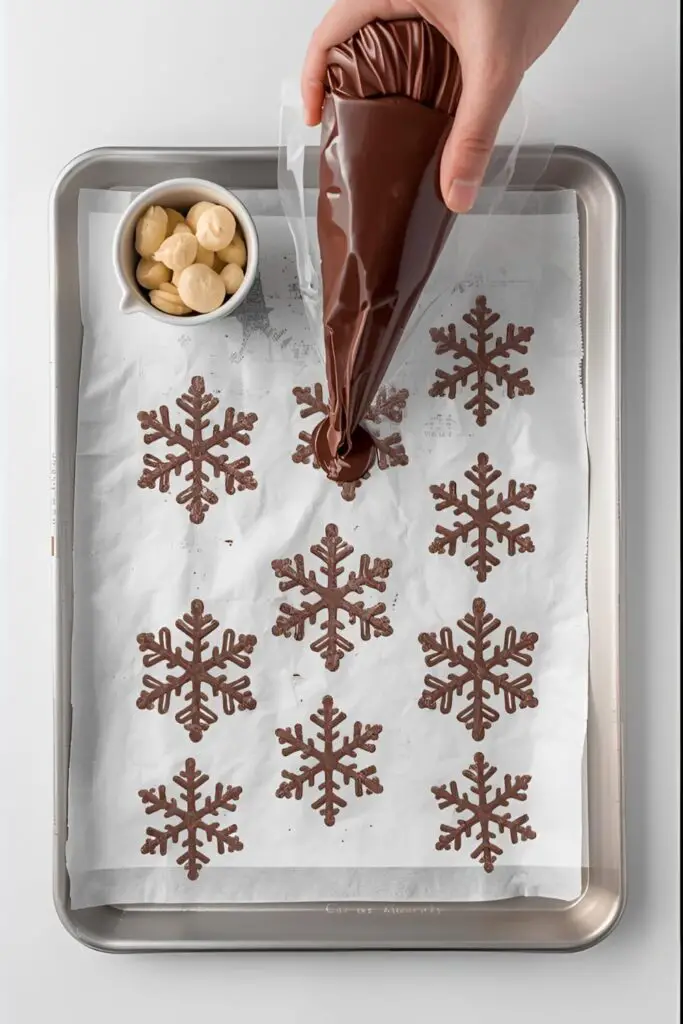
Step 1: Prep Your Snowflake Station
Lay a sheet of parchment paper flat on your baking sheet. If you’re using snowflake templates, simply slide the printed paper underneath the parchment paper. You’ll be able to see the designs clearly through the parchment. Genius, right?
Step 2: Melt That Chocolate
Place your chocolate chips or candy melts in a microwave-safe bowl. Microwave on 50% power for 30-second intervals, stirring well between each interval. This low-and-slow method is crucial to prevent the chocolate from seizing and turning into a sad, lumpy mess. Continue until the chocolate is almost completely melted, then just stir until the residual heat melts the last few bits. It should be smooth and fluid.
Step 3: Bag It Up

Let the melted chocolate cool for a minute or two. You don’t want it to be piping hot, as it will be too runny. Carefully spoon the chocolate into your piping bag or Ziploc bag. If using a Ziploc, push the chocolate down into one corner.
Snip a tiny hole in the tip of the piping bag or the corner of the Ziploc bag. And I mean tiny. You can always make it bigger, but you can’t make it smaller. Start small.
Step 4: Let the Piping Begin!
Now for the fun part! Holding your piping bag like a pen, gently and steadily squeeze the chocolate out, tracing the snowflake patterns on your template. If you’re going rogue and freehanding it, just remember the basics: a central point with six arms branching out.
Pro Tip: Don’t make your lines too thin and delicate. While they look pretty, they will be incredibly fragile. Give them a little substance so they don’t break when you try to move them. And remember the golden rule: no two snowflakes are alike! So don’t stress about perfection.
Step 5: Add Some Sparkle (Optional)
While the chocolate is still wet, now is the time to add any sprinkles or edible glitter. A light dusting of sparkle can make your snowflakes look extra magical.
Step 6: Chill Out
Once you have a full sheet of beautiful snowflakes, carefully transfer the baking sheet to the refrigerator. Let them chill for about 10-15 minutes, or until the chocolate is completely firm and hardened.
Step 7: The Delicate Peel

This is the moment of truth. Once your snowflakes are solid, gently and carefully peel them off the parchment paper. They are delicate, so handle them with care! Use a thin spatula if they need a little help.
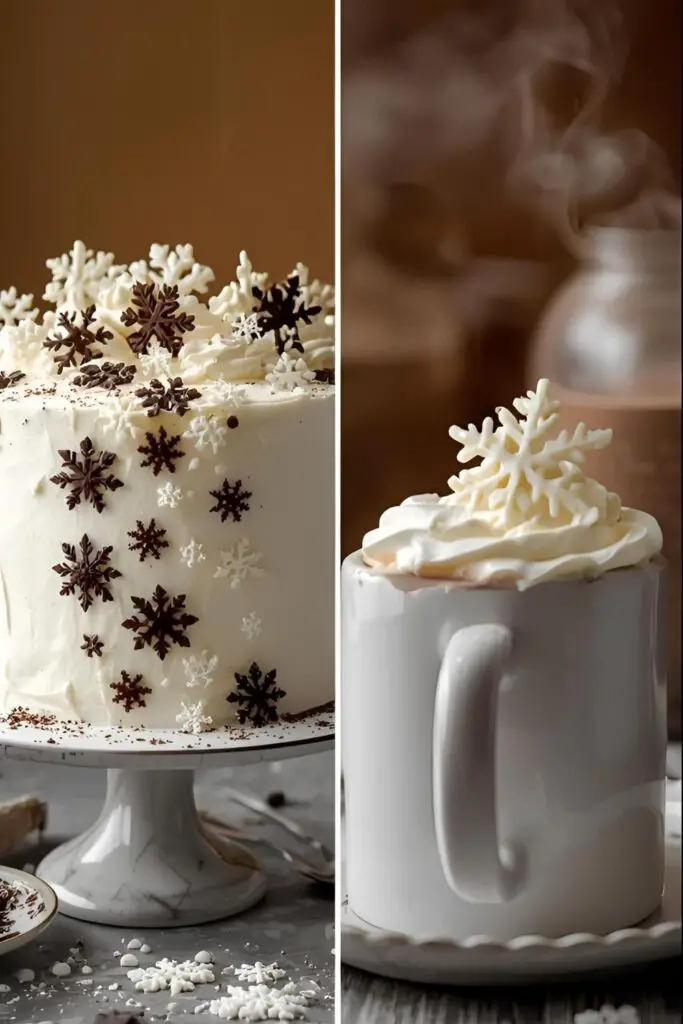
Now you have a collection of beautiful, edible chocolate snowflakes! Use them to top cupcakes, decorate a cake, float on a mug of hot cocoa, or just eat them straight off the pan. I won’t judge.
Calories & Nutritional Info (It’s a Garnish, Relax)
Let’s be real, you’re not eating a whole plate of these (or are you?). The nutritional info is for the chocolate itself.
- Serving Size: 1 chocolate snowflake
- Estimated Calories: 15-30 (depending on size and thickness)
- Main Ingredient: Delicious, glorious chocolate.
- Health Benefit: 100% boost in dessert-related happiness.
Common Mistakes to Avoid (Save the Snowflakes!)
- The Scorched Chocolate Tragedy: You nuked your chocolate in the microwave for too long. Melt it in short 30-second bursts and stir, stir, stir. Once it’s seized, there’s no going back.
- The Blobby Mess: The hole in your piping bag was too big, or your chocolate was too hot and runny. Start with a tiny snip and let your chocolate cool slightly before piping.
- The Shattered Dream: You tried to peel the snowflakes off the parchment before they were fully hardened. They will break into a million sad little pieces. Be patient and make sure they are completely firm.
- Fragile Filigree Fiasco: Your piped lines were too thin. While they look ethereal and beautiful, they will snap if you so much as breathe on them too hard. Pipe with confidence and give your lines some structure.
Variations & Customizations (A Flurry of Ideas)
The basic snowflake is just the beginning. Let’s get creative!
1. White Chocolate Peppermint Flakes
Use white chocolate or white candy melts for a classic snowy look. While the chocolate is still wet, sprinkle them with finely crushed peppermint candies. Perfect for topping peppermint mochas or chocolate peppermint cake.
2. A Colorful Blizzard
Who says snowflakes have to be white or brown? Use different colored candy melts—blue, pink, purple, you name it—to create a vibrant, colorful flurry of snowflakes.
3. The 3D Snowflake Showstopper
This one is for the ambitious! Pipe two identical, simple snowflake designs. Let them harden completely. Then, pipe a small dot of melted chocolate in the center of one snowflake and gently stand the second snowflake up in it, creating a 3D, perpendicular shape. Hold it for a moment until it sets. It’s a guaranteed “wow.”
FAQ: Your Chocolate Conundrums, Answered
Let’s clear up some common questions about this fun technique.
1. What is the absolute easiest chocolate to use for this? Compound chocolate or candy melts. They are designed for this kind of work. They melt smoothly, harden quickly at room temperature, and are very forgiving.
2. Why did my real chocolate snowflakes melt the second I touched them? If you use real chocolate (with cocoa butter), it needs to be tempered to be stable and snappy at room temperature. Untempered chocolate will be soft and melt easily from the heat of your fingers. Candy melts avoid this issue.
3. How do I store my finished chocolate snowflakes? Store them in a flat, rigid, airtight container. Layer them between sheets of parchment paper to prevent them from sticking or breaking. Keep them in a cool, dry place. The refrigerator is a great option.
4. How long will my chocolate snowflakes last? If stored properly, they can last for several weeks! They are a fantastic make-ahead decoration for holiday baking.
5. I don’t have piping bags. What else can I use? A sturdy, high-quality Ziploc-style bag is your best bet. Just snip a tiny bit off one of the bottom corners. Don’t use a flimsy sandwich bag, as it might burst under pressure.
6. My piped lines are all shaky and wobbly. Any tips? Try to pipe with a slow, steady hand and consistent pressure. It can help to use your non-dominant hand to support your piping wrist. But honestly? Wobbly, organic-looking snowflakes are charming! Don’t stress.
7. Can I use these on a warm drink like hot chocolate? Yes! They will look beautiful floating on top for a few moments before they slowly melt into a delicious, chocolatey puddle. It’s a win-win.
Final Thoughts
You did it! You’ve officially mastered the art of creating delicate, delicious, and seriously impressive chocolate snowflakes. You now hold the power to turn any dessert into a festive masterpiece. Your cakes will be prettier, your cupcakes will be classier, and your hot chocolate will be the envy of all.
So go forth and let it snow… chocolate, that is. Unleash your creativity, have fun with it, and prepare for the flood of compliments. And when someone asks where you bought such beautiful decorations, just give them a cool, casual shrug and say, “Oh, these old things? I just whipped them up.”