Unleash Your Inner Goth Baker: How to Make Black Vanilla Buttercream (It’s Not Witchcraft, Promise!)
Okay, let’s be real. We’ve all seen those stunning, dramatic cakes adorned with impossibly dark frosting and wondered, “How in the actual heck did they get it that black?” Did they sell their soul to a culinary demon? Did they empty every bottle of black food coloring on the planet? Fear not, my darkly delicious friends! Today, we’re diving into the surprisingly simple (yes, simple!) secrets of how to make black vanilla buttercream that’s rich, decadent, and doesn’t taste like pure dye. Get ready to embrace your inner goth baker, because this recipe is about to change your frosting game forever.
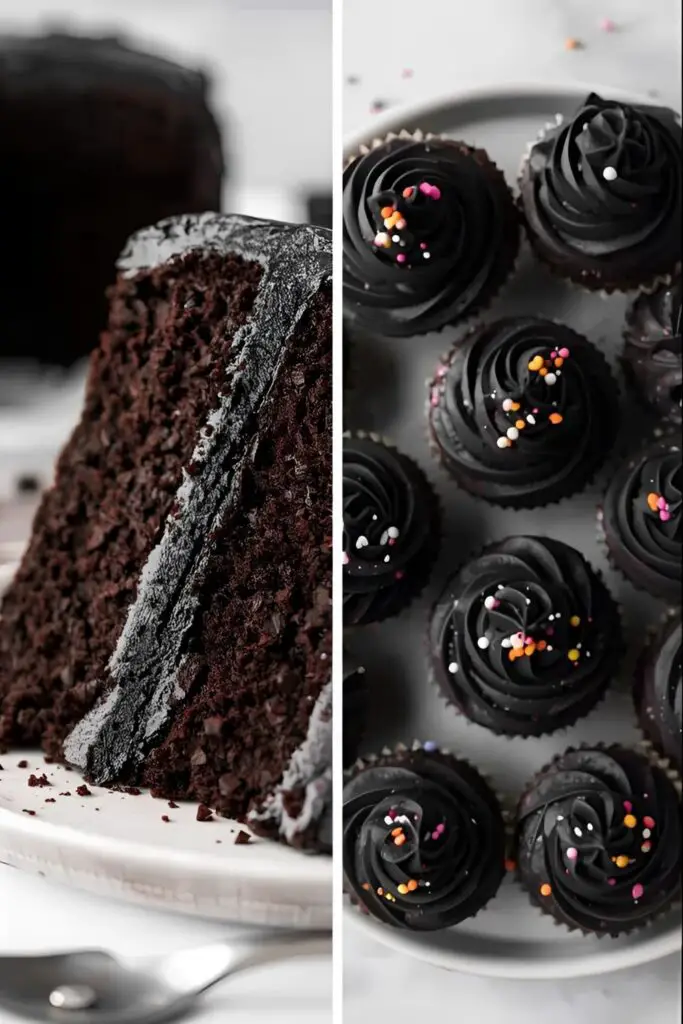
Forget those pale grey attempts at “black” buttercream. We’re talking about a deep, true, midnight hue that will make your cakes and cupcakes look like they were kissed by shadows (in a good way, obviously). Ready to unlock this dark art?
Why Black Vanilla Buttercream Is the Only Frosting That Matters (Sometimes)
Why would anyone want black vanilla buttercream? Isn’t regular vanilla buttercream cheerful and… beige? Well, sometimes you need a little drama in your dessert life.
First, it’s visually stunning. Let’s face it, a cake slathered in perfectly black frosting is a showstopper. It’s sophisticated, it’s edgy, and it’s guaranteed to make a statement at any Halloween bash, gothic-themed party, or even just when you’re feeling a bit… moodily delicious.
Second, it still tastes like vanilla! This isn’t some flavorless void of darkness. We’re starting with a classic, delicious vanilla buttercream base and then, with a little trickery, transforming its color. You get the best of both worlds: incredible flavor and a seriously cool aesthetic.
Finally, it’s surprisingly versatile. Think beyond Halloween! Black buttercream provides a striking contrast to bright sprinkles, edible gold accents, or even fresh, colorful berries. It’s the perfect backdrop for your creative decorating ideas.
The Dark Arts (Ingredients)


You won’t need any mystical ingredients for this, just your standard buttercream crew and one crucial addition.
- Unsalted Butter: 1 cup (2 sticks), softened (room temperature is your friend here, not melty puddle)
- Powdered Sugar: 3-4 cups (start with 3 and add more to reach desired thickness)
- Heavy Cream or Milk: 2-4 tablespoons (adds moisture and helps with consistency)
- Pure Vanilla Extract: 1 teaspoon (don’t skimp on the vanilla; it’s the star!)
- Black Gel Food Coloring: This is the MVP. Gel is essential! Liquid food coloring will add too much liquid and can taste bitter if you use enough to get true black. You’ll likely need a fair amount, so have a good-sized container on hand.
Substitution Notes:
- Butter: Margarine can work in a pinch, but butter provides the best flavor and texture.
- Heavy Cream/Milk: You can also use half-and-half or even a non-dairy milk alternative like almond milk, though the fat content of heavy cream contributes to a richer texture.
- Vanilla: Feel free to experiment with other extracts, but keep in mind the “vanilla” part of black vanilla buttercream is kind of the point. 😉
The Shadowy Toolkit (Tools & Kitchen Gadgets)
Time to gather your equipment for this deliciously dark endeavor.
- Large Mixing Bowl: Your trusty vessel for buttercream creation.
- Electric Mixer (Handheld or Stand Mixer): Essential for achieving that light and fluffy texture (and for incorporating all that color).
- Measuring Cups and Spoons: For accurate ingredient measuring, because baking isn’t exactly a free-for-all.
- Rubber Spatula: For scraping down the sides of the bowl and ensuring everything gets incorporated.
- Small Bowls (Optional): If you want to test the color intensity as you go.
Step-by-Step into the Darkness (Buttercream Edition)
Ready to whip up some seriously dark frosting? Let’s get started.
Step 1: Cream the Butter
In your large mixing bowl, beat the softened butter with your electric mixer on medium speed until it’s light and creamy. This usually takes about 2-3 minutes. Don’t rush this step; well-creamed butter is the foundation of good buttercream.
Step 2: Gradually Add the Sugar
With the mixer on low speed, gradually add the powdered sugar to the butter, one cup at a time. Mixing on low initially prevents a giant sugar cloud from engulfing your kitchen (trust me on this one). Once all the powdered sugar is in, increase the speed to medium and beat until the buttercream is light and fluffy, about 3-5 minutes. Scrape down the sides of the bowl with your rubber spatula a couple of times to ensure everything is evenly mixed.
Step 3: Add the Liquid and Vanilla

With the mixer on low speed, drizzle in the heavy cream or milk and the pure vanilla extract. Increase the speed to medium and beat for another minute until everything is well combined and the buttercream is smooth.
Step 4: The Transformation (Coloring Time!)
Now for the magic! Add a generous amount of black gel food coloring to the buttercream. Start with a teaspoon or two and mix it in thoroughly on medium speed. You’ll likely notice the buttercream turning a shade of grey. Don’t panic! This is normal.
Keep adding small amounts of black gel food coloring, mixing well after each addition, until you achieve your desired shade of deep, true black. This might take a bit of time and more coloring than you initially expect. Be patient! The color will also deepen as it sits.
Step 5: Whip It Good (for Color and Texture)
Once you’ve added enough black gel to get a rich color, beat the buttercream on medium-high speed for another 2-3 minutes. This helps to fully incorporate the color and makes the buttercream extra light and fluffy. You might notice the color deepen slightly during this final whipping.
Step 6: Let It Rest (The Color Deepens Further)
For the best and truest black color, cover the bowl of buttercream with plastic wrap (pressing it directly onto the surface to prevent a skin from forming) and let it sit at room temperature for at least 30 minutes, or even better, an hour. The color will continue to develop and deepen during this time. Give it a final mix before using.
Calories & Nutritional Info (It’s Butter and Sugar, Folks!)
Let’s not pretend this is a health food. It’s delicious, decadent frosting.
- Serving Size: About ¼ cup (standard serving for frosting a cupcake)
- Estimated Calories: 200-250
- Main Components: Primarily fat and sugar.
- Nutritional Notes: Best enjoyed in moderation as a delightful accompaniment to cake. The black food coloring adds virtually no calories or nutritional value (it’s just for looks!).
Common Mistakes to Avoid (Don’t End Up with Grey Sludge!)
- Using Liquid Food Coloring: I can’t stress this enough. Stick to gel food coloring. Liquid will thin your buttercream too much and you’ll need a ridiculous amount to even approach black, which can make it taste bitter.
- Not Using Enough Food Coloring: Getting true black takes a significant amount of gel color. Don’t be shy! Keep adding until you get there.
- Stopping Too Early: As mentioned, the color deepens as it sits. If you think it’s “almost black,” let it rest for a bit before adding more dye. You might be surprised!
- Overmixing After Adding Color: While some whipping is good, excessive mixing after adding a lot of food coloring can sometimes introduce air and make the color look slightly less intense. Mix until just combined.
- Cold Butter: Using cold butter will result in lumpy buttercream that’s hard to mix. Make sure your butter is softened to room temperature.
Variations & Customizations (Embrace the Dark Side Your Way)

Want to put a little twist on your black vanilla buttercream?
1. Dark Chocolate Vanilla Buttercream
Melt and cool about ¼ cup of unsweetened or dark chocolate and whisk it into your finished black vanilla buttercream for a richer, more complex flavor. The dark chocolate will also help deepen the black color.
2. Activated Charcoal for Color
For a more “natural” black coloring option (though it can have a slightly earthy taste if you use too much), try adding a small amount of food-grade activated charcoal powder to your buttercream. Start with ½ teaspoon and add more gradually until you reach the desired shade.
3. Different Extracts
While vanilla is classic, you could experiment with other extracts like black cocoa extract (if you can find it!) or even a hint of anise for a more mysterious flavor profile to go with the black color.
FAQ Section: Your Black Buttercream Brain Dump, Answered
Let’s tackle those dark and delicious queries!
1. Will black food coloring stain my teeth/mouth? Yes, it’s definitely possible, especially if you eat a large amount. It’s usually temporary and will go away after a while. Consider it part of the fun (or the price you pay for awesome black frosting).
2. How much black gel food coloring will I need? It varies depending on the brand and intensity of the gel, but you might need anywhere from 1-3 tablespoons for a full batch. Start small and add gradually until you achieve the desired color.
3. Can I make a smaller batch of this buttercream? Absolutely! Just halve or quarter the ingredient amounts.
4. How far in advance can I make black vanilla buttercream? You can make it 2-3 days in advance and store it in an airtight container in the refrigerator. Let it come to room temperature and re-whip it before using.
5. Will the black color affect the taste? If you use a good quality gel food coloring and don’t go overboard (like, emptying an entire bottle), the taste shouldn’t be significantly affected. Liquid coloring is more likely to impart a bitter taste.
6. My buttercream looks grey, not black. What am I doing wrong? You likely haven’t used enough black gel food coloring yet. Keep adding more, a little at a time, and be patient. Letting it rest will also help the color deepen.
7. Can I use black cocoa powder to help color the buttercream? Yes! Substituting some of the powdered sugar with black cocoa powder (start with ¼ cup and adjust to taste and color) can help achieve a darker base and reduce the amount of black food coloring needed.
Final Thoughts
Congratulations, you’ve officially embraced the dark side of buttercream! You now possess the knowledge to create stunningly black vanilla frosting that will wow your friends and make your desserts the talk of the town. So go forth, bake those dramatic cakes, frost those edgy cupcakes, and don’t be afraid to unleash your inner goth baker. And if anyone asks how you got it so black? Just smile mysteriously and say it’s a secret… unless they offer you a slice of cake, then maybe you can share. 😉