How to Make Vibrant Red Chocolate (The Right Way!)
Ever tried to make festive treats for Valentine’s Day or Christmas and ended up with a sad, streaky, pink-ish blob instead of a vibrant red masterpiece? Yeah, me too. You stand there, wooden spoon in hand, wondering where you went wrong. Well, my friend, I’m here to tell you the secret is out, and you’re about to learn exactly how to make red chocolate that’s smooth, stunning, and actually tastes good. Say goodbye to lumpy, seized-up messes forever.
Why This Recipe is Awesome
First off, it’s ridiculously simple. We’re talking melt-and-stir level easy. But the result? It looks like you spent hours in a patisserie. Imagine dipping strawberries in this glorious red chocolate, or making heart-shaped candies that scream “I am a culinary god/goddess!” It’s the ultimate kitchen hack for looking fancy with minimal effort. Plus, you control the ingredients, so you can make it as rich and delicious as you want. Who’s the boss of the kitchen now? You are.
Ingredients: The Short & Sweet List
You won’t need to embark on an epic quest for these items. It’s a blissfully short list.
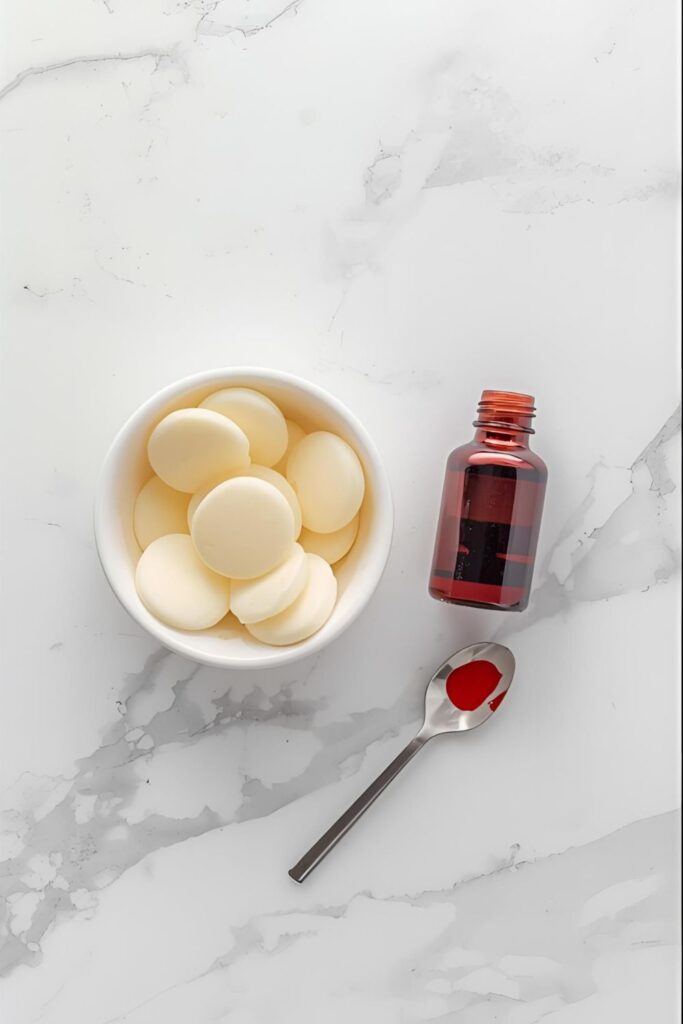
- 1 cup high-quality white chocolate chips or wafers (The better the chocolate, the better the taste. Don’t cheap out here!)
- Oil-based red food coloring (This is the non-negotiable secret weapon. I repeat: OIL-BASED.)
- Optional: 1/2 teaspoon coconut oil or paramount crystals (to help with thinning if needed).
Tools & Kitchen Gadgets Used: Your Arsenal
To achieve red chocolate perfection, you’ll want these trusty sidekicks.
- Microwave-safe bowl (preferably glass or ceramic)
- Silicone spatula
- Double boiler (or a saucepan and a heatproof bowl that fits over it)
- Chocolate molds (hearts, squares, whatever your heart desires)
- Parchment paper or a silicone baking mat
Step-by-Step Instructions: Let’s Do This!
Alright, deep breaths. You’re about to create something beautiful. Just follow these steps and try not to eat all the chocolate before it sets.
1. Prep Your Station

Line a baking sheet with parchment paper or get your molds ready. Nothing’s worse than having perfectly melted chocolate and nowhere to put it. Get organized, people!
2. Melt the White Chocolate
You have two options here. For the microwave method, place your white chocolate chips in a microwave-safe bowl. Heat on 50% power for 30-second intervals, stirring with a dry silicone spatula after each one. It’s a marathon, not a sprint. Be patient until it’s about 90% melted, then just stir until the residual heat melts the rest.
For the double boiler method, fill a saucepan with about an inch of water and bring it to a simmer. Place a heatproof bowl over the top (don’t let the bottom touch the water!) and add your chocolate. Stir gently until it’s smooth and completely melted. This method gives you more control, you fancy chef, you.
3. Time for the Magic Color
Now for the moment of truth. Grab your oil-based red food coloring. Start with just a few drops. You can always add more, but you can’t take it away. Stir it in completely until the color is uniform. Want a deeper red? Add a few more drops. Keep going until you achieve that perfect, stop-sign red you’ve been dreaming of.
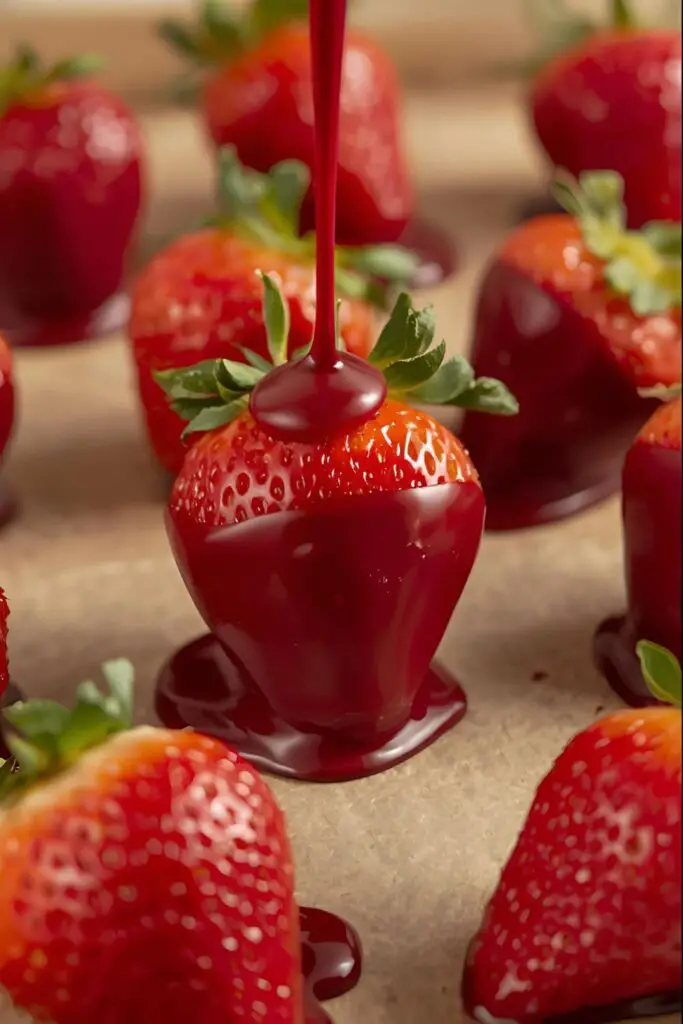
4. Pour and Set
Carefully pour your glorious red chocolate into your molds or spread it onto your parchment-lined baking sheet to make bark. Tap the molds on the counter a few times to release any air bubbles. We want smooth, professional-looking treats, not something that looks like a science experiment gone wrong.
5. Chill Out
Pop your creations into the refrigerator for 10-15 minutes, or until the chocolate is completely firm. Don’t leave it in there for too long, or it might get condensation on it (we’ll talk about that later). Once firm, carefully pop the chocolates out of the molds. Voila! You did it.
Calories & Nutritional Info (Per Ounce, Approx.)

Let’s just get this out of the way. It’s a treat, not a salad.
- Serving Size: 1 ounce (about 28g)
- Calories: Approximately 150-160 kcal (highly dependent on your white chocolate brand)
- Fat: Around 9g
- Carbohydrates: Roughly 17g
- Sugar: About 17g (Yeah, it’s mostly sugar. You’re welcome.)
- Note: This is a treat, not a health food. Let’s just enjoy it for what it is: delicious, colorful sugar.
Common Mistakes to Avoid (Please, I’m Begging You)
Read this section twice. Your chocolate’s life depends on it.
- THE BIGGEST MISTAKE: Using Water-Based Food Coloring. I can’t stress this enough. Water is the mortal enemy of melting chocolate. Adding even a drop of regular, water-based food coloring will cause your beautiful, smooth chocolate to “seize” into a thick, grainy, unusable clump. YOU MUST USE OIL-BASED or POWDERED food coloring. No exceptions. Don’t do it. Seriously.
- Overheating the Chocolate. Scorched white chocolate is a sad, lumpy, caramel-colored tragedy. It tastes awful and there’s no saving it. Use low power on your microwave and short intervals, or gentle heat on a double boiler. Patience is key.
- Getting Water in the Chocolate. Even a tiny droplet of water from a wet spoon or a steamy double boiler can cause seizing. Make sure all your tools are bone dry.
- Ignoring the Quality of Your White Chocolate. Cheap white chocolate or “confectionery coating” might contain vegetable oil instead of cocoa butter. It won’t melt as smoothly or taste as good. Splurge a little on the good stuff. You deserve it.
Variations & Customizations: Get Creative!
Think of this as your red chocolate canvas. Now, let’s paint.
- Red Velvet Dream: Once your chocolate is melted and colored, stir in about 1/4 teaspoon of sifted cocoa powder and a few drops of cream cheese extract. You’ve just made red velvet chocolate. Mind = blown.
- Spicy Firecracker Chocolate: Looking for a kick? Add a tiny pinch of cayenne pepper or chili powder to the melted red chocolate. It’s a surprising and delicious combination of sweet and spicy. Perfect for the adventurous palate.
- Berry Bliss Chocolate: Enhance the red theme by adding a few drops of oil-based strawberry or raspberry flavoring along with your red food coloring. This creates a fruity, fragrant chocolate that’s absolutely divine for dipping fruit or making bonbons.
FAQ Section: Your Questions, Answered
Here are the answers to the questions probably swirling in your head right now.
- Why can’t I use regular food coloring in chocolate? Regular food coloring is water-based. Chocolate is fat-based (cocoa butter). When you mix water and fat in this context, the sugar and cocoa particles in the chocolate cling to the water droplets, causing the mixture to thicken and become a grainy paste. This is called seizing.
- My chocolate seized! Can I fix it? Sometimes. If it’s only slightly seized, you can try stirring in a teaspoon of vegetable shortening or coconut oil for every 6 ounces of chocolate. It might smooth it out enough to use as a drizzle, but it won’t be perfect for molding. TBH, it’s often a lost cause.
- What is the best type of food coloring for chocolate? Hands down, oil-based food coloring (often called candy colors) is the best. Powdered food coloring also works very well because it contains no liquid.
- Can I make red chocolate with milk or dark chocolate? You can try, but it won’t be a true, vibrant red. Adding red to brown just makes a muddy, reddish-brown. For a bright, pure red, you need to start with a white base, which is why we use white chocolate.
- How should I store my homemade red chocolate? Store it in an airtight container in a cool, dry place like a pantry. Avoid the refrigerator, as condensation can form on the surface and cause sugar bloom (those white, dusty spots).
- Can I use natural colorants like beet powder? Yes, you can! Sift beet powder into the melted white chocolate. It will give a lovely natural red/pink hue. Be aware that it might add a very subtle earthy flavor and can sometimes affect the texture slightly.
- What’s the difference between red chocolate and ruby chocolate? Great question! The red chocolate we are making is white chocolate colored red. Ruby chocolate is considered the “fourth type of chocolate” (after dark, milk, and white). It’s naturally pinkish-red and has a unique berry-like flavor, derived from a specific type of cacao bean.
Final Thoughts
There you have it! You are now officially a master of red chocolate. No more culinary catastrophes or sad, pale pink desserts. Go forth and create stunning, vibrant treats that will make everyone think you’ve secretly been attending pastry school. Dip, drizzle, and mold to your heart’s content. And when someone asks for your secret, just give them a mysterious smile. Or, you know, send them this article. Your call. 😉