You’re the Hero Your Kitchen Deserves: How to Make a Batman Cake
Let’s be honest. You’re not just here to bake a cake. You’re here to answer the call, to become a legend, to bring justice to the world of boring desserts. You’re here because you want to know how to make a Batman cake, and that, my friend, is a truly noble cause. This isn’t just about flour and sugar; it’s about embracing the darkness (of rich chocolate, of course) and creating something iconic.
Forget those sad, store-bought sheet cakes with their smudged superhero images. We’re about to create a cake worthy of the Caped Crusader himself. It’s going to be dark, it’s going to be brooding, and it’s going to be ridiculously delicious. So, put on your cape (or, you know, an apron), because tonight, you’re not just a baker. You’re the hero your party needs.
Why This Cake is the Hero We Deserve
Still lurking in the shadows, wondering if this is the right mission for you? Allow me to shed some light on why this Batman cake is an absolute must-make.
First, the sheer “wow” factor is off the charts. Imagine placing this cake on the table. A dark, moody Gotham City skyline with the iconic Bat-Signal shining bright. It’s not just a cake; it’s a centerpiece. It’s the kind of dessert that makes both kids and grown-up comic book nerds gasp in delight.
Second, it’s deceptively simple. I know, it looks like something a professional would make in a secret underground bakery (the Bat-Bakery?). But I’m going to show you a super easy technique to create that impressive skyline and a foolproof way to get a perfect Bat-Signal every time. No fancy fondant skills required.
Finally, it’s a dark chocolate dream. What other flavor could a Batman cake possibly be? We’re making a rich, moist, intensely chocolatey cake that’s as dark and mysterious as the Dark Knight himself. It looks amazing, and it tastes even better.
Your Utility Belt: Ingredients


Every hero needs the right gear. Here’s the arsenal of ingredients you’ll need for your mission.
For the “Dark Knight” Chocolate Cake (makes two 8-inch layers):
- 2 cups all-purpose flour.
- 2 cups granulated sugar.
- ¾ cup unsweetened cocoa powder (use dark cocoa or black cocoa for an extra dark “Gotham” look).
- 2 teaspoons baking soda.
- 1 teaspoon baking powder.
- 1 teaspoon salt.
- 1 cup buttermilk.
- ½ cup vegetable oil.
- 2 large eggs, at room temperature.
- 1 teaspoon vanilla extract.
- 1 cup freshly brewed hot coffee. (This is the secret to a super moist, intensely chocolatey cake!)
For the “Gotham City” Buttercream:
- 1 ½ cups (3 sticks) unsalted butter, softened.
- 5-6 cups powdered sugar, sifted.
- ⅓ cup milk or heavy cream.
- 2 teaspoons vanilla extract.
- A pinch of salt.
- Black gel food coloring.
- Yellow gel food coloring.
Your Batcave: Tools & Kitchen Gadgets
You don’t need Lucius Fox to supply your tech, but these tools are essential for a successful operation.
- Two 8-inch round cake pans.
- Parchment paper.
- Electric Mixer (stand or handheld): Crucial for both the cake and the buttercream.
- Mixing Bowls & Spatulas: The basics of any hero’s kitchen.
- Wire Cooling Rack: For cooling your cake layers properly.
- Cake Turntable (optional but HIGHLY recommended): Makes frosting so much easier.
- Offset Spatula & Bench Scraper: The dynamic duo for achieving a smooth frosting finish.
- Piping Bags.
- A printed Batman logo template: Find one online and print it to the size you want for your cake.
- Scissors & Wax Paper.
- Small sharp knife or an X-Acto knife (for crafting purposes only!).
To the Bat-Bakery! Step-by-Step Instructions
Alright, hero. Time to assemble.
Step 1: Bake the “Dark Knight” Cake Preheat your oven to 350°F (175°C). Grease and flour your two 8-inch cake pans and line the bottoms with parchment paper. In a large bowl, whisk together the flour, sugar, cocoa powder, baking soda, baking powder, and salt. In a separate bowl, mix the buttermilk, oil, eggs, and vanilla. Pour the wet ingredients into the dry ingredients and mix on low speed until just combined. Carefully pour in the hot coffee and mix on low until the batter is smooth (it will be thin, don’t panic!). Pour the batter evenly into your prepared pans. Bake for 30-35 minutes, or until a toothpick inserted into the center comes out clean. Let the cakes cool in the pans for 10 minutes before inverting them onto a wire rack to cool completely.

Step 2: Whip up the Buttercream In a large bowl, beat the softened butter with your electric mixer until creamy. Gradually add the powdered sugar, one cup at a time, alternating with the milk, until you reach your desired consistency. Beat in the vanilla and salt. Continue to beat on medium-high speed for another 3-5 minutes until the buttercream is light and fluffy.
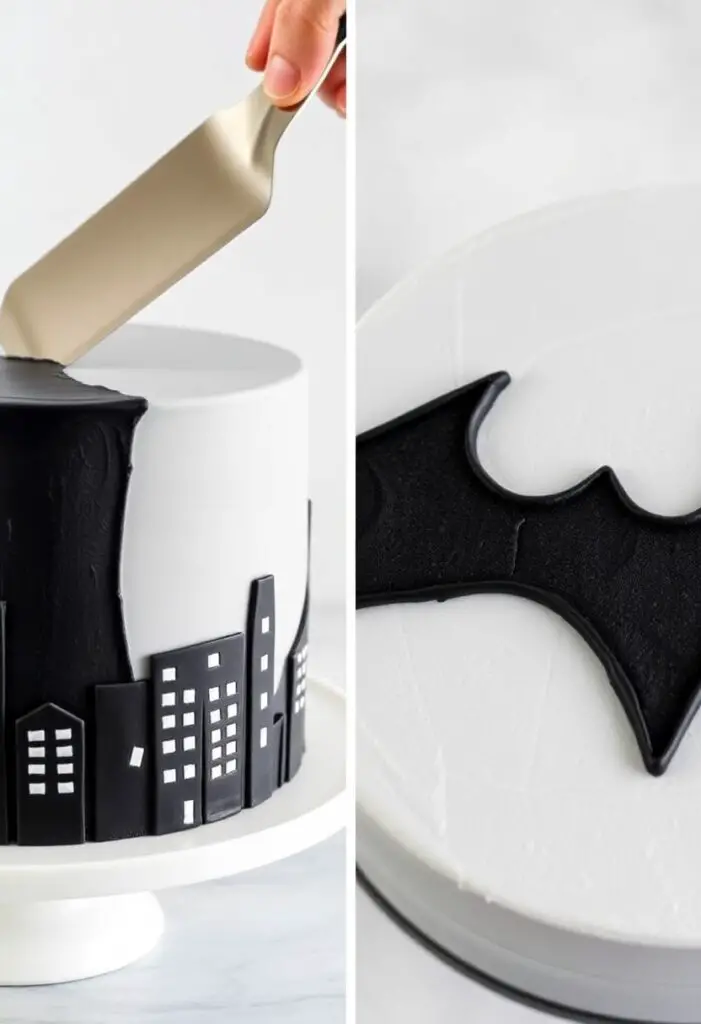
Step 3: Create the Gotham Skyline Set aside about 1 cup of buttercream. Divide the rest of the buttercream into three bowls. Leave one white, tint one a light grey, and tint the third a dark grey/black. Place one cooled cake layer on your turntable or serving plate. Frost the cake with alternating patches of the white, light grey, and dark grey buttercream. Don’t try to be neat! You want a mottled, moody look. Place the second cake layer on top and repeat. Frost the sides of the cake with the same patchy technique. Now, take your bench scraper and run it around the cake in one smooth motion to blend the colors into a beautiful, stormy Gotham skyline. Clean up the top edge with your offset spatula.
Step 4: Craft the Bat-Signal (The Easy Way!) Place your printed Batman logo on a flat surface. Tape a piece of wax paper over it. Tint the cup of buttercream you set aside with yellow gel coloring. Fill a piping bag with the yellow buttercream. Carefully trace the oval part of the Bat-Signal onto the wax paper with the yellow buttercream, then fill it in completely. Place the wax paper drawing flat in the freezer for at least 30 minutes until it’s frozen solid. This is called a buttercream transfer, and it’s a game-changer!
Step 5: Assemble the Signal Once your yellow oval is frozen solid, carefully peel the wax paper off and place the frozen buttercream transfer directly onto the center of your cake. Now, using black frosting in a piping bag with a small round tip, pipe the bat symbol directly onto the yellow oval. You can also use the same freezer transfer method for the bat itself if you want it to be extra sharp.
Step 6: The Final Touches For a cool city effect, you can use a small spatula to dab little yellow squares onto the dark parts of your skyline to look like lit windows in buildings. Now, stand back and admire your work. You are the hero Gotham deserves.
Nutritional Information (Because Even Batman Watches His Figure)
This is a rich, dark chocolate cake. It’s a treat fit for a billionaire vigilante.
- Calories: ~500-650 per slice (it’s a hero-sized slice)
- Sugar: A heroic amount.
- Fat: Enough to fuel a night of crime-fighting.
- Awesomeness: 1000%
- Note: This is an indulgence. Enjoy it. Alfred would insist.
Avoiding a Supervillain-Level Fail: Common Mistakes

Even Batman makes mistakes. Here’s how to avoid some common cake-making blunders.
- Decorating a Warm Cake: I cannot say this enough. If you try to frost a cake that is even slightly warm, you will have a melted, sliding, buttercream nightmare. Let it cool completely. No exceptions.
- A Crumbly Mess: A crumbly cake is a sign of overbaking or not measuring ingredients correctly. The hot coffee in this recipe helps keep it super moist, but be sure to watch your baking time. A crumbly cake is also why a crumb coat (a thin layer of frosting before the main layer) is your best friend, though our patchy skyline method is pretty forgiving.
- A Smudged Bat-Signal: The freezer is your secret weapon here. If your buttercream transfer isn’t frozen completely solid, it will bend, break, or smudge when you try to apply it. Give it plenty of time to freeze solid.
- Runny Buttercream: If your kitchen is warm, your buttercream might get too soft. If it starts to feel melty, pop the bowl (and the cake) in the fridge for 15-20 minutes to firm up before you continue.
Customizing Your Bat-Cake: Variations
Every Batman has his own style. Here’s how to customize your cake.
- The Joker’s Takeover: Frost the cake with white buttercream. Create a chaotic, smudged effect with green and purple buttercream. Use red frosting to pipe a sinister smile and “HA HA HA” around the cake.
- Classic Comic Book Style: Use bright blue and grey for the skyline and a classic yellow and black for the Bat-Signal for a more retro, Adam West-era vibe.
- Gotham City Grit: Before the frosting sets, sprinkle the cake board around the base of the cake with crushed Oreo cookies to look like dark, gritty Gotham streets.
Your Questions, Answered by the Bat-Computer (FAQ)
1. Can I make this cake with fondant instead of buttercream? You absolutely can. Fondant will give you an even cleaner, sharper look. You would cover the cake in black or grey fondant and then apply a yellow fondant oval and black fondant bat symbol on top. It’s a different skill set, but totally doable!
2. Can I make the cake layers ahead of time? Yes! This is a great way to break up the work. You can bake the cake layers up to two days in advance. Let them cool completely, then wrap them tightly in plastic wrap and store them at room temperature.
3. How do I get a really black buttercream? Getting a true, deep black can be tough and requires a LOT of food coloring. The secret is to start with a dark chocolate buttercream (add cocoa powder to your regular recipe) and then add the black gel coloring. Letting the colored frosting sit for a while also helps the color deepen.
4. My buttercream transfer broke! What do I do? Don’t panic! If it breaks into a few clean pieces, you can often “glue” it back together on the cake. Place the pieces on the cake as close together as possible, and the slight thawing will help them meld. You can use a small spatula to smooth the seam.
5. How should I store the finished Batman cake? You can store the cake in a cake carrier or loosely covered at room temperature for a day. For longer storage, keep it in the refrigerator. Just be aware that the colors can sometimes bleed slightly in the fridge. Let it sit at room temperature for about 30 minutes before serving for the best flavor.
6. What if I don’t have buttermilk? Easy fix! For every 1 cup of buttermilk, use 1 cup of regular milk mixed with 1 tablespoon of white vinegar or lemon juice. Let it sit for 5-10 minutes before using.
7. Can I make this a different flavor? Of course! While dark chocolate is thematically perfect, a vanilla cake with grey and black vanilla buttercream would also look stunning. It’s your Gotham!
Final Thoughts
You did it. You faced the challenge and emerged victorious. You’ve created a cake that’s not just a dessert, but a tribute to one of the greatest heroes of all time. You’ve proven that with a little bit of planning and a whole lot of buttercream, anyone can be a hero in the kitchen.
Now, go on and present your masterpiece. Watch as your friends and family marvel at your skills. And as you cut the first slice, feel free to say, in your deepest, graveliest voice, “I’m Batman.” You’ve earned it. 🙂