So, You Want to Build a Tractor Out of Cake? Let’s Get Our Hands Dirty.
Alright, let’s get one thing straight. You could be baking a sophisticated lavender-infused chiffon cake right now. You could be mastering the art of the French macaron. But no, you’ve bravely decided to tackle a project that’s equal parts delicious and… agricultural. You want to know how to make a tractor cake, and I am absolutely here for this brand of chaotic brilliance.
Forget your pristine, perfectly round layer cakes. Today, we’re venturing into the world of edible engineering. We’re going to take a humble cake and transform it into a magnificent, sugar-fueled piece of farm equipment. Why? Because a regular cake is just a cake, but a tractor cake is a story, a spectacle, and frankly, a hilarious and impressive feat of baking. So, roll up your sleeves, because we’re about to plow through this project together.
Why This Tractor Cake is an Absolute Powerhouse
Still on the fence about turning your kitchen into a cake construction zone? Let me give you a few reasons why this is the best idea you’ve had all year.
First, it’s a guaranteed showstopper. Whether you’re making this for a kid’s birthday party or for your favorite farmer, this cake commands attention. Imagine the look on everyone’s faces when you bring out a fully formed, edible tractor. You’ll be a certified baking legend.
Second, it’s way easier than it looks. I know, it seems intimidating. Carving? Assembling? But I’m going to show you a super simple method using a single loaf pan cake. No complex templates, no fancy sculpting skills required. It’s all about clever cuts and strategic frosting.
Finally, it’s incredibly fun to decorate. This is where you get to unleash your creativity. From Oreo wheels to candy headlights, you can customize your tractor to your heart’s content. It’s a delicious art project, and the end result is something you can actually eat. What’s not to love?
Your Farm Stand Shopping List: Ingredients


Here’s what you’ll need to assemble your edible farm machinery. We’re keeping the base simple so we can focus on the construction.
For the Cake (The Tractor Body):
- Your favorite sturdy cake recipe, enough for one 9×5 inch loaf pan. A pound cake or a dense chocolate cake works best as they are less crumbly and easier to carve. A box mix for pound cake is a great, easy option!
- Ingredients as called for in your chosen recipe.
For the Buttercream “Paint Job”:
- 1 cup (2 sticks) unsalted butter, softened.
- 4 cups powdered sugar, sifted.
- 1/4 cup milk or heavy cream.
- 1 teaspoon vanilla extract.
- A pinch of salt.
- Gel food coloring in your desired tractor colors (green, red, or yellow are classic choices), plus black for details.
For the Details & Assembly (The Fun Part!):
- 4 Oreo cookies (or similar chocolate sandwich cookies) for the large back wheels.
- 2 mini Oreo cookies (or similar) for the smaller front wheels.
- 1 large marshmallow or a piece of licorice for the exhaust pipe.
- 2 small round candies (like M&Ms or Skittles) for the headlights.
- Chocolate sprinkles or crushed Oreos for creating a “dirt” path on your serving plate.
Your Workshop: Tools & Kitchen Gadgets
You don’t need a full mechanic’s toolkit, but these items will make your cake construction a whole lot smoother.
- 9×5 inch Loaf Pan: This is the key to our simple tractor shape.
- Electric Mixer (stand or handheld): For whipping up your cake batter and buttercream without breaking a sweat.
- Mixing Bowls & Spatulas: The trusty essentials.
- Parchment Paper: To line your loaf pan for easy cake removal.
- Serrated Knife: Your main carving tool. A long, sharp one is best.
- Cake Board or Large Serving Platter: The “field” where your tractor will live.
- Offset Spatula or Butter Knife: For applying the frosting.
- Piping Bags and Tips (optional): A small round tip can be useful for piping on details, but you can also use a zip-top bag with the corner snipped off.
Let’s Build This Thing: Step-by-Step Instructions
Alright, hard hats on (figuratively, of course). It’s time to start construction.

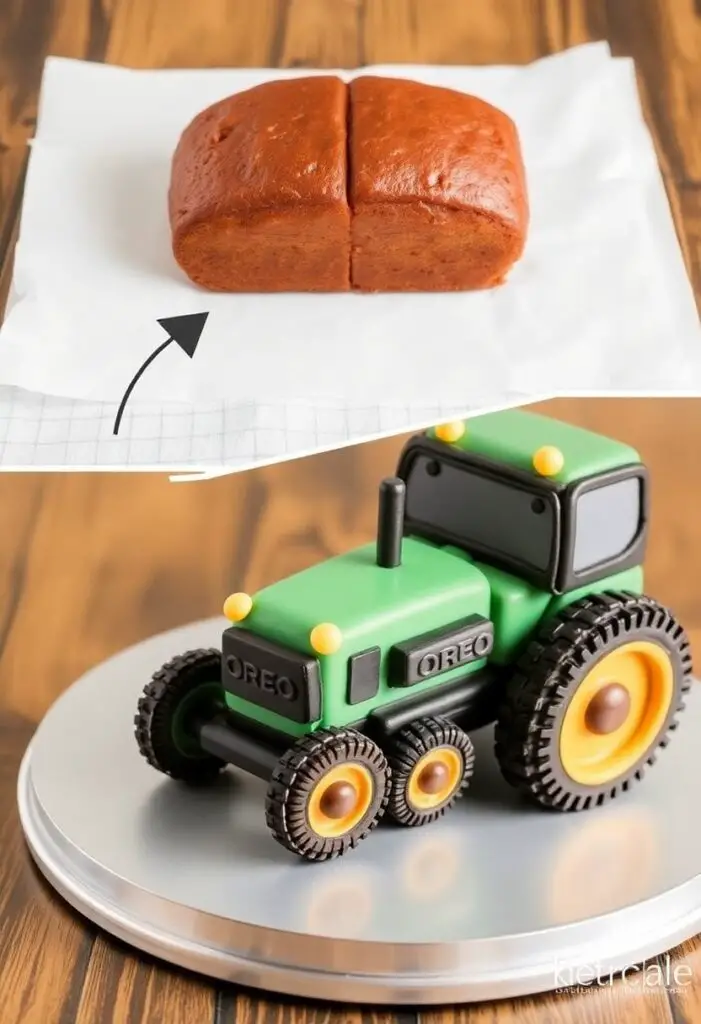
Step 1: Bake Your Cake Block Prepare your chosen cake batter according to the instructions. Grease your 9×5 loaf pan and line it with parchment paper, leaving some overhang on the sides to act as handles. Pour the batter into the pan and bake until a toothpick inserted into the center comes out clean. Let the cake cool in the pan for about 15 minutes before using the parchment handles to lift it out onto a wire rack to cool completely. I mean it. A warm cake will crumble into a tragic mess when you try to cut it.
Step 2: The Strategic Cuts Once your cake is completely cool, place it on a cutting board. Now, for the brilliant part. Measure about one-third of the way from one end of the loaf and make a straight cut down. You’ll now have two pieces: a smaller one-third piece and a larger two-thirds piece.
Step 3: The Assembly Take the smaller one-third piece and place it upright on top of the larger two-thirds piece, towards the back. This creates the tractor’s cab. Use a generous dollop of buttercream as “mortar” to glue the two pieces together. You should now have a recognizable tractor shape! How easy was that?
Step 4: The Crumb Coat (The Primer) Using your offset spatula, apply a thin, even layer of uncolored or lightly colored buttercream over the entire surface of your assembled tractor cake. This is your crumb coat, and it’s the secret to a clean, professional-looking finish. It traps all the loose crumbs. Chill the cake in the refrigerator for at least 30 minutes until the buttercream is firm. This step is non-negotiable!
Step 5: The “Paint Job” While the cake is chilling, divide your remaining buttercream into bowls and tint it with your chosen gel food colors. Make your main tractor color (green, red, etc.) and a smaller amount of black for details. Once the crumb coat is firm, frost the entire tractor with your main color. Don’t stress about getting it perfectly smooth; tractors are hardworking machines, they can have a few bumps!
Step 6: Add the Wheels and Details Now for the grand finale! This is where your tractor really comes to life.
- Wheels: Gently press the four regular-sized Oreos onto the sides for the back wheels and the two mini Oreos for the front wheels.
- Exhaust Pipe: Stick the large marshmallow or a piece of licorice onto the front “hood” of the tractor.
- Headlights: Press the two small round candies onto the front grill area.
- Finishing Touches: Use your black buttercream in a piping bag (or zip-top bag) to pipe on details like a steering wheel inside the cab, window outlines, and maybe even a grill on the front.

Step 7: Create the Scene Sprinkle your chocolate sprinkles or crushed Oreos onto the cake board around the tractor to look like dirt and tire tracks. You’ve just created a masterpiece!
Nutritional Information (A Rough Estimate)
This is a cake shaped like a tractor. It’s a celebration on a plate. But if you’re curious, here’s a general idea per serving:
- Calories: ~400-550 kcal (depending on your cake recipe and how much frosting you use)
- Sugar: A delightful amount.
- Fat: Present and accounted for, thanks to butter and cake.
- Fun Factor: Off the charts.
- Note: This is a treat! Enjoy the moment, the cake, and the impressive construction you just pulled off.
Avoiding a Construction Disaster: Common Mistakes
Don’t let your tractor cake end up in a ditch. Steer clear of these common issues.
- Carving a Warm Cake: I will say this until I’m blue in the face. If you try to cut a warm cake, you will have a pile of crumbs, not a tractor. Let it cool completely!
- Skipping the Crumb Coat: You’ll regret it. Trying to frost a carved cake without a crumb coat will result in a messy, crumb-filled frosting job. Chill it first!
- Making the “Cab” Too Big: If you cut your loaf cake in half instead of in thirds, the cab will be too large and might be unstable. Stick to the one-third/two-thirds ratio.
- Using a Flimsy Cake: A light, airy chiffon cake will not hold up to carving and stacking. Use a dense cake like a pound cake or a sturdy chocolate cake for the best structural integrity.
Creative Customizations (Pimp My Tractor)
Ready to upgrade your basic model? Here are a few fun ideas.
- Different Color Schemes: Who says tractors have to be green? Make a bright pink one, a cool blue one, or even a rainbow one!
- Add a Trailer: Bake a second, smaller loaf cake. Cut it in half lengthwise to make it shorter, frost it, add some Oreo wheels, and “hitch” it to your tractor with a piece of licorice. You can even fill the trailer with candy or fresh fruit!
- Themed Tractors: For a construction-themed party, make your tractor yellow and use chocolate rocks and crushed yellow candies. For a farm party, add some small plastic farm animals around the cake.
Your Burning Questions Answered (FAQ)
1. What’s the best kind of cake to use for a tractor cake? A dense, sturdy cake is your best bet. Pound cake is ideal because it’s firm and carves beautifully. A dense chocolate cake or even a sturdy carrot cake (without large chunks of nuts) can also work well.
2. Can I make this cake ahead of time? Yes! You can bake the cake a day in advance, let it cool, wrap it well, and store it at room temperature. You can also assemble and crumb coat it the day before you plan to serve it. Just do the final frosting and decorating on the day of for the best results.
3. How do I store the finished tractor cake? Store it in a cool, dry place. If your kitchen is very warm, you can store it in the refrigerator, but be aware that the fondant-like texture of some buttercream can get a little sticky from condensation. Let it sit at room temperature for about 30 minutes before serving.
4. My cake is really crumbly. What did I do wrong? This could be due to a few things: the cake might still be slightly warm, you might be using a cake recipe that’s too light and airy, or your knife might not be sharp enough. Always use a long, serrated knife and a gentle sawing motion.
5. Can I use fondant instead of buttercream? You absolutely can! It will give you a super smooth, clean finish. Just follow the same steps for crumb coating, then cover your tractor in panels of colored fondant. It’s a bit more advanced but looks amazing.
6. What’s an easy way to make the “dirt”? The easiest way is to put a few Oreo cookies in a zip-top bag and crush them with a rolling pin or the back of a spoon. It looks just like rich, dark soil!
7. How many people will this cake serve? A standard 9×5 loaf pan cake will typically serve about 8-10 people, depending on how large you cut the slices.
Final Thoughts
Look at you, you absolute cake architect! You took a simple loaf of cake and turned it into a fully-fledged, edible tractor. You’ve proven that with a little creativity (and a lot of buttercream), you can make a dessert that’s truly unforgettable.
Now, go on and show off your creation. Take pictures, accept the flood of compliments, and enjoy watching the looks of pure delight on everyone’s faces. You’ve officially mastered the art of agricultural baking. And let’s be honest, it’s way more fun than making another boring round cake. 🙂