Ah, the Starbucks snowman cookie. That fleeting symbol of holiday cheer, priced just high enough to make you question your life choices, yet undeniably adorable. But what if I told you that you could recreate that magic in your own kitchen, without the need for a second mortgage? Today, we’re diving headfirst into how to make Starbucks snowman cookies, and let me tell you, your inner baker (and your wallet) will thank you.
Let’s face it, those little guys are cute. But wouldn’t it be even cuter (and way more satisfying) to pull a tray of homemade versions out of your oven? Think about it: the same buttery, vanilla-y goodness, the same charmingly lopsided icing, all crafted by your own two hands. Plus, you get to control the ingredients, meaning you can make them taste even better than the coffee shop version. Are you intrigued yet? I thought so.
Why These Snowman Cookies Will Melt Your Heart (Not Literally)
Forget those generic sugar cookies. These Starbucks-inspired snowmen are where it’s at. Here’s why you absolutely need to bake a batch, like, yesterday.
First, they’re irresistibly festive. Seriously, what screams “winter wonderland” more than a smiling snowman cookie? They’re perfect for holiday parties, cookie exchanges, or just for adding a touch of cheer to a gloomy day.
Second, they’re surprisingly simple to make. Don’t let the adorable decoration intimidate you. We’re breaking it down into easy-to-follow steps, and IMO, a little bit of homemade imperfection just adds to their charm.

Third, they taste amazing. We’re talking about a classic buttery sugar cookie base topped with a sweet and smooth royal icing. It’s a timeless combination that everyone loves, guaranteed.
Finally, you can customize them. Want a different flavor? Go for it! Want to give your snowmen tiny scarves or hats? The power is in your hands, my friend. Unleash your inner cookie artist!
Your Winter Wonderland Pantry: Ingredients
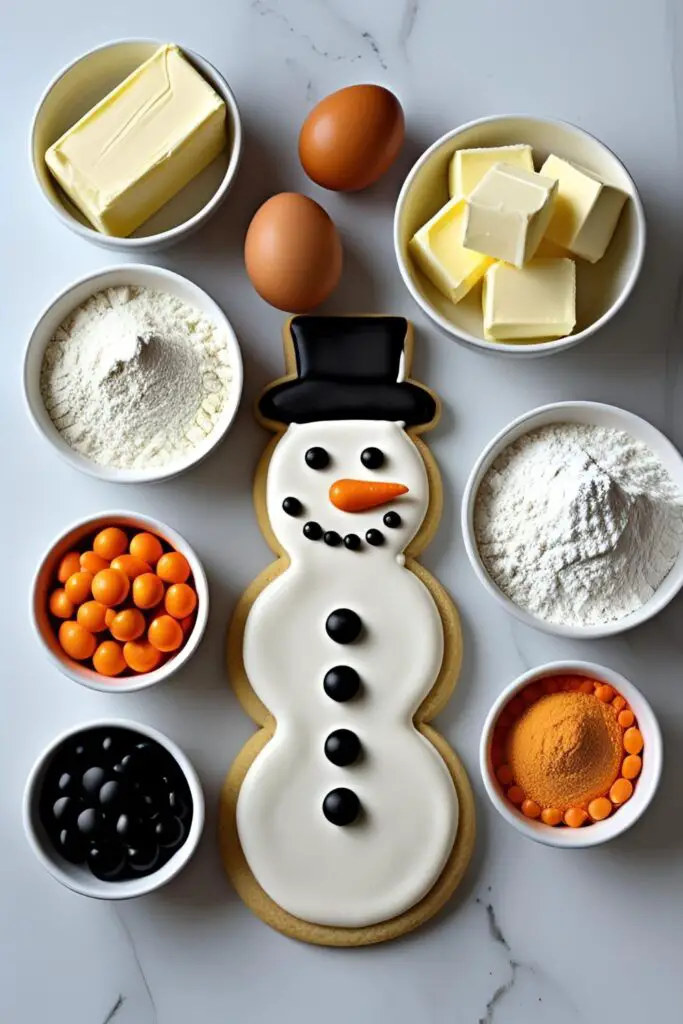
Here’s what you’ll need to bring these frosty fellas to life. Don’t worry, no actual snow required (unless you want to get really authentic, which I don’t recommend for baking).
For the Sugar Cookies (The Snowman Base):
- 1 cup (2 sticks) unsalted butter, softened.
- 1 cup granulated sugar.
- 1 large egg.
- 1 teaspoon vanilla extract.
- 3 cups all-purpose flour.
- 1 teaspoon baking powder.
- 1/2 teaspoon salt.
For the Royal Icing (The Frosty Coating):
- 4 cups powdered sugar, sifted (trust me on this).
- 3 tablespoons meringue powder. (This is key for that smooth, set icing.)
- 1/2 cup warm water.
- 1 teaspoon clear vanilla extract (optional, but keeps the icing pure white).
For Decoration (The Snowman Details):
- Orange candy melts or orange royal icing: For the carrot nose.
- Black food coloring (gel is best): For the eyes and buttons.
- Red or pink food coloring (gel is best): For the scarf (optional).
- Sprinkles, edible glitter, etc. (optional, for extra pizzazz).
Your Cookie-Crafting Command Center: Tools & Gadgets

Get your kitchen ready for a flurry of cookie creation with these essential tools.
- Large mixing bowls: For creaming butter and sugar, and for mixing the dry ingredients.
- Electric mixer (handheld or stand mixer): Your arm will thank you for this.
- Rubber spatula: For scraping down bowls and folding ingredients.
- Measuring cups and spoons: Precision is your friend in baking.
- Parchment paper or silicone baking mats: Prevents sticking and makes cleanup easier.
- Rolling pin: For rolling out that perfect cookie dough.
- Snowman cookie cutter (about 3-4 inches tall): The star of the show!
- Baking sheets: For baking your frosty friends.
- Wire cooling rack: Essential for cooling cookies completely.
- Piping bags or zip-top bags: For applying the royal icing.
- Small round piping tips (various sizes) or just the corner of a zip-top bag snipped: For decorating.
- Toothpicks or a scribe tool: For guiding icing and fixing minor mistakes.
Let’s Get Frosty: Step-by-Step Instructions
Ready to transform simple ingredients into adorable, edible snowmen? Let’s do this!
Step 1: Cream the Butter and Sugar In a large mixing bowl, cream together the softened butter and granulated sugar until light and fluffy. This usually takes 2-3 minutes with an electric mixer. Don’t rush this step; it incorporates air and makes for tender cookies.
Step 2: Add the Wet Ingredients Beat in the egg and vanilla extract until well combined. Scrape down the sides of the bowl to ensure everything is mixed evenly.
Step 3: Combine the Dry Ingredients In a separate medium bowl, whisk together the flour, baking powder, and salt.
Step 4: Gradually Add Dry to Wet Slowly add the dry ingredients to the wet ingredients, mixing on low speed until just combined. Be careful not to overmix! Overmixing develops gluten and can make your cookies tough.

Step 5: Chill the Dough (Patience is a Virtue) Form the dough into a disc, wrap it tightly in plastic wrap, and refrigerate for at least 1 hour. This chilling time is crucial! It prevents the cookies from spreading too much while baking and makes the dough easier to roll out. Don’t skip the chilling!
Step 6: Roll Out and Cut the Cookies Preheat your oven to 375°F (190°C). Line baking sheets with parchment paper or silicone baking mats. On a lightly floured surface, roll out the chilled dough to about 1/4-inch thickness. Use your snowman cookie cutter to cut out the cookies. Carefully transfer them to the prepared baking sheets, leaving about an inch between each cookie.
Step 7: Bake Until Golden Bake the cookies for 8-12 minutes, or until the edges are lightly golden brown. Baking time will vary depending on your oven and the size of your cookie cutter.
Step 8: Cool Completely (Seriously, Completely!) Let the cookies cool on the baking sheets for a few minutes before transferring them to a wire cooling rack to cool completely. Do not attempt to ice warm cookies! The icing will melt and slide right off.
Step 9: Make the Royal Icing In a clean mixing bowl, combine the sifted powdered sugar and meringue powder. Add the warm water and clear vanilla extract (if using). Beat on low speed until the powdered sugar is moistened, then increase the speed to medium-high and beat for 5-7 minutes, or until the icing is stiff and glossy and forms stiff peaks when you lift the beaters.
Step 10: Divide and Color the Icing Divide the royal icing into several bowls depending on the colors you need. Leave one bowl white. Tint small portions with black, orange (or use pre-made orange icing), and red/pink food coloring. Stir well until the color is evenly distributed.
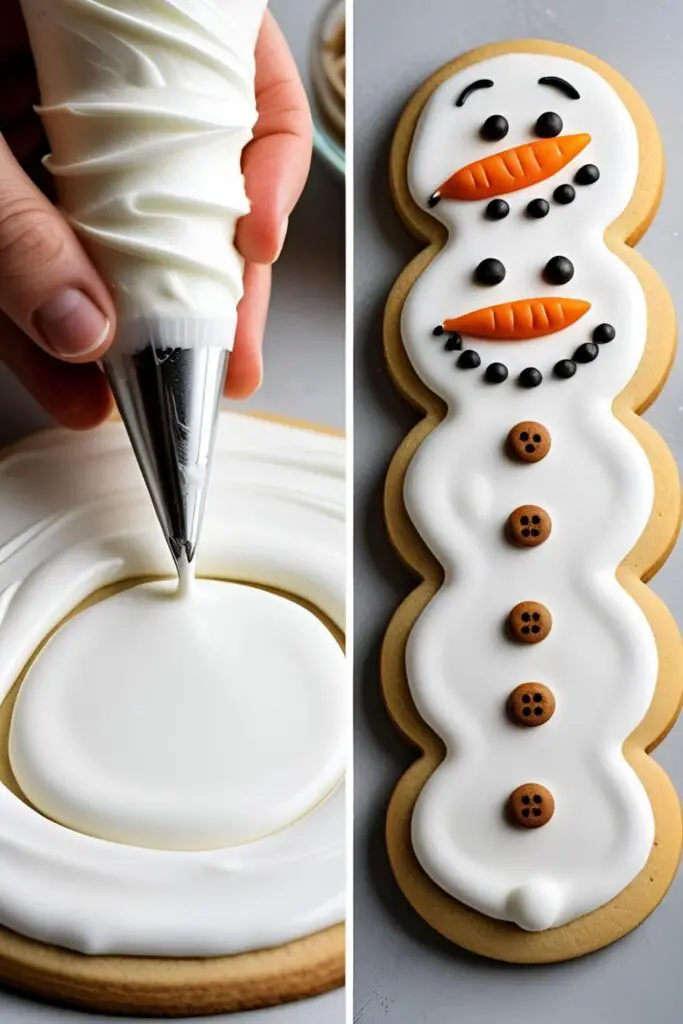
Step 11: Decorate Your Snowmen (The Fun Part!) Transfer the different colored icings to piping bags fitted with small round tips (or use zip-top bags with a tiny corner snipped off).
- Outline and Flood: Outline the entire snowman cookie with white royal icing. Then, flood the inside of the outline with more white icing. Use a toothpick or scribe tool to gently spread the icing and pop any air bubbles. Let the white icing dry completely (this usually takes several hours or overnight). Be patient; wet icing will smudge!
- Add Details: Once the white icing is dry, use the black icing to pipe on two eyes and a few buttons down the snowman’s body. Use the orange icing to pipe on a small carrot nose. If desired, use the red/pink icing to pipe on a scarf.
- Optional Flair: While the colored icing is still wet, you can add sprinkles or edible glitter for extra sparkle.
Step 12: Let the Icing Set Allow the decorated cookies to dry completely at room temperature until the royal icing is hard and no longer tacky. This can take several hours.
Step 13: Enjoy Your Homemade Starbucks Snowman Cookies! Now you can proudly display (and devour) your adorable creations. You just saved yourself a trip to Starbucks and probably a few dollars too. Go you!
Nutritional Frosty Facts (Estimate per cookie, without extra decorations)
Let’s be honest, these are sugar cookies with more sugar on top. They’re a treat, not a health food. But for those who are curious:
- Calories: ~150-200 kcal
- Sugar: A fair amount (it’s a sugar cookie with icing!).
- Fat: Comes from the butter in the cookie.
- Carbohydrates: Mostly from the flour and sugar.
- Note: This is a rough estimate and will vary depending on the size of your cookies and the amount of icing you use.
Common Snowy Slip-Ups (Mistakes to Avoid)
Don’t let your snowman dreams turn into a melty disaster!
- Overmixing the Cookie Dough: We said it before, but it’s worth repeating. Overmixing leads to tough cookies. Mix until just combined.
- Not Chilling the Dough: Warm dough spreads like crazy in the oven, and your snowmen will end up looking like they’ve been run over by a reindeer. Chill that dough!
- Icing Warm Cookies: This is a recipe for a sticky, melty mess. Let those cookies cool completely before you even think about the royal icing.
- Not Sifting the Powdered Sugar: Lumps in your powdered sugar will lead to lumpy icing. Take the extra minute to sift; your smooth icing will thank you.
- Adding Too Much Water to the Icing: Start with the recommended amount of water and add more very gradually, a teaspoon at a time, until you reach the desired consistency. Too thin, and your icing will run off the cookie.
Frosty Fun: Variations & Customizations
Want to put your own personal blizzard on these cookies? Here are a few ideas:
- Flavor Frenzy: Add a teaspoon of lemon zest or almond extract to your cookie dough for a different flavor profile.
- Chocolate Snowmen: Use a chocolate sugar cookie recipe for a richer, darker snowman.
- Marshmallow Madness: Before the royal icing sets completely, gently press mini marshmallows onto the snowman’s body for a fluffy effect.
Your Snowy Queries Answered (FAQ)
1. Can I make the cookie dough ahead of time? Yes! You can store the wrapped cookie dough in the refrigerator for up to 3 days. Let it sit at room temperature for about 15-20 minutes before rolling.
2. How long do these cookies stay fresh? Once the royal icing is completely set, store the cookies in an airtight container at room temperature for up to a week.
3. Can I freeze these snowman cookies? Yes, you can freeze both the baked and decorated cookies. Wrap them individually in plastic wrap and then place them in a freezer-safe container for up to 3 months. Thaw at room temperature.
4. What if my royal icing is too thick? Add a very small amount of warm water (a few drops at a time) and mix until you reach the desired consistency.
5. What if my royal icing is too thin? Whisk in a little more sifted powdered sugar, a tablespoon at a time, until it thickens.
6. Can I use a different kind of icing? While royal icing gives that classic smooth, matte finish, you could use a thick buttercream frosting if you prefer. However, it won’t set as hard as royal icing and might be more prone to smudging.
7. Where do I find meringue powder? You can find meringue powder in the baking aisle of most grocery stores, especially those with a good selection of cake decorating supplies. You can also find it online.
Final Frosty Farewell
Well, there you have it! You’re now fully equipped to unleash a blizzard of adorable, homemade Starbucks-inspired snowman cookies upon the world (or at least your kitchen). Go forth, bake with joy, and decorate with a sprinkle of whimsy.
Remember, these cookies are all about fun. So don’t stress too much about perfection. A slightly crooked carrot nose or a lopsided smile just adds to their individual charm, right? Now go enjoy your frosty creations, and maybe even pair them with a homemade latte for the full Starbucks experience. You’ll never look at those overpriced coffee shop cookies the same way again! 😉