For Real Though? You Want to Make a Mushroom Cake? Let’s Do This.
Okay, let’s not beat around the bush (or should I say, the mushroom?). You clicked on a recipe for how to make a mushroom cake. Are you sure about this? Like, really sure? Because while everyone else is scrolling through endless photos of perfectly frosted layer cakes, you’re thinking, “Nah, I want mine to look like it sprouted from the forest floor.” And honestly? I respect that level of quirky commitment. So, buckle up, buttercup, because we are about to embark on a culinary adventure that’s equal parts whimsical and… well, mushroomy.
You might be thinking, “Why a mushroom cake?” And to that, I say, “Why not a mushroom cake?” It’s unexpected, it’s fun, it’s a guaranteed conversation starter, and let’s be honest, it’s kind of adorable in a slightly earthy way. Forget boring sheet cakes; we’re about to craft a dessert that’s as unique as you are (and maybe a little bit fungi).
Why This Mushroom Cake Will Sprout Happiness
Still on the fence about embracing your inner mycologist baker? Let me give you a few compelling reasons why this cake is spore-tacular (sorry, I had to).
First, it’s ridiculously cute. Seriously, who can resist a little edible toadstool? It’s like bringing a fairy tale to your dessert table. Prepare for gasps of delight and a barrage of “awwws.”
Second, it’s easier than you think. The shaping and decorating might look a bit involved, but we’re going to break it down into simple steps. You don’t need to be a professional sculptor; just follow along, and you’ll be amazed at what you can create.
Finally, it’s perfect for themed parties or for anyone who just loves something a little different. Birthday parties, woodland creature gatherings, a celebration of your favorite foraging trip – the possibilities are endless. Plus, imagine the look on people’s faces when you present this masterpiece. Pure, unadulterated “wait, what?” followed by “can I have a slice?”
The Forest Floor Pantry: Ingredients

Here’s what you’ll need to bring your fungal fantasy to life. Don’t worry, no actual mushrooms in the cake itself (unless you’re feeling really adventurous, which I don’t recommend for this recipe).
For the Cake (Choose Your Adventure):
- Your favorite cake recipe: This could be vanilla, chocolate, red velvet, even a simple box mix in a pinch. You’ll need enough batter for two 6-inch round cakes.
- Ingredients as called for in your chosen recipe.
For the “Cap” (Shaping Magic):
- Extra cake scraps: From leveling your cake layers (don’t throw those away!).
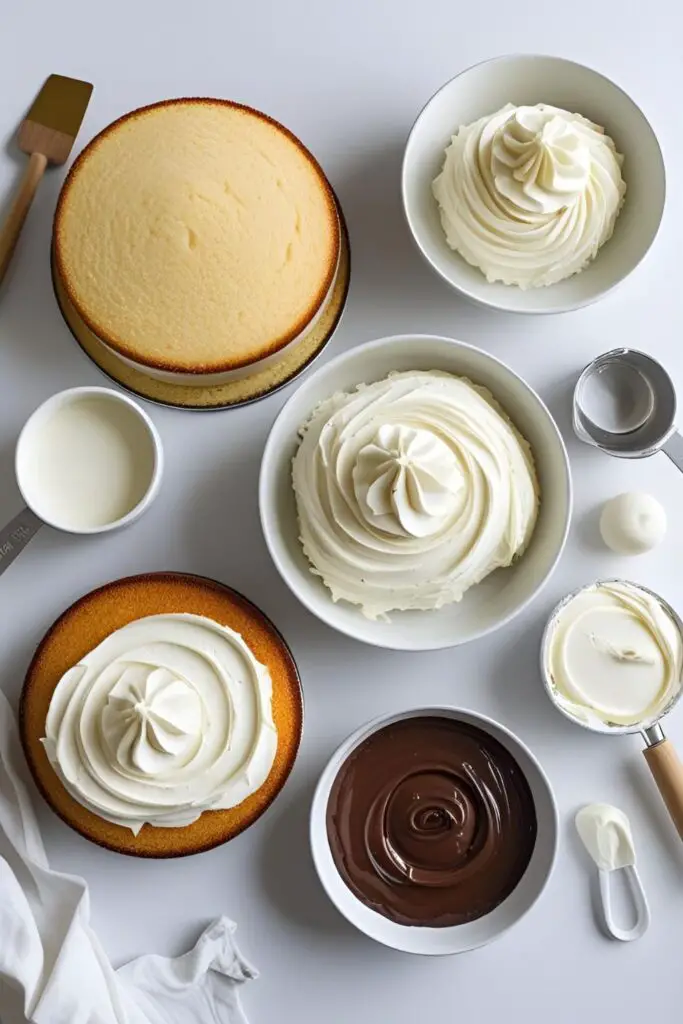
- Buttercream frosting: About 1-2 cups, any flavor that complements your cake.
For the Frosting “Gills” and “Stem”:
- Buttercream frosting: About 2-3 cups, vanilla or a light color works best for the stem.
- Cocoa powder: For tinting some of the frosting a light tan/brown for the stem and darker brown for the cap details (optional, you can use food coloring too).
For the “Cap” Coating:
- Melted chocolate or chocolate ganache: About 1-2 cups, milk or dark chocolate.
- White fondant or melted white chocolate: For the dots on the mushroom cap.
Tools & Magical Gadgets
You don’t need a magic wand, but these tools will definitely help you conjure up your mushroom cake.
- Two 6-inch round cake pans: Because mushrooms usually have a round-ish cap.
- Parchment paper: For lining your cake pans (makes releasing a breeze).
- Mixing bowls: For whipping up that batter and frosting.
- Electric mixer (handheld or stand mixer): Your arm will thank you.
- Rubber spatula: For scraping every last bit of batter.
- Serrated knife: For leveling your cake layers.
- Cake leveler (optional but helpful): If you’re serious about even layers.
- Small offset spatula or butter knife: For frosting.
- Piping bags and round tips (various sizes): For the gills and stem details.
- Small bowl for melting chocolate: Microwave-safe, naturally.
- Rolling pin (if using fondant): To roll out those cute little dots.
- Small round cookie cutter or piping tip (for fondant dots): For uniform spots.
- Cake stand or serving plate: For showcasing your fungal masterpiece.
The Sprouting Process: Step-by-Step Instructions

Alright, let’s get down to the nitty-gritty. Follow these steps, and you’ll have a charming mushroom cake in no time.
Step 1: Bake Your Cake Layers Prepare your chosen cake batter according to the recipe instructions. Divide the batter evenly between your two lined 6-inch round cake pans. Bake according to your recipe until a toothpick inserted into the center comes out clean. Let the cakes cool in the pans for a few minutes before inverting them onto a wire rack to cool completely. Cool cakes are essential for mess-free frosting!
Step 2: Level and Shape the “Cap” Once your cakes are completely cool (seriously, don’t rush this), use a serrated knife or a cake leveler to trim off any domed tops so you have two flat layers. Save those scraps! Now, we’re going to create the mushroom cap’s gentle slope. You can do this freehand with your serrated knife, carving a slight dome shape into one of the cake layers. Don’t worry about perfection; we’ll smooth it out with frosting.
Step 3: Assemble the “Cap” Crumble those cake scraps you saved into a bowl. Mix in about half of your buttercream frosting until you get a mixture that you can mold. This will be like edible Play-Doh. Use this mixture to further shape and round out the top of your domed cake layer, creating a smoother, more mushroom-cap-like shape. You can also use it to fill in any gaps between the domed layer and the flat layer if you stack them.
Step 4: Crumb Coat the “Cap” Frost the entire mushroom “cap” (the shaped layers) with a thin layer of buttercream frosting. This is your crumb coat, and it’s crucial for trapping any loose crumbs and ensuring a smooth final frosting layer. Chill the crumb-coated “cap” in the refrigerator for at least 30 minutes to firm up. Chilling is your secret weapon for easy frosting!
Step 5: Frost the “Stem” Use your remaining cake layer (the flat one) as the base and “stem” of your mushroom. Frost the sides and top of this layer with your vanilla or light-colored buttercream. Aim for a relatively smooth but slightly rustic look, like a real mushroom stem.

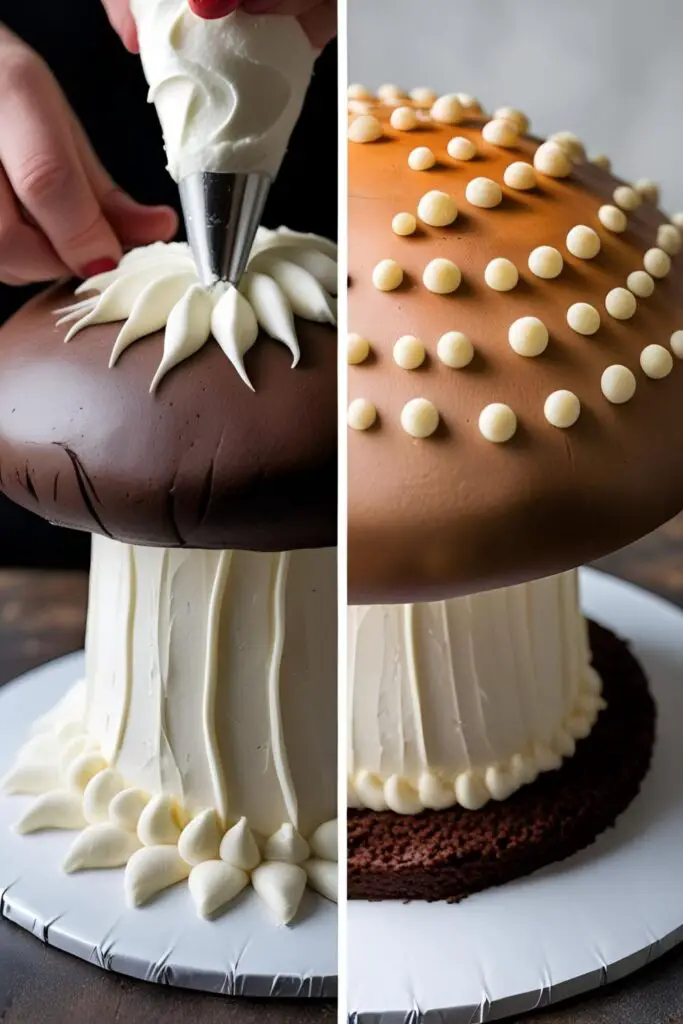
Step 6: Add the “Gills” Now for the fun, slightly tedious part – the gills! Fit a piping bag with a small round tip. Fill it with your white or light-colored buttercream. On the underside of your chilled mushroom “cap,” pipe concentric circles or lines radiating out from the center to the edge. Don’t worry about making them perfectly uniform; real mushroom gills aren’t perfect either. You can use different sized round tips for variation.
Step 7: The Chocolate “Cap” Coating Melt your chocolate or prepare your chocolate ganache. Once the “gills” are somewhat firm (you can chill the cap again briefly if needed), carefully pour or spread the melted chocolate over the top and sides of the mushroom “cap.” Let the excess drip down naturally for a slightly organic look. Place the frosted “cap” on top of your frosted “stem.”
Step 8: Add the Iconic Dots If using white fondant, roll it out thinly and use a small round cookie cutter or piping tip to cut out small circles. Adhere these to the chocolate-coated “cap” with a tiny bit of water or melted white chocolate. If using melted white chocolate, pipe small dots onto the cap. Arrange them randomly for a natural mushroom-like appearance.
Step 9: Chill and Admire Refrigerate your magnificent mushroom cake for at least 30 minutes to allow the chocolate to set and everything to firm up. Then, behold your edible fungal creation!
Nutritional Forest Facts (Approximately per serving, depending on your cake recipe)
Let’s be honest, this is cake dressed up as a mushroom. It’s not exactly a health food. But here’s a rough estimate (this will vary greatly based on your cake and frosting recipes):
- Calories: ~350-500 kcal
- Sugar: A fair amount (it’s cake, after all!)
- Fat: Depends on your frosting and chocolate choices.
- Carbohydrates: Mostly from the cake and sugar.
- Note: This is purely an estimate and can fluctuate wildly. Enjoy it in moderation, just like finding a rare mushroom in the forest.
Common Foraging Faux Pas (Mistakes to Avoid)
Don’t let your mushroom cake turn into a moldy mess!
- Trying to Shape a Warm Cake: Seriously, don’t do it. Warm cake is fragile and will crumble in your hands. Patience is key; let those layers cool completely.
- Skimping on the Crumb Coat: Skipping the crumb coat is like walking through the forest without proper boots – you’re going to get messy. Loose crumbs will end up in your final frosting, and it won’t look smooth.
- Using Water-Based Anything on Chocolate: We talked about this with almond bark, and it applies here too. Water and melted chocolate are not friends. Stick to oil-based food coloring if you want to tint your chocolate.
- Overhandling the Cake Scraps: Be gentle when mixing the cake scraps with frosting for the “cap.” Overmixing can make it tough. Aim for a moldable consistency, not a dense brick.
Mycelium of Creativity: Variations & Customizations
Want to put your own spin on this fungal delight? Go wild!
- Different Mushroom Varieties: Play with the shape and colors to mimic different types of mushrooms. Use reddish-brown chocolate and taller, thinner stems for a morel-inspired look, or try flatter caps with brown and tan shades for a shiitake vibe.
- Woodland Scene: Create a whole forest floor scene on a large cake board. Use crushed Oreos for dirt, green-tinted coconut for moss, and add other edible woodland creatures made from fondant or candy.
- “Poisonous” but Delicious: For a fun twist, make a bright red “Amanita” mushroom cap with white fondant spots. Just make sure everyone knows it’s edible!
Frequently Asked Fungi Facts (FAQ)
1. What kind of cake works best for a mushroom cake? A relatively dense cake like vanilla, chocolate, or even pound cake works well for shaping. Avoid very light and airy cakes that might crumble easily.
2. How do I get the domed shape for the mushroom cap? You can carve it freehand with a serrated knife, use a bowl as a guide, or even bake the cake in a slightly domed pan if you have one. The cake scrap and frosting mixture will help refine the shape.
3. Can I make the mushroom cake ahead of time? Yes! You can bake the cake layers and make the frosting a day in advance. Assemble and decorate the cake the day you plan to serve it for the best freshness.
4. How do I store the mushroom cake? Store it in an airtight container in the refrigerator due to the buttercream and potentially chocolate ganache. Let it come to room temperature for about 30 minutes before serving for the best flavor and texture.
5. Can I use candy melts instead of chocolate for the cap? Absolutely! Candy melts are very user-friendly and come in various colors, which could be fun for different mushroom effects.
6. My piped “gills” look messy. Is that okay? Totally! Real mushroom gills aren’t perfectly uniform. Embrace the organic look. You’re going for a natural feel, not a perfectly manufactured one.
7. Can I make a giant mushroom cake? You could! Just scale up the recipe and use larger cake pans. Be mindful that a larger cake will take longer to bake and chill. You might need to use internal supports to prevent a very large “cap” from collapsing.
Final Fun-gi Thoughts
Well, there you have it! You now possess the knowledge to transform ordinary cake into an extraordinary, edible mushroom. Go forth and surprise your friends, delight your family, and maybe even confuse a few woodland creatures (though I wouldn’t recommend leaving it outside for them).
Remember, baking should be fun, even when you’re making a dessert that looks like it belongs in a fairytale (or a slightly damp forest). So embrace the quirkiness, don’t be afraid to get a little messy, and enjoy the delicious, slightly surreal, results. Now, who’s ready for a slice of magic mushroom? (The non-hallucinogenic, cake kind, of course!)