The Unbelievably Easy Chicken Cordon Bleu Recipe (That Looks Super Fancy)
Let’s be real. The phrase “Chicken Cordon Bleu” sounds intimidating, right? It conjures images of fancy French chefs in tall hats, tiny portions, and a bill with too many zeros. It’s the kind of dish you see at a wedding reception from 1998, a relic of a bygone culinary era. But what if I told you that making a spectacular, restaurant-quality chicken cordon bleu at home is not only possible but actually… easy? You heard me. We’re taking this classic dish out of the stuffy dining room and putting it squarely into your “I’m a kitchen rockstar” repertoire.
Forget the frozen, pre-made stuff that tastes vaguely of cardboard and regret. We’re talking about tender, juicy chicken wrapped around savory ham and a molten river of nutty Swiss cheese, all encased in a shatteringly crispy, golden-brown crust. Are you drooling yet? Good. Let’s make this fancy-pants dinner a reality.
Why This Recipe is Awesome (And Will Impress Everyone)
First and foremost, the impressiveness-to-effort ratio is off the charts. This dish looks complicated and elegant. When you slice into it and that glorious cheese starts to ooze out, your dinner guests (or just your very lucky cat) will think you’ve been secretly attending culinary school. The secret? It’s just a clever roll-up. You’ve got this.
Second, the flavor combination is legendary for a reason. It’s a perfect trifecta of textures and tastes. You get the savory, salty punch from the ham, the creamy, nutty melt of the Swiss cheese, and the tender, juicy chicken, all balanced by that crunchy, golden breading. It’s a masterpiece of comfort food disguised as fine dining.
Finally, let’s talk about the cheese pull. That moment when you cut into a finished roll and the melted Swiss cheese stretches out in a glorious, gooey strand? That’s pure culinary magic. It’s satisfying, it’s dramatic, and TBH, it’s totally worth it for the ‘gram.
Ingredients: Your Cordon Bleu Construction Kit
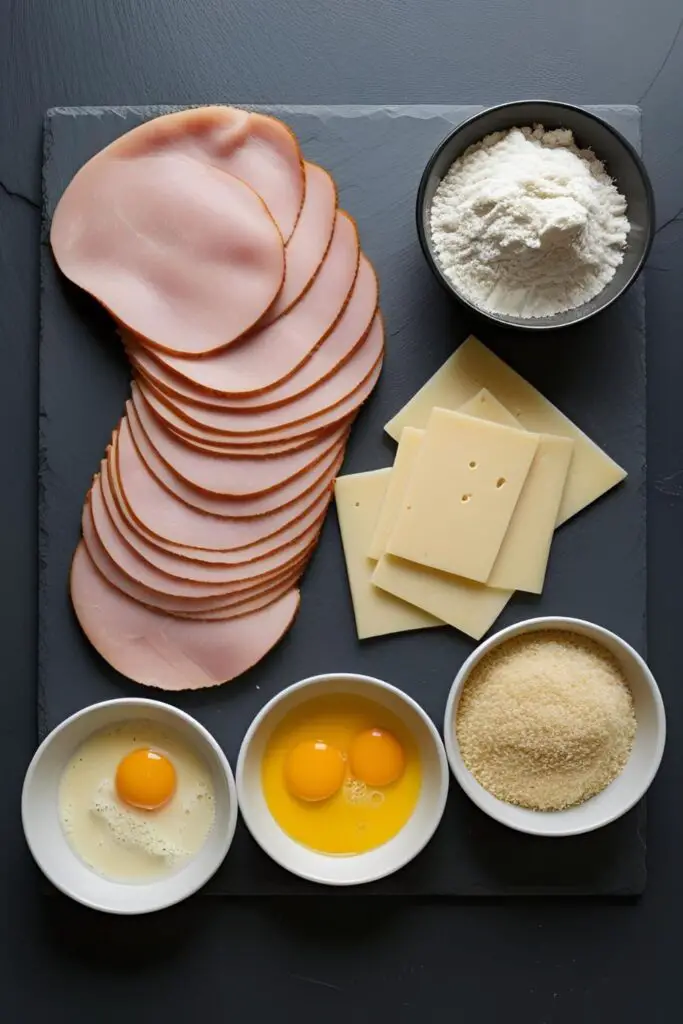
Don’t be scared by the French name; the shopping list is surprisingly simple. Quality ingredients are key here!
For the Chicken Rolls:
- Chicken Breasts: 4 large (8 oz each) boneless, skinless chicken breasts.
- Ham: 8 slices of good quality deli ham (Black Forest or Virginia ham are excellent choices).
- Swiss Cheese: 4-8 slices of Swiss cheese. Gruyère is a fantastic, nutty upgrade if you’re feeling fancy.
- Toothpicks or Kitchen Twine: For securing your precious chicken parcels.
For the Crispy Breading Station:
- Flour: 1/2 cup of all-purpose flour.
- Seasoning for Flour: 1 teaspoon paprika, 1 teaspoon garlic powder, 1/2 teaspoon salt, and 1/2 teaspoon black pepper.
- Eggs: 2 large eggs, beaten with a splash of water.
- Panko Breadcrumbs: 1.5 cups. Panko is the secret to an extra-light and crispy crust. Regular breadcrumbs will work, but Panko is better.
- Oil & Butter: 2 tablespoons of olive oil and 2 tablespoons of butter for pan-searing.
For the Optional (But Highly Recommended) Dijon Cream Sauce:
- Butter: 2 tablespoons.
- Garlic: 1 clove, minced.
- Chicken Broth: 1/2 cup.
- Dijon Mustard: 2 tablespoons.
- Heavy Cream: 1/2 cup.
- Fresh Parsley: Chopped, for garnish.
Tools & Kitchen Gadgets Used
Having the right equipment makes this seemingly complex dish a total breeze.
- Meat Mallet / Tenderizer: The flat side is your best friend for pounding the chicken to an even thickness without tearing it. A rolling pin or the bottom of a heavy skillet will also work in a pinch.
- Plastic Wrap or a Large Ziplock Bag: To place over the chicken while you pound it. This prevents a chicken-y mess all over your kitchen.
- Three Shallow Dishes: For setting up your assembly line-style breading station (flour, eggs, Panko).
- A Large, Oven-Safe Skillet: A cast-iron skillet is perfect because you can go straight from the stovetop to the oven. If you don’t have one, just use a regular skillet and transfer to a baking dish.
- Baking Sheet with a Wire Rack: If you’re not using an oven-safe skillet, this is the best way to bake the chicken and keep the bottom from getting soggy.
- Instant-Read Thermometer: The most reliable way to know when your chicken is perfectly cooked without drying it out.
Step-by-Step Instructions: Let’s Get Ready to Roll
Deep breath. You’re about to create something amazing. Follow these steps, and you can’t go wrong.
Step 1: Pound It Out (Therapy Session)
Preheat your oven to 400°F (200°C). Place a chicken breast inside a large Ziplock bag or between two sheets of plastic wrap. Using the flat side of a meat mallet, pound the chicken until it’s about 1/4-inch thick. You want an even thickness so it cooks uniformly. Repeat with the remaining chicken breasts. Season both sides of your beautifully thin chicken cutlets with salt and pepper.
Step 2: Layer, Roll, and Secure
Lay a chicken cutlet flat. Layer 2 slices of ham on top, followed by 1-2 slices of Swiss cheese. Now, starting from one of the shorter ends, roll the chicken up as tightly as you can, tucking in the sides as you go to seal in the cheesy goodness. Secure the roll with a few toothpicks or tie it with kitchen twine. Repeat for all four chicken rolls.
Step 3: The Breading Assembly Line
Set up your three shallow dishes. In the first, whisk together the flour, paprika, garlic powder, salt, and pepper. In the second, beat the eggs with a splash of water. In the third, place your Panko breadcrumbs. Take one chicken roll, dredge it in the seasoned flour, shake off the excess, dip it completely in the egg wash, and finally, press it firmly into the Panko, ensuring it’s coated on all sides. Place the breaded chicken on a clean plate.
Step 4: Get That Golden-Brown Sear

In your large, oven-safe skillet, heat the olive oil and butter over medium-high heat. Once the butter is melted and foaming, carefully place the breaded chicken rolls seam-side down in the pan. Sear for 2-3 minutes per side, until a beautiful golden-brown crust forms. This step is crucial for color and texture!
Step 5: Finish in the Oven
Transfer the entire oven-safe skillet to the preheated oven. Bake for 20-25 minutes, or until the chicken is cooked through and the internal temperature reaches 165°F (74°C) on an instant-read thermometer. Let the chicken rest for 5-10 minutes before slicing. This is critical for keeping the juices inside!
Step 6: Make the Heavenly Dijon Sauce (Optional)
While the chicken bakes, make the sauce. In a small saucepan, melt the butter over medium heat. Add the minced garlic and cook for 30 seconds. Whisk in the chicken broth and Dijon mustard, bringing it to a simmer. Reduce the heat and stir in the heavy cream. Let it gently simmer for a few minutes to thicken slightly. Stir in the parsley and season with salt and pepper.
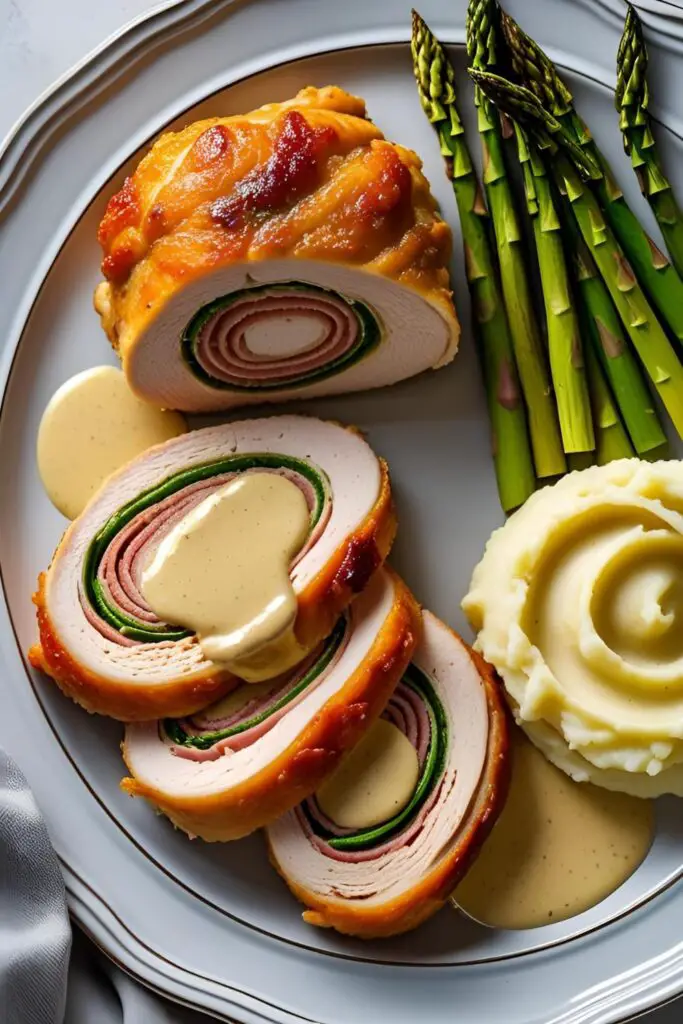
Step 7: Serve and Await a Standing Ovation
Remove the toothpicks from your rested chicken cordon bleu. Slice it into thick medallions (to show off that beautiful spiral and molten cheese) and serve immediately, drizzled with that luscious Dijon cream sauce. You did it, you fancy chef, you. 🙂
Calories & Nutritional Info
This is a rich and decadent meal, so let’s just call it a “special occasion” dish, shall we? Here’s an estimate per serving (one chicken roll, with sauce).
- Calories: Approximately 650-800 kcal
- Protein: A whopping 50-60g
- Fat: Around 40-50g
- Carbohydrates: Around 20-25g
- Note: This is a powerhouse of protein, but also high in sodium and saturated fat. It’s pure, unadulterated comfort and deliciousness.
Common Mistakes to Avoid (Or, How to Prevent a Cheese-pocalypse)
Heed my warnings, and your cordon bleu will be flawless.
- The Great Cheese Escape: This is the most common tragedy. It happens when the chicken isn’t pounded thin enough or isn’t rolled tightly. Roll it like a burrito, tucking in the sides, and secure it well with toothpicks.
- The Raw-in-the-Middle Problem: If you don’t pound the chicken to an even thickness, the thick parts will take longer to cook, leaving you with either a raw center or a dry exterior. Even pounding is the key to success.
- Soggy Bottom Syndrome: Skipping the sear and just baking will lead to a pale, soft crust. Searing first in butter and oil creates that crispy, golden foundation. Baking on a wire rack also helps circulate air for ultimate crispiness.
Variations & Customizations
Once you’ve mastered the classic, why not get a little creative?
The Italian Stallion
Swap the ham for prosciutto and the Swiss for provolone or fresh mozzarella. Consider adding a thin layer of basil pesto inside with the cheese. Serve with a simple marinara sauce instead of the Dijon cream.
Spicy Southwestern Cordon Bleu
Use slices of pepper jack cheese instead of Swiss. Add a layer of roasted green chiles or a few pickled jalapeño slices inside with the ham. A cilantro-lime cream sauce would be amazing with this version.
Deconstructed Cordon Bleu Bake
The lazy (but still delicious) weeknight version. Place your pounded chicken breasts in a baking dish. Top each with a smear of Dijon, a slice of ham, and a slice of Swiss. Cover with Panko breadcrumbs tossed with melted butter and bake until the chicken is cooked and the topping is golden. All the flavor, none of the rolling!
FAQ: Your Cordon Bleu Conundrums, Solved
Let’s tackle some frequently asked questions.
1. Can I make Chicken Cordon Bleu in an air fryer? Yes! It works beautifully. Assemble and bread the chicken as directed. Spray the basket and the chicken rolls with cooking spray. Air fry at 375°F (190°C) for 15-20 minutes, flipping halfway, until golden and cooked through.
2. Can I prepare this ahead of time? You sure can. You can assemble and bread the chicken rolls up to a day in advance. Just lay them on a baking sheet, cover with plastic wrap, and store them in the fridge until you’re ready to cook.
3. What do I serve with Chicken Cordon Bleu? It’s rich, so simple sides are best. Think mashed potatoes, a lemon-dressed green salad, roasted asparagus or broccoli, or egg noodles.
4. Can I freeze it? Yes. You can freeze the uncooked, breaded chicken rolls. Place them on a baking sheet in the freezer until solid, then transfer to a freezer bag. You can cook them from frozen, just add about 15-20 minutes to the baking time.
5. My breading fell off when I seared it! What happened? Make sure you pat the chicken dry before breading and press the Panko on firmly. When searing, be gentle when you flip it, and make sure your oil is hot enough so the crust sets quickly.
6. Do I have to use Swiss cheese? Nope! Swiss is classic, but Gruyère, provolone, fontina, or even a good white cheddar would be delicious. Use a good melting cheese.
7. Why do you sear it first and then bake it? Searing gives you that beautiful, deep golden-brown, crispy crust. Baking finishes the cooking process gently and evenly without burning the outside, ensuring the chicken is juicy and cooked through. It’s the best of both worlds.
Final Thoughts
You did it! You took a dish with a fancy French name and made it your own. You pounded, you rolled, you breaded, and you conquered. Now you have a secret weapon in your culinary arsenal for date nights, dinner parties, or any time you just feel like treating yourself to something special. Go ahead, take a bow. You’ve earned it.