How to Make Strawberry Crunch Topping (The Nostalgic Ice Cream Bar Stuff!)
Remember that sound? The faint, tinkling music of the ice cream truck turning down your street on a hot summer day. You’d frantically search for loose change, sprint outside, and order the holy grail of frozen treats: the Strawberry Shortcake bar. The best part wasn’t even the ice cream; it was that magical, crumbly, pink and white coating. Well, get ready to have your mind blown, because today you’re going to learn how to make strawberry crunch topping with Oreos, and it’s the exact same stuff. Yes, really. Prepare to unlock a core childhood memory.
Why This Recipe Is Basically Magic Dust
So, why should you immediately drop everything and make a batch of this pink magic dust? First, it’s ridiculously easy. We are talking about three—yes, THREE—ingredients and about 10 minutes of your time. If you can operate a food processor (or even just a Ziploc bag and some righteous fury), you can make this.
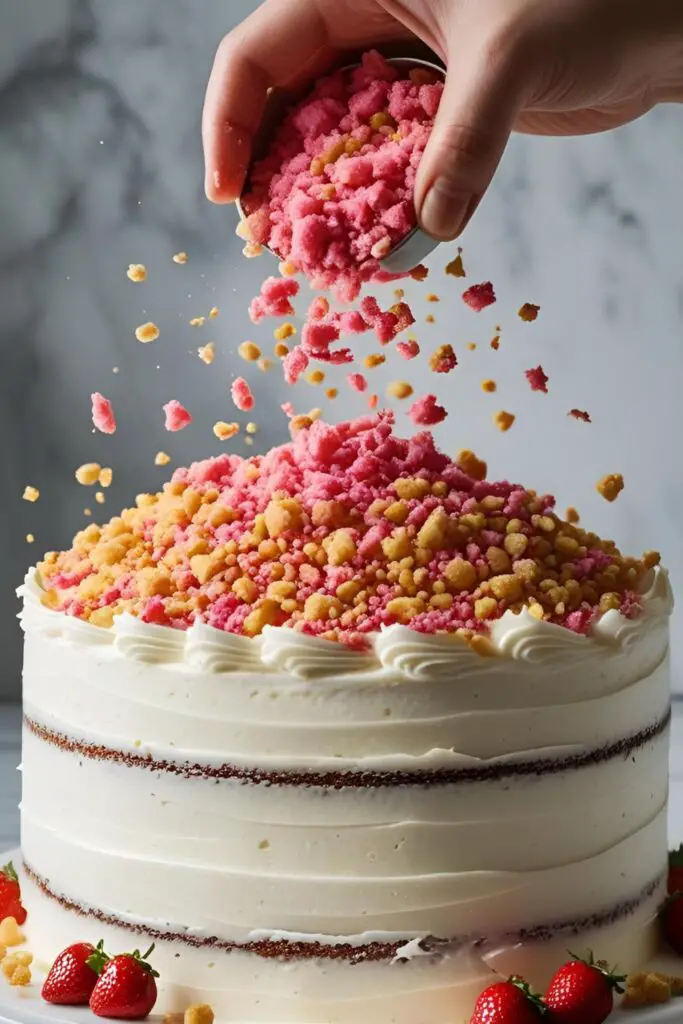
But the real power of this recipe is its versatility. This isn’t just a topping; it’s a dessert transformer. Sprinkle it on ice cream, yogurt, or oatmeal. Press it into the sides of a cake. Use it as a crust for a no-bake cheesecake. The possibilities are endless! It adds a burst of sweet strawberry flavor and an incredible buttery crunch that will elevate literally any dessert from “meh” to “OMG, where has this been all my life?”
Ingredients: The Holy Trinity of Crunch
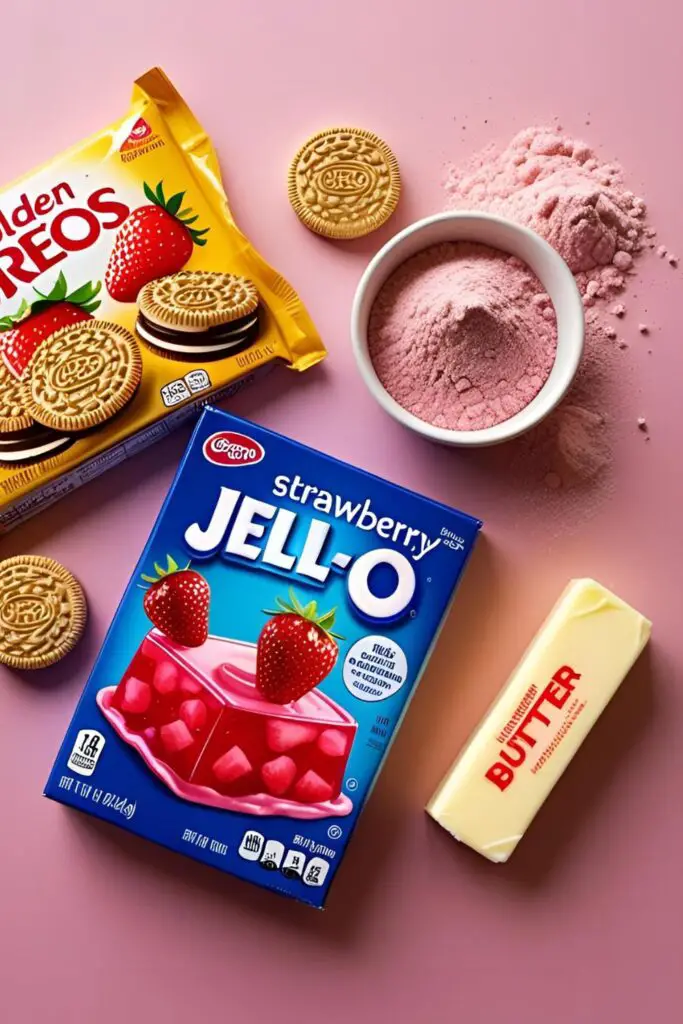
You are just three simple ingredients away from nostalgic bliss. It almost feels like cheating.
- 1 package (12.2 oz) Golden Oreos (or any similar vanilla sandwich cookie)
- 1 box (3 oz) Strawberry Jell-O Powder (just the dry powder, don’t actually make Jell-O!)
- 1/2 cup (1 stick) unsalted butter, melted
Key Substitutions:
- Golden Oreos: Nilla Wafers or other shortbread cookies are a great substitute. You’ll need about 3 cups of crumbs.
- Strawberry Jell-O: Feel free to experiment with other Jell-O flavors! Raspberry, peach, or even lemon would be delicious.
- Butter: You can use salted butter if that’s all you have, just be aware it will add a slightly salty kick (which, IMO, is actually pretty delicious).
Tools & Kitchen Gadgets Used: Your Arsenal of Crumble

You have two paths to choose from here: the high-tech way or the low-tech (but equally effective) way.
- Food Processor (the easy button for this recipe)
- OR a Ziploc Bag and a Rolling Pin/Meat Mallet/Heavy Can (for therapeutic smashing)
- Large mixing bowl
- Baking sheet
- Parchment paper or a silicone baking mat
- Spatula
Step-by-Step Instructions: Let’s Get Ready to Crumble!
This is so easy it’s almost laughable. Let’s do this.
- Prep Your Workspace: First things first, preheat your oven to 350°F (175°C). Line a large baking sheet with parchment paper. This will prevent the topping from sticking and save you from scrubbing a pan later. You’re welcome.
- Pulverize the Cookies: Place the entire package of Golden Oreos (yes, creme filling and all!) into the bowl of your food processor. Pulse a few times until you have coarse crumbs. Do not turn it into fine dust! You want a variety of textures, with some bigger crumbly bits.
- No Food Processor? No Problem: Put the cookies in a large Ziploc bag, seal it, and go to town with a rolling pin or the flat side of a meat mallet. It’s cheaper than therapy.
- Add the Magic Powder: Dump the cookie crumbs into your large mixing bowl. Add the dry Strawberry Jell-O powder directly to the crumbs. Stir everything together with a fork or spatula until the crumbs are evenly coated in that beautiful pink powder.
- Bring on the Butter: Drizzle the melted butter all over the pink cookie crumb mixture. Mix it all together until the crumbs are evenly moistened. The mixture should look like wet sand and start to form little clusters.
- Toast for Maximum Crunch: Spread the mixture evenly onto your prepared baking sheet. Bake for 5-7 minutes. Keep a close eye on it! You just want to toast it slightly to enhance the crunch and flavor. Do not let it burn! Burnt sugar is a sad, sad taste.
- Cool It Completely: Remove the baking sheet from the oven and let the strawberry crunch topping cool completely on the pan. It will get crispier as it cools.
- Crumble and Store: Once it’s cool, you can break up any large clumps with your hands. Your magical dessert dust is now ready to be deployed!
Calories & Nutritional Info (It’s Cookies, Butter, and Jell-O. You Know the Deal.)
Let’s not pretend this is a health food. This is pure, unadulterated joy.
- Serving Size: 2 tablespoons
- Estimated Calories: Around 100-120 per serving
- Fat: Approximately 6g
- Carbohydrates: Roughly 12g
- Sugar: A respectable amount that says “I’m here to party.”
Nutritional Note: This is a dessert topping. Its nutritional value is in the happiness it brings to your soul. Enjoy accordingly.
Common Mistakes to Avoid: A Guide to Perfect Crunch
- Obliterating the Cookies: If you process the Oreos into a fine powder, you’ll lose that signature “crunch.” Aim for a mix of small and medium crumbs for the best texture.
- Adding Too Much Butter: If your topping seems greasy, you may have added a bit too much butter. Stick to the recipe amount. You want the crumbs to be moistened, not swimming.
- Skipping the Baking Step: You could skip baking, but you’d be missing out. The quick trip to the oven toasts the butter and crumbs, making the topping significantly crunchier and more flavorful. Don’t skip it!
- Burning the Topping: This stuff can go from golden to burnt in a flash because of the high sugar content. Watch it like a hawk when it’s in the oven. The second you smell it getting toasty, it’s probably done.
Variations & Customizations: Create Your Own Crunch
This simple recipe is a fantastic base for experimentation. Go wild!
- Lemon Cream Crunch: Swap the strawberry Jell-O for a box of lemon Jell-O powder. Add the zest of one lemon to the cookie crumbs for an extra bright, citrusy kick. This is amazing on cheesecakes or lemon bars.
- Chocolate Strawberry Crunch: For the chocoholics out there, simply use regular chocolate Oreos instead of Golden Oreos. The combination of rich chocolate and sweet strawberry is a classic for a reason.
- Birthday Cake Crunch: Use Golden Oreos and a box of vanilla pudding mix instead of Jell-O. Add 1/4 cup of rainbow sprinkles to the mixture before baking for a festive, funfetti-style crunch.
FAQ Section: All Your Crunchy Questions, Answered
- Do I have to use Oreos? Nope! Golden Oreos are great because the creme filling adds some extra sweetness and helps it bind, but you can use about 12 oz of Nilla Wafers, shortbread cookies, or even chessmen cookies.
- Can I use freeze-dried strawberries instead of Jell-O? Yes, absolutely! For a more natural strawberry flavor, pulverize about 1/2 cup of freeze-dried strawberries into a powder and use that in place of the Jell-O mix. The color will be a bit more muted, but the flavor is incredible.
- Do I have to bake it? You don’t have to, but I highly recommend it. The 5-7 minutes in the oven dries out the topping and toasts the butter and crumbs, which results in a much crunchier, more stable topping that won’t get soggy as quickly.
- How do I store this strawberry crunch topping? Store it in an airtight container at room temperature. It will stay fresh and crunchy for up to a week. You can also store it in the freezer for up to 3 months for a longer shelf life.
- What can I use this topping on? Oh, the possibilities! Use it on cakes, cupcakes, ice cream, milkshakes, yogurt parfaits, cheesecakes, donuts, or just eat it by the handful.
- My topping is too clumpy/not clumpy enough. What did I do? If it’s too clumpy, you may have added a bit too much butter or not spread it out enough on the pan. If it’s not clumpy enough, it might need a little more butter, or you might have pulsed the cookies too fine. It’s pretty forgiving, though!
- Can I make this gluten-free? Yes! Simply use your favorite brand of gluten-free vanilla sandwich cookies. The rest of the ingredients are typically gluten-free, but always check the labels.
Final Thoughts
You are now the proud owner of the secret recipe for one of the best dessert toppings on the planet. This isn’t just a recipe; it’s a time machine back to the best parts of summer. Go forth and crunchify your world. Sprinkle it on everything. Your desserts will never be the same again, and honestly, you’ll never want them to be.