Baking Up Holiday Magic: Your Ridiculously Easy Guide on How to Make Christmas Cookies (Even if You Can Barely Boil Water)
Alright, let’s be real. You’ve scrolled through approximately one million Pinterest boards filled with perfectly iced, impossibly intricate Christmas cookies, haven’t you? Feeling a little inadequate? Don’t worry, friend. We’ve all been there. But what if I told you that you could actually whip up some seriously festive and delicious treats without needing a PhD in pastry arts? This guide on how to make Christmas cookies is for the rest of us – the ones who appreciate a little holiday cheer without the stress of a culinary Olympics. So, ditch the pressure and let’s get baking, shall we?
Why This Recipe Is Actually Kinda Genius
Let’s face it, during the holidays, time is more precious than that last roll of decent wrapping paper. That’s why this Christmas cookie recipe is your new best friend. It’s insanely easy, produces cookies that taste like a winter wonderland exploded in your mouth (in a good way, promise!), and requires minimal fancy footwork. Plus, the smell of these baking? Forget scented candles; this is aromatherapy, holiday edition. Your guests will think you’ve been slaving away for hours, and who are we to correct them? Wink, wink.
The Starry Cast: Ingredients You’ll Need
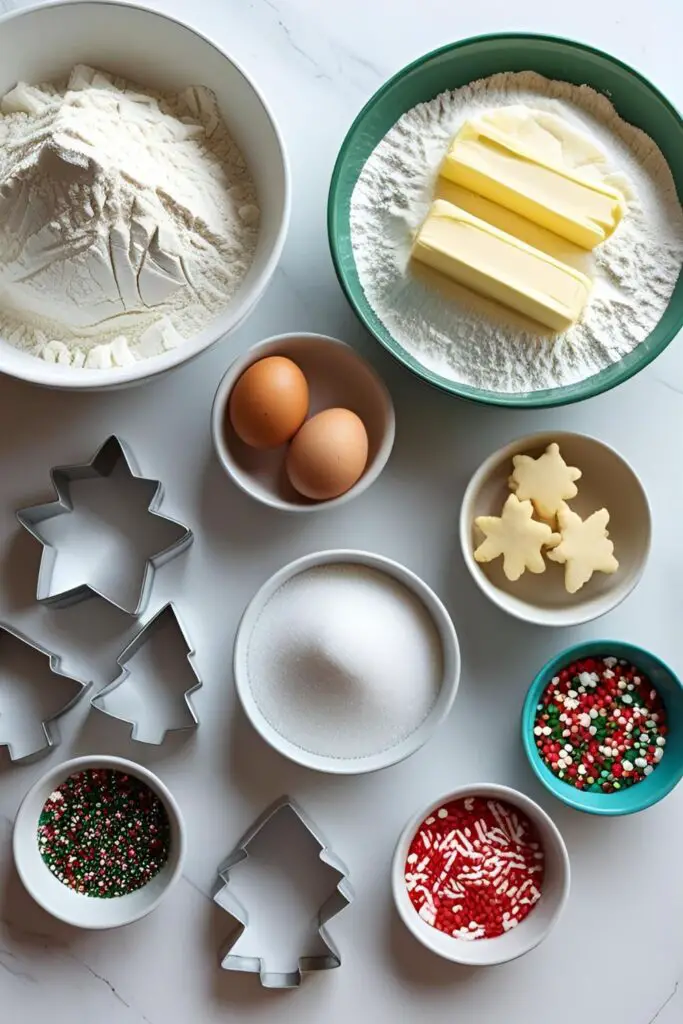
- All-Purpose Flour: 2 ¾ cups (the unsung hero of most baked goods). For a gluten-free option, try a good quality all-purpose gluten-free blend.
- Baking Powder: 1 teaspoon (the little puff that could!). Make sure it’s not ancient; nobody wants flat cookies.
- Salt: ½ teaspoon (balances the sweetness, don’t skip it unless you like bland sadness).
- Unsalted Butter: 1 cup (2 sticks), softened. Keyword: softened, not melted! Trust me on this. For a dairy-free version, use a good quality vegan butter stick.
- Granulated Sugar: 1 cup (sweetness and structure, a classic combo).
- Large Eggs: 2 (the binders that bring it all together).
- Vanilla Extract: 1 teaspoon (because everything is better with a little vanilla, right?). Almond extract works great for a different flavor twist!
For the Icing (Optional, But Highly Recommended for Maximum Festiveness):
- Powdered Sugar: 3 cups (the magical white powder).
- Milk: ¼ cup (start with less, you can always add more). Dairy or non-dairy works.
- Light Corn Syrup: 1 tablespoon (for that smooth, glossy finish).
- Vanilla Extract: ½ teaspoon (yep, more vanilla!).
- Food Coloring: Gel is best for vibrant colors, but liquid works in a pinch.
- Sprinkles: Because, well, sprinkles.
Your Baking Arsenal: Tools & Kitchen Gadgets
Alright, time to gather your weapons of mass cookie production! Here’s what you’ll need:
- Large Mixing Bowls: For combining your ingredients. You’ll need at least two.
- Electric Mixer: A stand mixer is a lifesaver, but a handheld one will also get the job done (arm workout included!).
- Measuring Cups and Spoons: Precision is your friend in baking, usually.
- Rubber Spatula: For scraping down bowls and gently folding.
- Rolling Pin: To flatten that glorious dough.
- Parchment Paper or Silicone Baking Mats: Say goodbye to stuck cookies!
- Cookie Cutters: Get creative! Stars, trees, gingerbread men – the festive possibilities are endless.
- Baking Sheets: You’ll likely need a couple.
- Wire Rack: For cooling your masterpieces.
- Small Bowls:** If you’re making multiple colors of icing.
- Piping Bags or Ziploc Bags with the corner snipped:** For decorating.
- Offset Spatula or Butter Knife:** For spreading icing.
Let’s Get This Dough Rolling: Step-by-Step Instructions
Step 1: The Great Creaming
In a large mixing bowl, cream together the softened butter and granulated sugar with your electric mixer on medium speed until the mixture is light and fluffy. This usually takes about 2-3 minutes. Don’t rush this step; it’s important for the cookie’s texture. Why? Because science! (Mostly, it incorporates air.)
Step 2: Egg-cellent Addition
Beat in the eggs one at a time, making sure each one is fully incorporated before adding the next. Then, stir in the vanilla extract. Doesn’t that already smell amazing?
Step 3: The Dry Stuff Shuffle

In a separate bowl, whisk together the all-purpose flour, baking powder, and salt. Whisking helps to evenly distribute the baking powder and salt, preventing any weirdly salty or overly puffy cookies. Nobody wants a surprise salt bomb in their gingerbread man.
Step 4: The Grand Unification
Gradually add the dry ingredients to the wet ingredients, mixing on low speed until just combined. Be careful not to overmix! Overmixing develops the gluten in the flour, which can lead to tough cookies. We’re aiming for tender, melt-in-your-mouth deliciousness, not hockey pucks.
Step 5: Chill Out, Dough
Divide the dough in half, flatten each half into a disc, wrap them in plastic wrap, and refrigerate for at least 1 hour. This chilling time is crucial! It allows the butter to firm up, which makes the dough easier to roll and helps the cookies hold their shape during baking. Impatient? Too bad. Go watch a holiday movie or something.
Step 6: Preheat and Prep
Preheat your oven to 375°F (190°C). Line your baking sheets with parchment paper or silicone baking mats. Trust me, future you will thank you for the easy cleanup.
Step 7: Roll with It
On a lightly floured surface, roll out one disc of dough to about ¼-inch thickness. Use your favorite cookie cutters to cut out festive shapes. If the dough is sticking, add a little more flour, but don’t go overboard! Too much flour can make the cookies dry.
Step 8: Bake It ‘Til You Make It
Carefully transfer the cut-out cookies to the prepared baking sheets, leaving a little space between each one. Bake for 8-10 minutes, or until the edges are lightly golden brown. Keep an eye on them; ovens can be temperamental little beasts.
Step 9: Cool Down Period

Let the cookies cool on the baking sheets for a few minutes before transferring them to a wire rack to cool completely. Patience, grasshopper! Trying to ice warm cookies is just asking for a melty, sugary disaster.
Step 10: Icing on the Cake (or Cookie, Rather)
Once the cookies are completely cool (seriously, completely!), it’s time to unleash your inner artist. In a medium bowl, whisk together the powdered sugar, milk, and light corn syrup until smooth. Stir in the vanilla extract. Add food coloring a few drops at a time until you reach your desired shades.
Step 11: Decorate Like Nobody’s Watching (Except Maybe for Instagram)
Transfer the icing to piping bags or ziploc bags with a tiny corner snipped off. Decorate your cookies with swirls, dots, and whatever festive designs your heart desires. Don’t forget the sprinkles! They hide all icing imperfections, FYI.
Step 12: Let It Set
Allow the icing to set completely before stacking or storing the cookies. This usually takes about an hour or two.
Calorie Confessions & Nutritional Snippets

Okay, let’s talk numbers. Keep in mind these are estimates and will vary based on the size of your cookies and the amount of icing you use.
- Estimated Calories per Cookie (plain, no icing): Around 70-90 kcal
- Estimated Calories per Decorated Cookie (with icing): Around 120-150 kcal
- Key Nutritional Notes:
- Primarily carbohydrates and sugars.
- Contains fats from the butter.
- Minimal protein and fiber.
- Consider these a treat, not a health food. (Did you really think otherwise? 😉)
Uh Oh, Cookie Catastrophes: Common Mistakes to Dodge
So, you want to avoid a holiday baking meltdown? Here are a few classic blunders and how to sidestep them:
- Using Cold Butter: Your butter needs to be softened to properly cream with the sugar. Cold butter will just sit there in stubborn chunks. Not ideal.
- Overmixing the Dough: Resist the urge to beat the dough into oblivion after adding the flour. Overmixing = tough cookies = sad times. Mix until just combined.
- Not Chilling the Dough: Skipping the chilling step is a recipe for flat, spread-out cookies that lose their shape. Be patient!
- Rolling the Dough Too Thin or Too Thick: Aim for about ¼-inch thickness. Too thin and they’ll burn; too thick and they might not cook evenly.
- Overbaking: Nobody likes a dry, crunchy Christmas cookie. Keep a close eye on them and take them out when the edges are just starting to turn golden. They’ll continue to bake a bit on the hot pan.
- Icing Warm Cookies: We’ve been over this. Melty mess alert! Let them cool completely.
- Rushing the Icing Process: Give your icing time to set before you start stacking or packing the cookies. Smudged icing is a tragedy.
Remix Your Recipe: Fun Variations & Customizations

Feeling adventurous? Here are a few ways to jazz up your Christmas cookies:
- Chocolate Peppermint Twist: Add 2 tablespoons of unsweetened cocoa powder to the dry ingredients for chocolate cookies. After baking and cooling, dip them in melted white chocolate and sprinkle with crushed candy canes. Festive AF!
- Spiced Gingerbread Delights: Omit the vanilla extract and add 1 teaspoon of ground ginger, ½ teaspoon of ground cinnamon, ¼ teaspoon of ground cloves, and a pinch of nutmeg to the wet ingredients. You can also use molasses instead of some of the sugar for a more authentic gingerbread flavor.
- Citrus Sugar Cookies: Add the zest of one lemon or orange to the wet ingredients for a bright, zesty flavor. You can also add a bit of citrus juice to your icing for an extra zing.
Your Burning Cookie Questions Answered (FAQ Style!)
Why are my Christmas cookies hard?
Likely culprits include overmixing the dough or adding too much flour. Also, overbaking will definitely lead to hard cookies.
How do you keep Christmas cookies soft?
Don’t overbake them! Take them out when the edges are just lightly golden. Store them in an airtight container with a slice of bread; the bread will absorb excess moisture and keep the cookies softer.
Can I freeze Christmas cookie dough?
Absolutely! Wrap the dough tightly in plastic wrap, then place it in a freezer-safe bag or container. It will keep well for up to 3 months. Thaw it in the refrigerator overnight before rolling and baking.
How long do homemade Christmas cookies last?
Stored in an airtight container at room temperature, they’ll typically last for about 3-5 days. They might lose some of their crispness over time.
What’s the best flour to use for Christmas cookies?
All-purpose flour is generally the go-to for classic sugar cookies. It strikes a good balance between structure and tenderness.
Why do my sugar cookies spread so much?
This can happen if your butter was too warm, you didn’t chill the dough long enough, or your oven temperature is too low. Make sure your butter is softened but still cool, chill the dough thoroughly, and ensure your oven is at the correct temperature.
Can I make vegan Christmas cookies?
Yes! Substitute the butter with a good quality vegan butter stick and use a flax egg (1 tablespoon of ground flaxseed mixed with 3 tablespoons of water, let it sit for 5 minutes to thicken) for the eggs.
Final Cookie Crumbs of Wisdom
So there you have it! Your official, no-nonsense guide to making ridiculously delicious Christmas cookies that will impress your friends, delight your family, and maybe even make you feel a tiny bit like a holiday baking rockstar. Remember, perfection is overrated; it’s the fun (and the tasty results!) that truly matter. Now go forth, preheat that oven, and get ready to spread some holiday cheer, one cookie at a time. And hey, if they don’t look like they came straight off a magazine cover? Who cares? They’re homemade with love (and maybe a little bit of sarcasm). Happy baking! 🙂