How to Make Crostini: The World’s Fanciest Toast (It’s Deceptively Easy)
Picture this: you have guests coming over in an hour. Your house is… let’s call it “creatively messy,” and you’ve completely forgotten about snacks. Panic starts to set in. You frantically search your pantry, hoping for a miracle. And there it is, a slightly sad, day-old baguette. My friend, that isn’t a problem; that’s an opportunity. Today, you will learn how to make crostini, the unsung hero of appetizers, and transform that forgotten bread into something so elegant, your guests will think you’re a culinary genius.
Crostini, which literally translates to “little crusts” in Italian, is just a fancy way of saying “tiny toasts.” But these aren’t your average breakfast toast. Oh no. These are crisp, golden, olive oil-kissed vehicles for every delicious topping imaginable. Welcome to your new favorite party trick.
Why This Recipe is Your New Secret Weapon
So, why should you care about making fancy little toasts? Let me count the ways.
First, it’s practically foolproof. I am not exaggerating when I say this is one of the easiest recipes on the planet. If you can slice bread and turn on an oven without causing a major incident, you can make crostini. It’s the ultimate low-effort, high-reward kitchen hack.
Second, it’s endlessly versatile. Crostini is the blank canvas of the appetizer world. It’s a perfect base for literally anything. Sweet, savory, creamy, crunchy—if you can dream it, you can probably put it on a crostini. It’s also the best way to use up leftover bread, so you can feel both fancy and frugal. A true win-win.
Finally, it makes you look incredibly sophisticated. Seriously. Put a platter of beautifully topped crostini on a table, and people are instantly impressed. They don’t need to know it took you all of 15 minutes. Let them believe you slaved away for hours. I won’t tell if you don’t. 😉
The Extremely Short Ingredient List
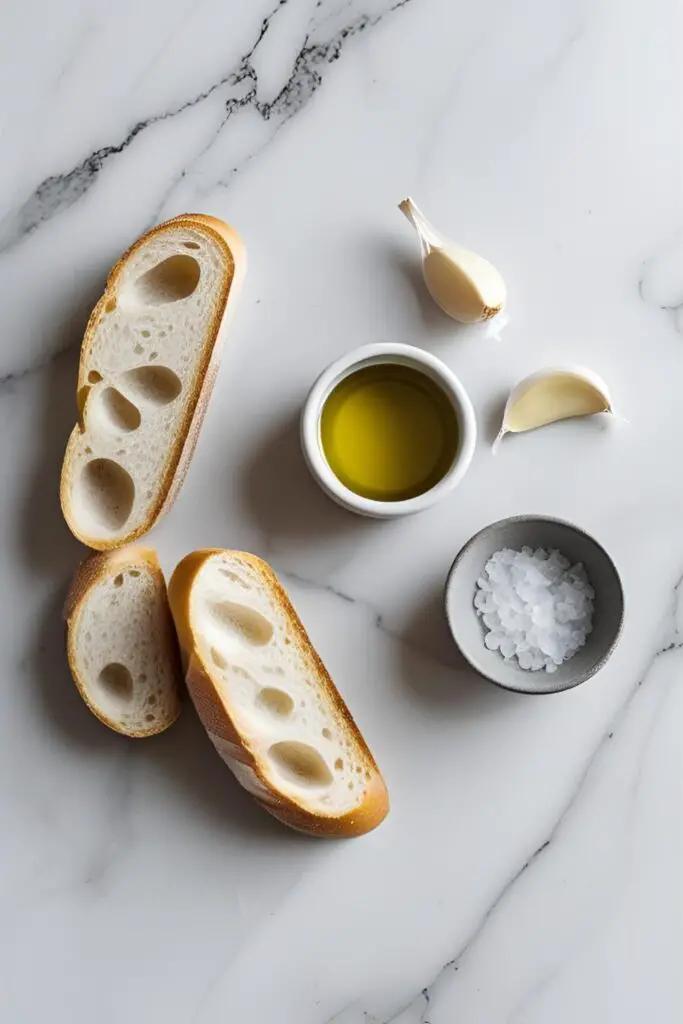

To create the perfect crostini base, you need a laughably small number of ingredients. It’s almost suspicious, isn’t it?
- A Baguette: This is your star player. A long, thin French baguette is ideal. And here’s the best part: day-old bread is actually better! It’s firmer and easier to slice thinly without squishing.
- Good Quality Extra Virgin Olive Oil: About ¼ cup. Don’t use the cheap stuff here. Since there are so few ingredients, the flavor of the oil really shines through.
- A Clove of Garlic: 1 large one, peeled and cut in half. This is the secret weapon. It’s optional, but is it really? No.
- Salt and Freshly Ground Black Pepper: To taste. Kosher salt or flaky sea salt works beautifully.
Your Arsenal of Tools & Gadgets
You don’t need any high-tech equipment for this mission. Just the basics.
- A Serrated Bread Knife: This is non-negotiable for getting clean, even slices without mangling your baguette.
- A Large Baking Sheet: To toast all your little creations to golden perfection.
- A Pastry Brush: For evenly applying that luscious olive oil. You can use a spoon to drizzle, but a brush gives you more control.
- A Cutting Board: To protect your countertops from your very sharp bread knife.
- Tongs: Helpful for flipping the crostini, though not strictly necessary.
Step-by-Step Instructions: The Path to Crispy Perfection
Ready for the most strenuous 15 minutes of your life? I’m kidding. This is easier than deciding what to watch on TV.
Step 1: Get the Oven Ready First things first, preheat your oven to 375°F (190°C). A hot oven is the key to getting that perfect, crisp texture. Don’t you dare put your bread in a cold oven.
Step 2: Slice and Dice (Well, Just Slice) Take your baguette and, using your serrated knife, slice it into ¼ to ½-inch thick rounds. If you want to get extra fancy and create more surface area for toppings, slice it on a slight diagonal (also known as “on the bias”). Try to keep the slices as uniform as possible so they toast evenly.
Step 3: Arrange for Success Lay your bread slices out in a single, even layer on the baking sheet. Don’t let them overlap! Give each little toast its own personal space. They need room to breathe and get crispy. Overcrowding leads to steaming, and steaming leads to soggy sadness.

Step 4: The Golden Touch Using your pastry brush, lightly coat one side of each bread slice with olive oil. You want a nice, even sheen, not a swimming pool of oil.
Step 5: Time to Toast! Pop the baking sheet into your preheated oven and bake for 6-8 minutes. The edges should be just starting to turn a beautiful light golden brown.
Step 6: Flip and Repeat Carefully take the baking sheet out of the oven. Flip each slice over and brush the other side with olive oil. Return the pan to the oven and bake for another 5-7 minutes, or until both sides are golden and crisp. Keep a close eye on them during this last stretch—they can go from perfectly toasted to tragically burnt in a flash.
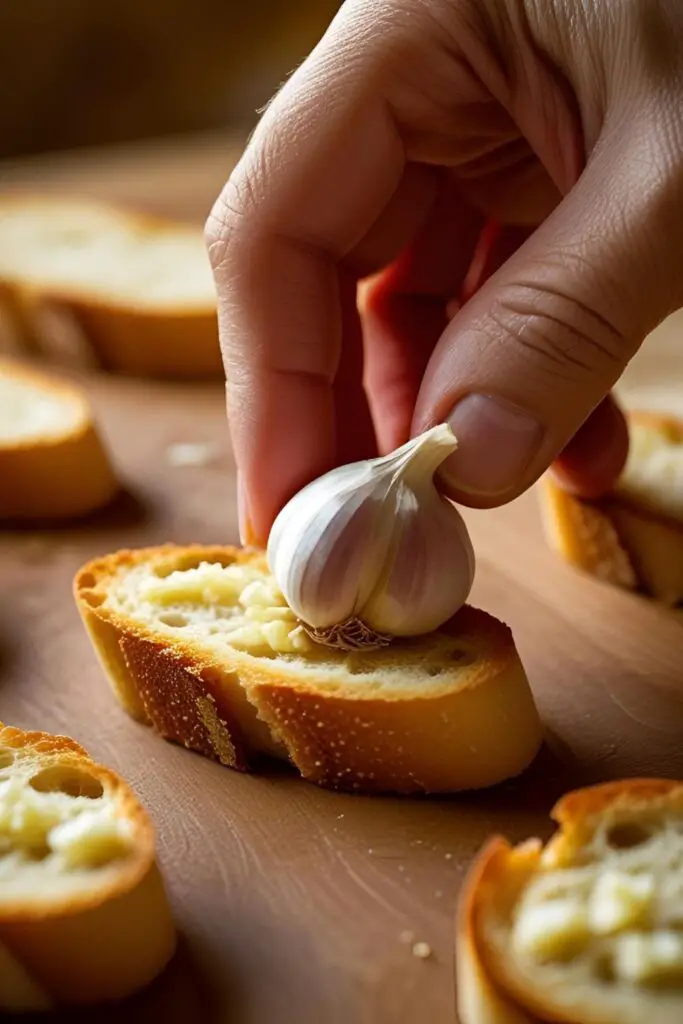
Step 7: The Magical Garlic Rub (The Most Important Step!) This is the pro move that takes your crostini from good to absolutely divine. As soon as you take them out of the oven, while they’re still warm, take your halved garlic clove and rub the cut side over the surface of each toast. The heat from the bread will melt the garlic just enough to release its incredible aroma and flavor, without being overpowering. It’s pure magic.
Step 8: Season and Serve Finish with a light sprinkle of salt and freshly ground black pepper. Your perfect crostini are now ready! You can serve them warm as is, or let them cool and pile them high with your favorite toppings.
Calories & Nutritional Info (The Fine Print)
Let’s talk numbers. This is for one plain crostini slice (without toppings), because let’s be honest, the toppings are a “choose your own adventure” of caloric destiny.
- Calories: ~35-50 kcal
- Fat: ~2-3g
- Carbohydrates: ~5-7g
- Protein: ~1g

FYI: These are just estimates. It’s basically a tiny piece of bread with a little heart-healthy olive oil. It’s the mountain of cheese you pile on top that you need to worry about. 😉
Common Mistakes to Avoid (Don’t Sabotage Your Toast!)
It’s hard to mess this up, but where there’s a will, there’s a way. Here’s how to avoid common crostini catastrophes.
- Using Fresh, Soft Bread: Fresh bread is lovely, but it will squish when you try to slice it thin. Day-old bread is your best friend. It’s firmer and will give you those perfect, crisp slices.
- Cutting the Slices Too Thick: If your slices are too thick, the inside will stay soft and bready while the outside gets toasted. Aim for that ¼ to ½-inch sweet spot for maximum crunch.
- Burning the Crostini: The line between “golden brown” and “sad, black hockey puck” is perilously thin. Watch them like a hawk, especially during the last few minutes of baking.
- Drowning Them in Oil: A light, even brushing of oil is all you need. Too much oil will make them greasy and heavy.
- Skipping the Garlic Rub: You can skip it, but why would you want to? It adds a subtle, savory depth that is just unbeatable. Don’t deny yourself this simple joy.
Variations & Customizations (The Fun Part!)
The crostini base is just the beginning. Now it’s time to decorate your tiny toasts!
- Classic Tomato & Basil Bruschetta Topping: This is a classic for a reason. In a bowl, combine finely diced ripe tomatoes, minced garlic, chopped fresh basil, a drizzle of olive oil, and a splash of balsamic glaze. Season with salt and pepper and spoon it onto your crostini just before serving.
- Whipped Goat Cheese with Fig Jam & Prosciutto: A sophisticated and addictive combo. Spread a layer of creamy goat cheese on each crostini, top with a small dollop of fig jam, and finish with a delicate piece of prosciutto. Sweet, savory, and salty perfection.
- Smoked Salmon & Dill Cream Cheese: For a brunch-worthy bite, mix some cream cheese with chopped fresh dill, a squeeze of lemon juice, and a little black pepper. Spread it on the crostini and top with a small piece of smoked salmon and a few capers.
FAQ Section (Answering Your Most Pressing Toast Questions)
What is the difference between crostini and bruschetta?
Generally, crostini (“little crusts”) are smaller, thinner slices of bread (like a baguette), always toasted. Bruschetta (“to roast over coals”) usually involves larger, thicker slices of rustic bread that are grilled and then typically rubbed with garlic and topped with olive oil and tomatoes. But honestly, the lines are often blurred.
Can I make crostini ahead of time?
Absolutely! You can make the plain, untopped crostini up to two days in advance. Let them cool completely and store them in an airtight container at room temperature. They might lose a tiny bit of crispness, but you can refresh them in a warm oven for a few minutes before serving.
How do I store leftovers?
Store leftover plain crostini in an airtight container for a couple of days. If they have toppings on them, TBH, they’re best eaten right away as they can get soggy.
Can I make crostini in an air fryer?
Yes! It’s super fast. Arrange the oiled slices in a single layer in your air fryer basket and cook at 350°F (175°C) for about 3-5 minutes, flipping halfway, until golden and crisp.
What’s the best way to keep my crostini from getting soggy after I add toppings?
The key is to add wet toppings right before you serve them. For really wet toppings like fresh tomatoes, you can also spread a thin layer of a “moisture barrier,” like soft cheese or a thick pesto, on the crostini first.
Why did my crostini turn out rock-hard instead of crispy?
You likely baked them for too long or at too low a temperature, which dried them out completely instead of just toasting them. They should be crisp and shatter when you bite them, but not so hard you’re worried about your dental work.
Can I use a different type of bread?
While a baguette is traditional, you can certainly experiment with other crusty breads like a ciabatta or a rustic Italian loaf. Just make sure you can slice it relatively thin.
Final Thoughts
Congratulations! You are now a master of the most elegant, versatile, and deceptively simple appetizer known to humanity. You’ve unlocked a kitchen superpower that will save you from countless “what do I serve?” emergencies.
So go forth and toast! Experiment with toppings, impress your friends, and never, ever settle for a boring, store-bought cracker again. You’re better than that now. You’re a crostini connoisseur. Welcome to the fancy toast club. 😎