How to Make Starbucks Cake Pops at Home (Without the Coffee Shop Price Tag)
Let’s talk about that moment of weakness in the Starbucks line. You know the one. You’re ordering your overly complicated latte, and then you see them, staring at you from their little glass case: the cake pops. They’re cute, they’re perfectly portioned, and they cost a small fortune. I’m here to tell you that you can have it all—the adorable cake on a stick and the money in your wallet. Today, you’ll learn how to make Starbucks cake pops that are so good, you might just start charging your family members for them.
I first ventured into the world of homemade cake pops for a friend’s baby shower. I figured, “how hard can it be?” Reader, it was a journey. But after a few trials (and a lot of taste-testing—it’s a tough job), I cracked the code. Now, you get to benefit from my sprinkle-covered wisdom.
Why This Recipe Will Be Your New Obsession
Still on the fence? Let me paint a picture for you.
First, the taste. These aren’t just balls of cake; they’re perfectly moist, fudgy bites of heaven, all wrapped up in a sweet candy shell. They taste exactly like the Starbucks birthday cake pop, but fresher. Because you made them, you genius.
Second, they’re way easier than they look. Sure, they look like they were crafted by tiny, magical baking elves, but the process is surprisingly simple. You’re basically taking a cake, destroying it (the fun part!), and then rebuilding it into something even better. It’s therapeutic, really.

Finally, the bragging rights are immense. Show up to any party, potluck, or Tuesday afternoon with a bouquet of these, and you will be a hero. People will ooh and aah, and you can just casually say, “Oh, these? I just whipped them up.” They don’t need to know your secret weapon is a box of cake mix.
The Not-So-Secret Ingredients
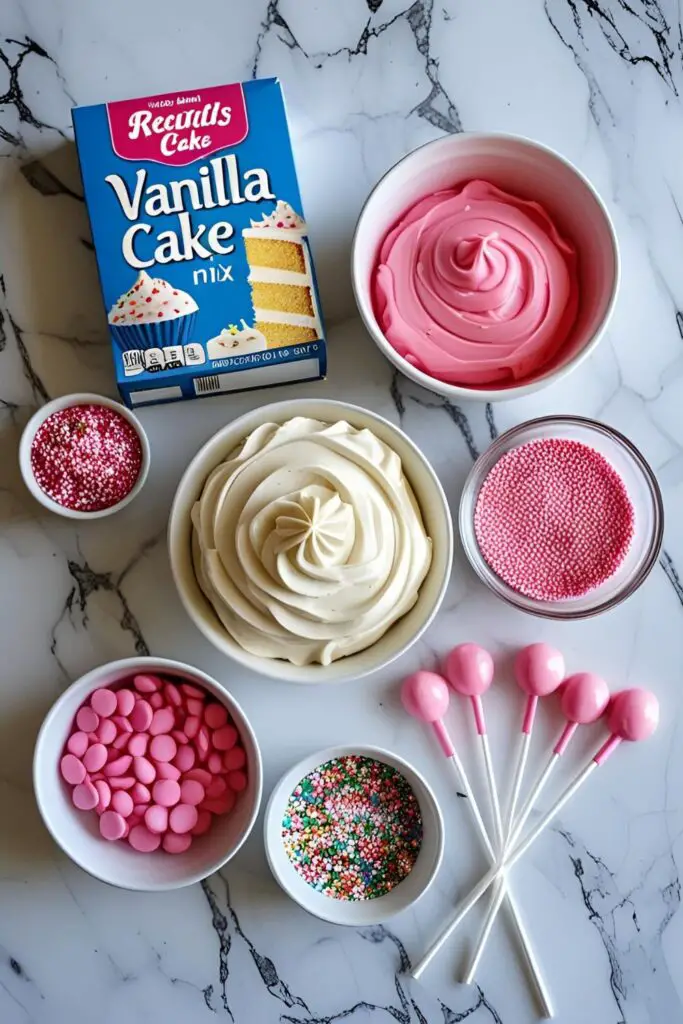
Here’s what you’ll need to assemble your army of delicious cake pops. It’s a surprisingly short list.
- Boxed Vanilla Cake Mix: One (15.25-ounce) box. Let’s not be heroes and bake from scratch. The consistency of a boxed cake is actually perfect for this. Plus, we’re lazy.
- Ingredients for the Cake: Whatever your cake mix calls for—usually eggs, oil, and water.
- Vanilla Frosting: One (16-ounce) can of creamy vanilla frosting. Again, store-bought is your best friend here. You’ll only use about half of it.
- Pink Candy Melts: A 12-ounce bag. This is what gives the cake pops their signature look and sweet, crunchy shell.
- White Sprinkles (Nonpareils): For that classic, festive look.
- Lollipop Sticks: About 40 six-inch sticks. You can find these at any craft or grocery store.
Key Substitutions
- Different Cake/Frosting Flavors: Go wild! Chocolate cake with chocolate frosting, red velvet with cream cheese frosting, funfetti with vanilla…the possibilities are endless.
- Different Candy Melts: Use any color you want! Match them to a party theme or your favorite color. White, blue, yellow—they all work the same.
The Arsenal: Tools & Gadgets
You don’t need a professional kitchen, but a few key tools will make your life a whole lot easier.
- 9×13 Inch Baking Pan: To bake your cake, obviously.
- Large Mixing Bowl: For the glorious cake-destruction phase.
- Hand Mixer or Stand Mixer: Not strictly necessary, but it makes mixing the frosting into the cake crumbs much easier.
- Cookie Scoop (1.5 tablespoon size): This is the secret to perfectly uniform cake pops. Trust me on this.
- Baking Sheet Lined with Wax Paper: You’ll need this for chilling the cake balls at various stages.
- Microwave-Safe Bowl or Candy Melting Pot: For melting your candy melts smoothly.
- Cake Pop Stand or a Block of Styrofoam: To hold your cake pops upright while they dry. If you don’t have one, a sturdy cardboard box with holes poked in it also works in a pinch.
Step-by-Step Instructions: Your Path to Cake Pop Glory
Ready to become a cake pop master? Let’s do this.
Step 1: Bake the Cake Prepare and bake the cake mix according to the package directions in a 9×13 inch pan. Let it cool completely. And I mean completely. A warm cake will turn into a greasy, mushy mess. Patience is a virtue, my friend.
Step 2: Destroy the Cake (The Fun Part!) Once the cake is cool, it’s time for some therapeutic destruction. Crumble the entire cake into a large mixing bowl. You can use your hands, a fork, or even your stand mixer with the paddle attachment. You want to get it down to fine crumbs with no large chunks.

Step 3: Make the Dough Add about 3/4 cup of the vanilla frosting to the cake crumbs. Mix it all together until it’s fully combined and has a thick, dough-like consistency. It should be moist enough to hold its shape when you squeeze it. If it’s too dry, add a tiny bit more frosting, one tablespoon at a time. Don’t overdo it! Too much frosting leads to oily, heavy cake pops.
Step 4: Scoop and Roll Using your cookie scoop, portion out the cake mixture and roll each portion between your hands to form a smooth, round ball. Place the cake balls on your wax paper-lined baking sheet. This recipe should make about 35-40 cake pops.
Step 5: The First Chill Place the baking sheet of cake balls in the refrigerator for at least 2 hours, or in the freezer for about 30 minutes. You want them to be firm, not frozen solid. This step is crucial for ensuring they don’t fall apart during the dipping process.
Step 6: Melt the Candy Coating When the cake balls are almost done chilling, melt your pink candy melts. You can do this in the microwave in 30-second intervals, stirring in between, until smooth. Or, use a candy melting pot if you’re fancy. The key is to not overheat the candy, or it will become thick and clumpy.
Step 7: The Dip and Stick Take your cake balls out of the fridge. Dip the tip of a lollipop stick about half an inch into the melted candy, then insert it into a cake ball, going about halfway through. The melted candy acts like glue. Do this for all your cake balls.
Step 8: The Second Chill (Almost There!) Pop the cake balls back into the refrigerator for another 15-20 minutes. This helps the “glue” set and ensures the cake pop is securely attached to the stick. Are you sensing a theme here? Chilling is your friend.

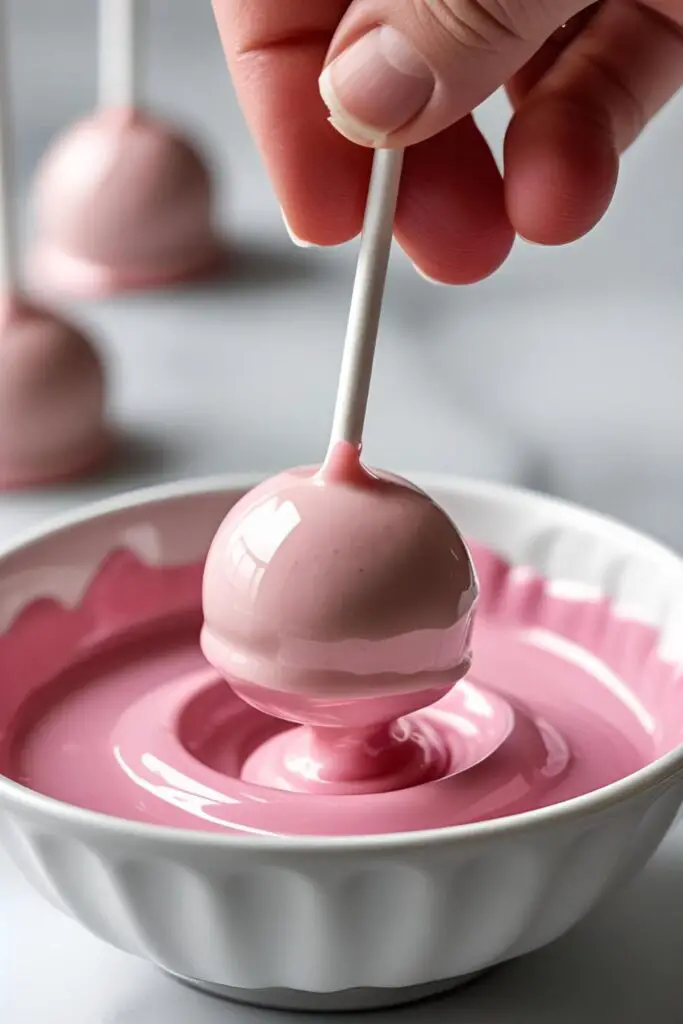
Step 9: The Final Dip and Decorate Now for the main event! Hold a cake pop by the stick and dip it straight down into the melted candy until it’s fully submerged. Do not stir it around. Pull it straight out and gently tap the stick on the side of the bowl to let the excess candy drip off.
Immediately, while the coating is still wet, add your white sprinkles. Place the finished cake pop in your stand to dry completely at room temperature. Do not put them in the fridge to dry, as condensation can make them sticky.
Calories & Nutritional Info (A Necessary Evil)
Let’s just say these are a “sometimes food.” But for those who like to know, here’s a rough estimate per cake pop.
- Calories: ~160-180 kcal
- Fat: ~9g
- Carbohydrates: ~20g
- Sugar: ~15g
- Protein: ~1g
FYI: This is an approximation. The final numbers depend on your specific cake mix, frosting, and candy melts. Also, who eats just one? 😉
Common Mistakes to Avoid (Learn From My Failures)
Making cake pops can be a humbling experience. Here are the most common pitfalls and how to sidestep them like a pro.
- The Oily Mess: If your cake balls are leaking oil, you added too much frosting. Start with less than you think you need and add more only if the mixture is too crumbly to hold its shape.
- The Cracking Shell: If your candy coating is cracking as it dries, your cake balls were too cold. Let them sit at room temperature for a few minutes before dipping if they’ve been in the freezer. The extreme temperature difference causes the shell to crack.
- The Plop of Sadness: Did your cake pop fall off the stick and into the candy melts? It’s a tragedy. This usually means you either didn’t use the candy “glue” on the stick, or the cake ball wasn’t firm enough. Don’t skip the chilling steps!
- The Lumpy Coating: If your candy melt coating is too thick, it means you either overheated it or it’s starting to cool and harden. You can stir in a tiny bit of coconut oil or vegetable shortening (about 1/2 teaspoon at a time) to thin it out.
Variations & Customizations (Unleash Your Inner Artist)
The birthday cake pop is a classic, but why stop there?
- Chocolate Lover’s Dream: Use a devil’s food cake mix, chocolate frosting, and dark chocolate candy melts. Top with chocolate sprinkles. It’s decadence on a stick.
- Lemon Delight: Use a lemon cake mix with lemon frosting. Dip in yellow or white candy melts and top with yellow sugar crystals for a zesty, refreshing treat.
- Red Velvet Elegance: A classic red velvet cake with cream cheese frosting, dipped in white candy melts. The color contrast is stunning, and it’s perfect for holidays or fancier occasions.
FAQ Section (Answering Your Burning Questions)
How long do homemade cake pops last?
They are best enjoyed within a few days. You can store them in an airtight container at room temperature for up to 3 days, or in the refrigerator for up to a week.
Can I make cake pops ahead of time?
Yes! You can make the cake balls and store them in the freezer for up to a month before dipping. Just let them thaw in the refrigerator before you proceed with the dipping steps.
Why won’t my cake balls stick together?
You probably need a little more frosting. Add it one tablespoon at a time until the mixture has the consistency of play-doh.
Do I have to use candy melts?
Candy melts are highly recommended because they are designed to set up hard and smooth. You can use melted chocolate chips, but you’ll need to add a bit of coconut oil to thin it for dipping, and it may not set as firmly.
Can I use a homemade cake recipe?
You can, but a denser cake, like a pound cake, works better than a light, airy one. Boxed cake mix is often preferred because its structure is perfect for crumbling and binding.
How do I get the candy coating perfectly smooth?
The key is to dip, not stir. Dip the pop straight in and pull it straight out. Then, gently tap and rotate the pop to let the excess drip off evenly. Working with candy melts that are the right consistency is also crucial.
My cake pops are lopsided! What happened?
Make sure you are rolling them into perfectly round, smooth balls. Also, when you insert the stick, make sure it goes in straight and doesn’t poke out the other side.
Final Thoughts
You did it! You’ve officially demystified the Starbucks cake pop. You’re now a certified creator of adorable, delicious treats. So go forth and bake! Impress your friends, delight your family, or just make a batch for yourself. You deserve it.
And the next time you’re standing in that Starbucks line, you can smile smugly, knowing you have a whole army of better, cheaper cake pops waiting for you at home. You’ve won.