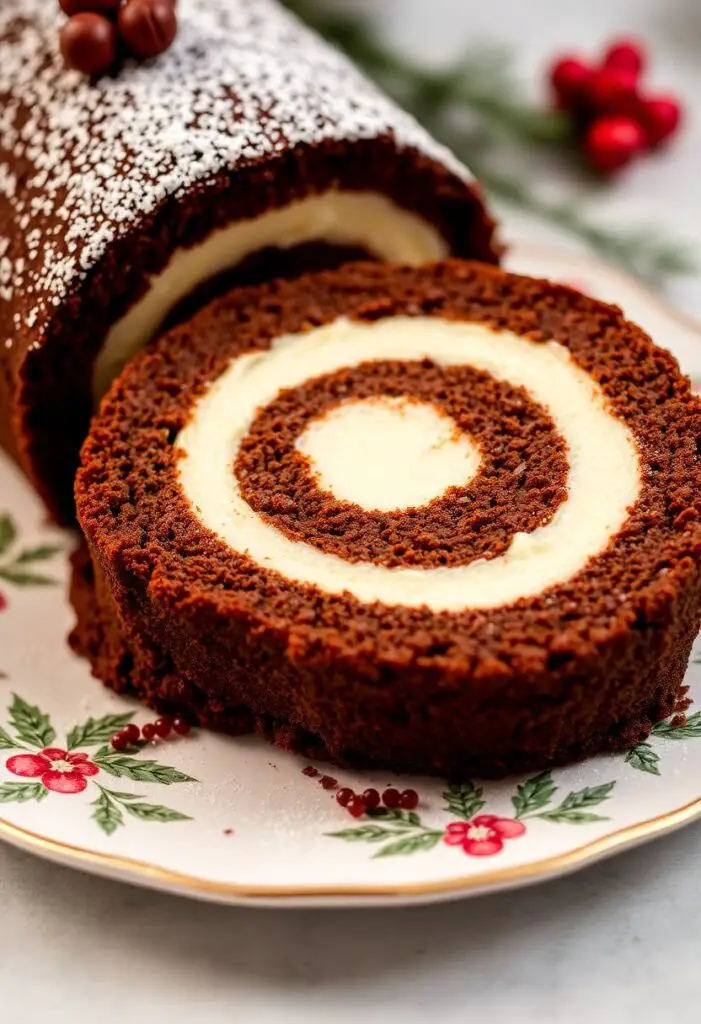
Roll Out the Cheer: Your Guide to a Showstopping Yule Log Cake (Bûche de Noël)
Okay, let’s be real. The holidays are great and all, but sometimes you just want to curl up with something warm and comforting that also looks like you’ve put in way more effort than you actually have. Enter the yule log cake, or Bûche de Noël if you’re feeling fancy. This rolled chocolate sponge cake, frosted and decorated to look like a festive log, is the edible equivalent of a crackling fireplace. Have you ever seen anything quite so charmingly rustic? And the best part? It’s not nearly as intimidating as it looks. Trust me, if I can pull this off without a culinary degree (or even a particularly clean kitchen most of the time), so can you.
Why This Yule Log Will Be the Star of Your Holiday Table
So, why should you wrestle with a rolled cake during the busiest time of the year? Well, for starters, it’s a total showstopper. Imagine presenting this beautifully decorated log at your holiday gathering. Instant oohs and aahs, guaranteed. Plus, it tastes incredible – a rich, moist chocolate cake swirled with a luscious filling and covered in a creamy chocolate frosting. What’s not to love?
Beyond the wow factor, it’s also surprisingly forgiving. See a crack in your “log”? Perfect! It adds to the rustic charm. Frosting a bit lumpy? Even better! It looks like real bark. This isn’t about perfection; it’s about embracing the cozy, homemade vibe of the season. And let’s be honest, who has time for perfection when there are presents to wrap and carols to butcher?
Gathering Your Festive Forest (The Ingredients)
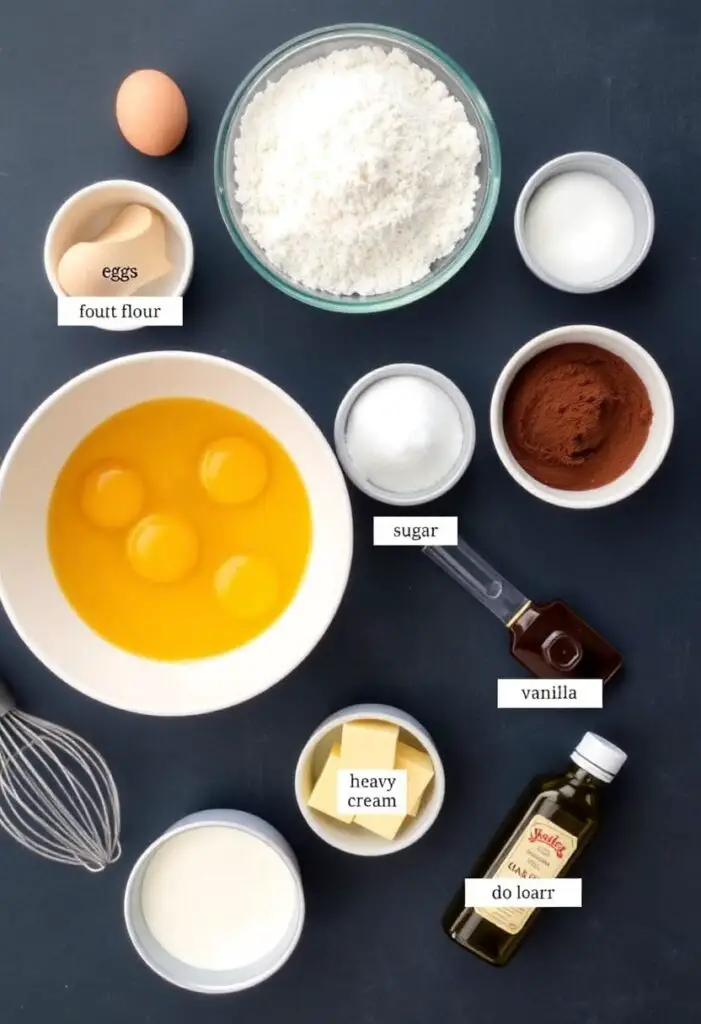
Time to raid your pantry and assemble the ingredients for our delightful log.
For the Chocolate Sponge Cake:
- Large Eggs (4 of them): Separated. We’re going for light and airy here.
- Granulated Sugar (⅔ cup): For sweetness and structure.
- All-Purpose Flour (⅔ cup): The base of our log.
- Unsweetened Cocoa Powder (¼ cup): Hello, chocolatey goodness!
- Baking Powder (½ teaspoon): For a little lift.
- Salt (¼ teaspoon): Enhances the chocolate flavor.
- Warm Water (¼ cup): Keeps things moist.
- Vanilla Extract (1 teaspoon): A touch of warmth.
For the Creamy Filling (The “Sawdust”? Nah, It’s Delicious):
- Heavy Cream (1 ½ cups): Needs to be cold for proper whipping.
- Powdered Sugar (2 tablespoons): For a touch of sweetness in the cream.
- Vanilla Extract (½ teaspoon): More cozy flavor.
For the Chocolate Bark Frosting (The Grand Finale):
- Unsalted Butter (1 cup / 2 sticks): Softened, please!
- Powdered Sugar (3 cups): Sweet and essential for the right consistency.
- Unsweetened Cocoa Powder (¾ cup): Double the chocolate? Don’t mind if I do.
- Milk (¼ cup): To bring it all together.
- Vanilla Extract (1 teaspoon): The final touch of flavor.
For Decoration (Making It Look Like a Real Log):
- Powdered Sugar: For a dusting of “snow.”
- Optional: Chocolate shavings, meringue mushrooms, fresh cranberries, rosemary sprigs – get creative!
Your Lumberjack Toolkit (Tools & Kitchen Gadgets Used)
You won’t need a chainsaw, thankfully. Just a few standard kitchen items.
- Large Mixing Bowls (3): For the eggs, dry ingredients, and frosting.
- Electric Mixer (Hand or Stand): Essential for whipping eggs and making frosting.
- Rubber Spatula: For folding and scraping.
- Sifter or Fine-Mesh Strainer: To ensure smooth, lump-free dry ingredients.
- Baking Sheets (2): We’ll bake the cake in a thin layer.
- Parchment Paper: The secret to easy rolling!
- Clean Kitchen Towel: Dampened, for rolling the warm cake.
- Offset Spatula or Butter Knife: For frosting.
- Piping Bag and Tips (optional): For fancy frosting details.
Let’s Get Rolling (Step-by-Step Instructions)

Time to channel your inner baker and create this festive masterpiece.
Step 1: Prep Your “Forest Floor”
Preheat your oven to 350°F (175°C). Grease a 10×15 inch jelly roll pan (a baking sheet with a rim) and line it with parchment paper, letting a couple of inches overhang on the long sides. This overhang will be your best friend when it’s time to unroll.
Step 2: Whip It Good (The Egg Magic)
In one large bowl, whisk together the flour, cocoa powder, baking powder, and salt. Set aside. In another large bowl, beat the egg yolks with half of the granulated sugar until pale and thick. Stir in the warm water and vanilla extract.
Step 3: Peak Performance (The Egg Whites)
In a clean, grease-free bowl, beat the egg whites with an electric mixer until soft peaks form. Gradually add the remaining granulated sugar, beating until stiff, glossy peaks form. Be careful not to overbeat – you want them firm but not dry.
Step 4: The Gentle Fold (Combining the Elements)
Gently fold the dry ingredients into the yolk mixture until just combined. Then, carefully fold in the whipped egg whites in two additions, being mindful not to deflate them. This is how we get a light and airy sponge.
Step 5: Spread the “Bark” Thin
Pour the batter into your prepared pan and spread it evenly to the edges.
Step 6: Bake Your “Wood”

Bake for 12-15 minutes, or until the cake springs back lightly when touched. Don’t overbake, or it will be difficult to roll without cracking.
Step 7: The Crucial Roll (While It’s Hot!)
Immediately after removing the cake from the oven, loosen the edges with a knife. Dust the top of the cake generously with powdered sugar. Place a clean, dampened kitchen towel over the cake. Invert the pan onto the towel, then carefully peel off the parchment paper. Starting from one of the short ends, roll the cake up tightly in the towel. Let it cool completely in this rolled position. This “trains” the cake to stay rolled.
Step 8: Whip Up the “Creamy Center”
While the cake cools, in a chilled bowl, beat the cold heavy cream with the powdered sugar and vanilla extract until stiff peaks form. Don’t over-whip, or you’ll end up with butter (unless that’s your secret plan!).
Step 9: Unroll and Fill
Once the cake is completely cool, gently unroll it. Spread the whipped cream evenly over the surface of the cake, leaving about an inch border at the far edge to prevent the filling from squeezing out when you re-roll.
Step 10: The Re-Roll (A Tighter Embrace)
Carefully re-roll the cake tightly, this time without the towel. Place it seam-down on a serving platter.
Step 11: Frost Like a Boss (The Chocolate Bark)
In a large bowl, beat the softened butter until creamy. Gradually beat in the powdered sugar and cocoa powder until well combined. Add the milk and vanilla extract and beat until light and fluffy. If it’s too thick, add a tiny bit more milk; if it’s too thin, add a little more powdered sugar.
Step 12: Decorate Your Log

Spread the chocolate frosting all over the rolled cake, creating a rustic “bark” effect with swirls and lines using your offset spatula or a fork. To make it look even more like a log, cut a small, angled slice off one or both ends and attach them to the sides of the log with frosting to resemble branches. Frost these “branches” as well.
Step 13: The Final Flourish
Dust generously with powdered sugar for a snowy look. Decorate with your optional elements like chocolate shavings (“wood chips”), meringue mushrooms, cranberries, and rosemary sprigs (“pine needles”).
Calories & Nutritional Info (A Festive Indulgence)
Let’s be honest, this is a holiday treat. It’s meant to be enjoyed, not analyzed under a microscope.
- Serving Size: One slice (about 1/10th of the log).
- Estimated Calories: 450-550 kcal per serving (depending on frosting thickness and decorations).
- Key Components: Chocolate, sugar, butter, cream – all the good stuff!
- Word to the Wise: Maybe balance this out with some extra veggies during your holiday meals? Just a thought.
Common Mistakes to Avoid (Don’t Let Your Log Crack Under Pressure)
Rolling a cake can be a bit nerve-wracking, but these tips will help you avoid disaster.
- Overbaking the Cake: A dry cake will crack when you try to roll it. Bake just until it springs back to the touch. Err on the side of slightly underbaked rather than overbaked.
- Not Rolling While Warm: The cake is most pliable when it’s fresh out of the oven. Rolling it while warm “trains” it to stay in that shape. If you wait until it’s completely cool, it’s much more likely to crack.
- Skipping the Powdered Sugar on the Towel: This prevents the cake from sticking to the damp towel. Trust me, you don’t want to peel bits of towel off your precious cake.
- Being Too Rough When Rolling: Gentle but firm pressure is key. Don’t Hulk out on that cake!
- Not Cooling Completely Before Filling: If you fill a warm cake, the whipped cream will melt into a sad, soupy mess. Patience, my friend, patience.
- Over-whipping the Cream or Frosting: Both should be stiff but still smooth and spreadable. Over-whipping can make them grainy or dry.
Variations & Customizations (Spruce Up Your Log!)
Want to put your own spin on this classic? Here are a few ideas.
- Coffee Flavored Yule Log: Add a tablespoon of instant coffee granules dissolved in the warm water for a mocha sponge. You can also add a shot of espresso to your frosting.
- Chestnut Cream Filling: Swap the whipped cream filling for a sweetened chestnut cream for a more traditional French flavor.
- Dairy-Free Yule Log: Use a dairy-free chocolate cake recipe and a dairy-free whipped topping or frosting alternative. Look for vegan butter and cream cheese alternatives for the frosting.
FAQ Section: Your Yule Log Queries Answered
Let’s tackle some of those burning yule log questions.
1. Why is it called a yule log?
The yule log cake tradition is inspired by the ancient practice of burning a large log in the fireplace during the winter solstice to bring warmth and ward off evil spirits. The cake evolved as an edible representation of this tradition.
2. Can I make the cake ahead of time?
Yes! You can bake the sponge cake a day in advance. Let it cool completely, wrap it tightly in plastic wrap, and store it at room temperature. Prepare the filling and frosting closer to serving time.
3. How do I prevent the cake from cracking when rolling?
The key is to roll it while it’s still warm, using a damp towel dusted with powdered sugar. Don’t overbake the cake, and be gentle but firm when rolling.
4. Do I need a special jelly roll pan?
While a jelly roll pan is ideal, you can use a regular baking sheet with a rim of approximately the same size (10×15 inches).
5. Can I freeze a yule log cake?
Yes, you can freeze a frosted yule log. Wrap it tightly in a double layer of plastic wrap and then in aluminum foil. Freeze for up to 3 months. Thaw it overnight in the refrigerator.
6. What are meringue mushrooms made of?
Meringue mushrooms are made from a mixture of egg whites and sugar that is piped into mushroom shapes and baked until crisp. They are a classic decoration for yule log cakes.
7. My frosting is too thick/thin. How do I fix it?
If your frosting is too thick, add a teaspoon of milk or other liquid at a time until you reach the desired consistency. If it’s too thin, add a tablespoon of powdered sugar at a time, beating well after each addition.
Final Thoughts
There you have it! Your very own edible yule log, ready to bring festive cheer (and deliciousness) to your holiday table. It might take a little practice to get the perfect roll, but even a few cracks just add to the rustic charm, right? Now go forth, bake your little heart out, and impress everyone with your surprisingly achievable yule log masterpiece. And hey, if it doesn’t look perfect the first time, just tell everyone it’s meant to represent a particularly rough and weathered log. They’ll never know the difference 😉