How to Make Cake Pops That Don’t Fall Apart (A Real Talk Guide)
They look so innocent, don’t they? Adorable little spheres of cake, perfectly coated in a glossy candy shell, perched atop a stick. They are the darlings of bake sales and birthday parties everywhere. But let me tell you a secret: they are tiny agents of chaos, sent to test your patience and break your spirit. It’s Friday afternoon here in Khulna, the perfect time to start a weekend project that seems fun but can quickly descend into madness. But fear not! I am here to be your spirit guide on this journey. This is your definitive, no-nonsense tutorial on how to make a cake pop that actually stays on the stick and doesn’t end up as a sad puddle of crumbs and regret.
Why This Recipe Is Worth the (Potential) Mess
So, why would you voluntarily enter this world of cake crumbling and candy dipping? Because when they work, they are utterly and completely magical. You are essentially taking a cake, concentrating its essence into a fudgy, truffle-like ball, and then wrapping it in a sweet candy shell. The texture is a dream, and the flavor is pure, concentrated cakey goodness. They are the perfect, portion-controlled party food. No plates, no forks, just pure, unadulterated deliciousness on a stick. They are also endlessly customizable for any theme, color scheme, or holiday. Plus, successfully creating a batch of beautiful cake pops is a next-level baking flex that will earn you the undying admiration of your friends and family.
The Cast of Characters for Your Cake Pop Saga
The beauty of the classic cake pop is that it starts with the simplest of ingredients.
- A Baked 9×13 inch Cake (1): This is the perfect time to use a box cake mix. Seriously. It’s consistent, moist, and you’re about to destroy it anyway, so no need to get overly sentimental with a fancy from-scratch recipe. Any flavor works—chocolate, vanilla, red velvet, you name it. It must be completely cooled.
- Frosting (about ½ to ¾ cup): Canned frosting is your best friend here. It has the perfect consistency to act as our delicious “glue.” The flavor should complement your cake (e.g., chocolate frosting with chocolate cake).
- Candy Melts / Wafers (one 12 oz bag): These are specifically designed for melting and dipping. They set up hard and smooth and are much more forgiving for beginners than trying to temper real chocolate.
- Vegetable Shortening or Coconut Oil (1-2 teaspoons, optional): Your secret weapon for thinning the candy melts to the perfect dipping consistency.
Your Cake Pop Survival Kit (Tools & Kitchen Gadgets)
Having the right gear is crucial for avoiding a sticky, frustrating disaster.
- A Large Mixing Bowl: The arena where your cake will meet its glorious, crumbled fate.
- Lollipop Sticks: About 4-6 inches long. These are essential for turning your cake balls into cake pops.
- A Baking Sheet lined with Parchment Paper: For chilling your cake balls and finished pops.
- A Cookie Scoop (1.5 tablespoon size): The key to making perfectly uniform, evenly-sized cake balls.
- A Tall, Narrow, Microwave-Safe Mug or Bowl: The perfect vessel for melting your candy melts. A narrow shape makes for easier, deeper dipping.
- A Styrofoam Block or Cake Pop Stand: This is non-negotiable. You need somewhere for your dipped cake pops to dry upright without smudging.
Step-by-Step to Cake Pop Victory
Read these steps carefully. Your success depends on it. No pressure.
Step 1: The Great Destruction
Once your 9×13 cake is completely cool, it’s time for the most therapeutic part. Crumble the entire cake into your large mixing bowl. You can use your hands, a fork, or even a stand mixer. Your goal is to get it into fine, uniform crumbs with no large chunks. Yes, you are intentionally destroying a cake. It feels wrong, but it’s so right.
Step 2: Create the “Dough”

Add about ½ cup of frosting to your cake crumbs. Using your hands (it’s the best way, just embrace the mess), mix the frosting into the crumbs until it comes together into a thick, workable dough, similar to the consistency of play-doh. If it’s still too crumbly, add more frosting, one tablespoon at a time. Be careful not to add too much!
Step 3: Roll ‘Em Up
Use your cookie scoop to portion out the cake dough. Roll each portion firmly between your palms to create smooth, round balls. Place the finished cake balls on your parchment-lined baking sheet.
Step 4: The First Chill
Place the baking sheet of cake balls into the refrigerator for at least 30 minutes, or the freezer for about 15 minutes. They need to be firm, but not frozen solid.
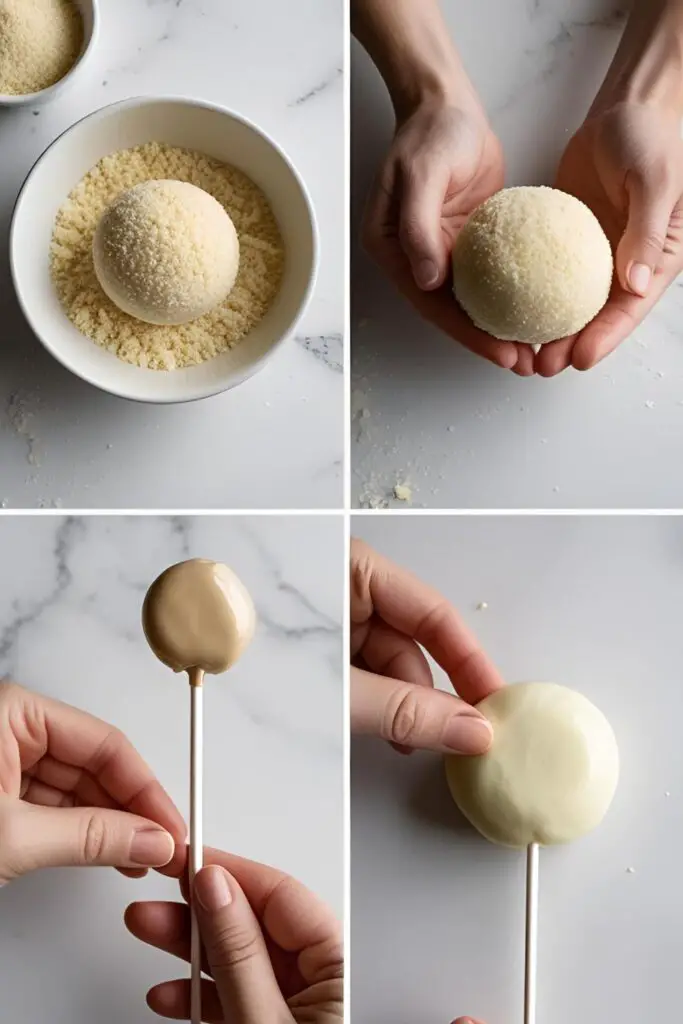
Step 5: The All-Important Anchor Dip
Melt about ¼ cup of your candy melts in the microwave. Take a lollipop stick and dip the tip about ½ inch into the melted candy. Immediately insert this candy-coated tip about halfway into one of your chilled cake balls. This acts as superglue. Repeat this for all your cake balls and place the baking sheet back in the fridge for another 10 minutes to set the “glue.” DO NOT SKIP THIS STEP.
Step 6: The Final Dip
Melt the rest of your candy melts in your tall, narrow mug, stirring until smooth. If the coating is too thick, stir in 1 teaspoon of shortening or coconut oil. Take a chilled cake pop and, holding it by the stick, dip it straight down into the melted candy until the entire cake ball is submerged. Do not stir it around. Lift it straight up and gently tap the stick on the side of the mug to allow the excess coating to drip off.
Step 7: Decorate and Dry
If you’re adding sprinkles, do it now while the coating is still wet. Immediately place the finished cake pop upright in your styrofoam block or cake pop stand to dry completely. Do not lay them down!
Calories & Nutritional Info (A Sweet Little Bite)


It’s a dense, fudgy ball of cake and frosting dipped in a candy shell. Let’s be real about what it is.
- Serving Size: 1 cake pop
- Calories: Approximately 150-250 kcal, depending on the size and ingredients.
- Key Feature: It’s small, so it’s a perfect little treat.
- The Truth: You’re probably going to eat three. That’s okay. It’s Friday.
Common Mistakes to Avoid (Cake Pop Catastrophes)
This is the real talk section. Here’s how to avoid weeping over a fallen cake pop.
- The Dreaded Plop: This is when your cake ball falls off the stick and into the molten candy abyss. It’s caused by either skipping the crucial anchor dip step or by making your cake balls too heavy or too soft (too much frosting).
- A Cracked Candy Shell: This usually happens when you dip a very cold (frozen) cake ball into warm candy melts. The drastic temperature change causes the shell to crack as it sets. Your cake balls should be chilled, not frozen solid.
- A Gloopy, Thick Coating: If your candy melts are too thick, you’ll get a lumpy, uneven coating. Thin your melted candy with a small amount of vegetable shortening or coconut oil until it flows smoothly off a spoon.
- A Greasy, Oily Cake Ball: This is the result of adding too much frosting. You want just enough to bind the crumbs into a workable dough, not a greasy mush. Start with less and add more only if you need it.
Variations & Customizations (Get Creative with Your Pops)
The basic formula is a blank canvas for your creativity.
- Red Velvet & Cream Cheese: Use a red velvet cake mix and cream cheese frosting for the filling. Dip in white candy melts for a classic, stunning look.
- Birthday Funfetti: Use a vanilla or funfetti cake mix. You can even mix some extra rainbow sprinkles into the cake ball dough. Dip in a colorful candy melt and, you guessed it, add more sprinkles.
- Salted Caramel Mocha: Use a chocolate cake, mix with a salted caramel frosting, and add 1 teaspoon of instant espresso powder to the cake crumb mixture. Dip in dark chocolate candy melts and finish with a tiny sprinkle of coarse sea salt.
FAQ: Your Cake Pop Conundrums, Solved
Let’s answer the questions that are probably swirling in your head right now.
1. Why did my cake pops fall off the stick into the candy melts?
You most likely skipped the “anchor dip” (dipping the stick in candy before inserting it) or your cake balls were too warm and soft. Chilling is key!
2. Can I use real chocolate instead of candy melts?
You can, but it’s much trickier for beginners. Real chocolate needs to be “tempered” to set up properly with a nice snap and sheen at room temperature. Candy melts are designed to be easy—just melt and dip.
3. How do I get a perfectly smooth coating?

The secret is to have your candy melts thinned to the right consistency (like wet paint) and to tap off all the excess coating after dipping. Don’t scrape it on the side of the mug.
4. How far in advance can I make cake pops?
You can make the cake balls and store them in the fridge for up to 2 days before dipping. Once dipped, they will last in an airtight container at room temperature or in the fridge for up to a week.
5. My candy coating is cracking! What did I do wrong?
Your cake balls were too cold. The temperature shock between the frozen-solid ball and the warm candy causes cracks. They should be chilled and firm, but not rock-hard frozen.
6. How do I store finished cake pops?
You can store them standing up in their styrofoam block, covered loosely with plastic wrap, or lay them down in an airtight container once they are completely dry.
7. What if I don’t have a styrofoam block?
You can use a cardboard box with small holes poked in the top, or a colander with large enough holes to hold the sticks. Get creative!
Final Thoughts
You are now armed with the truth about cake pops. You know their secrets, their weaknesses, and their potential for greatness. You are ready to face the challenge and emerge victorious with a beautiful, delicious, and structurally sound army of cake on a stick.
Go forth and create! Embrace the potential for a little mess, and enjoy the process of turning a simple cake into these adorable, bite-sized treats. Just be warned, once you master this, you will be the designated cake pop person for every party, bake sale, and baby shower for the rest of your life. It’s a sweet burden to bear.