How to Make Pav Bhaji That’ll Ruin Takeout For You Forever
It’s late Friday afternoon here in Khulna. You’re thinking about dinner, and the siren song of boring takeout is calling your name. But what if you could make something a thousand times more satisfying? What if you could recreate the magic of a bustling Mumbai street food stall—the sizzle of the giant tawa, the intoxicating aroma of spices and butter—right in your own kitchen? My friend, it’s time you learned how to make pav bhaji. This isn’t just a recipe; it’s a flavor-packed, veggie-loaded masterpiece that will become your new go-to for comfort food. Say goodbye to mediocre Fridays and hello to your new favorite meal.
Why This Recipe Is an Absolute Game-Changer
Pav bhaji is, without exaggeration, one of the greatest dishes ever invented. Why? First, it’s a flavor explosion. It’s a masterful blend of spiced, buttery, mashed vegetables that’s savory, slightly tangy, and deeply satisfying in a way that few other dishes are. Second, it’s a veggie Trojan horse. You’re eating a mountain of potatoes, cauliflower, carrots, and peas, but they’re mashed into a delicious, spicy gravy, so it feels like the most decadent indulgence. It’s the perfect way to trick your kids (or yourself) into eating more vegetables.
This is the ultimate comfort food, served with soft, pillowy bread rolls (pav) that are toasted in an obscene amount of butter. It’s a fun, interactive, and crowd-pleasing meal that’s perfect for a party, a family dinner, or just a random Tuesday when you need your soul soothed.
The Cast of Characters for Your Bhaji Masterpiece
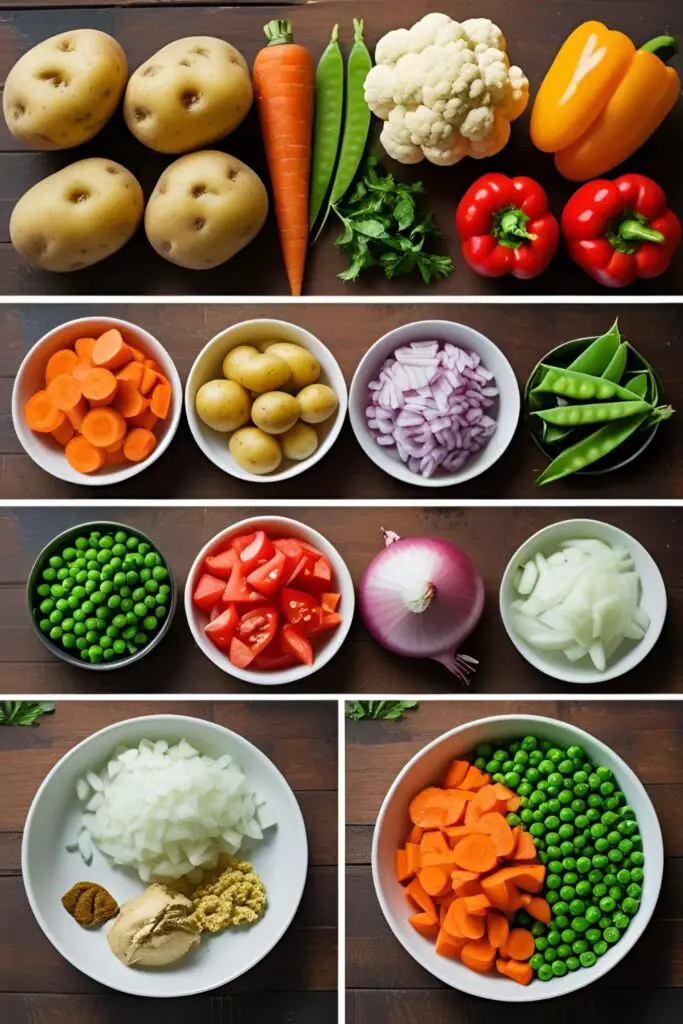
The beauty of pav bhaji is that it uses simple, humble ingredients to create something extraordinary.
For the Bhaji (The Veggie Mash):
- Potatoes (3 medium): Peeled and cubed. They form the creamy base.
- Cauliflower (½ a medium head): Chopped into florets.
- Carrots (2 medium): Peeled and chopped. Adds a touch of sweetness.
- Green Peas (½ cup): Frozen or fresh both work perfectly.
- Onion (1 large): Finely chopped.
- Green Bell Pepper / Capsicum (1 medium): Finely chopped.
- Tomatoes (3 large): Finely chopped or puréed.
- Ginger-Garlic Paste (2 tablespoons): A cornerstone of flavor.
- Butter & Oil: A glorious combination of both. We’re talking at least 4-5 tablespoons of butter here, plus a little oil.
- Pav Bhaji Masala (2-3 tablespoons): This is the non-negotiable, secret weapon. You must use a specific “Pav Bhaji Masala” blend.
- Kashmiri Red Chili Powder (1-2 teaspoons): Mostly for that beautiful, vibrant red color without too much heat.
- Turmeric Powder (½ teaspoon): For color and its earthy flavor.
For the Pav (The Buttery Bread) & Garnish:
- Pav Buns or Soft Dinner Rolls (8-10): The classic vehicle for the bhaji.
- More Butter: Yes, more. For toasting the pav.
- Toppings: Finely chopped red onion, fresh cilantro (coriander leaves), and wedges of lemon or lime for squeezing.
Your Street Food Stall Toolkit (Tools & Kitchen Gadgets)
You don’t need a giant street-side tawa, but a few key tools will make this much easier.
- A Pressure Cooker: The fastest and easiest way to get your vegetables perfectly soft and mashable. A large pot will also work; it just takes longer.
- A Large, Heavy-Bottomed Pan or Skillet: You need a wide surface for sautéing the base and for the all-important mashing.
- A Sturdy Potato Masher: This is your primary weapon. Choose your masher wisely.
- A Good Knife and Cutting Board: For all that chopping.
- A Separate Skillet or Tawa: For toasting those buttery pav buns to perfection.
Step-by-Step to Pav Bhaji Perfection
Let’s break down the process. It’s all about building layers of flavor.
Step 1: The Vegetable Takedown

Place your chopped potatoes, cauliflower, carrots, and green peas into your pressure cooker. Add just enough water to cover them (about 2 cups), a pinch of salt, and cook for 3-4 whistles (or about 10-15 minutes). If you’re using a pot, just boil them until they are all extremely soft and easily pierced with a fork.
Step 2: Build Your Flavor Base
In your large, wide pan, heat about 2 tablespoons of butter and 1 tablespoon of oil over medium heat. Add the finely chopped onions and sauté until they are soft and translucent. Add the chopped bell pepper and cook for another few minutes. Now, add the ginger-garlic paste and cook for a minute until the raw smell is gone.
Step 3: Tomates and Spices
Add the chopped tomatoes to the pan, along with a little salt to help them break down. Cook until the tomatoes are completely soft and mushy and the oil starts to separate from the mixture. Now, add your holy trinity of spices: the turmeric powder, Kashmiri red chili powder, and the pav bhaji masala. Stir and cook for one minute until fragrant.
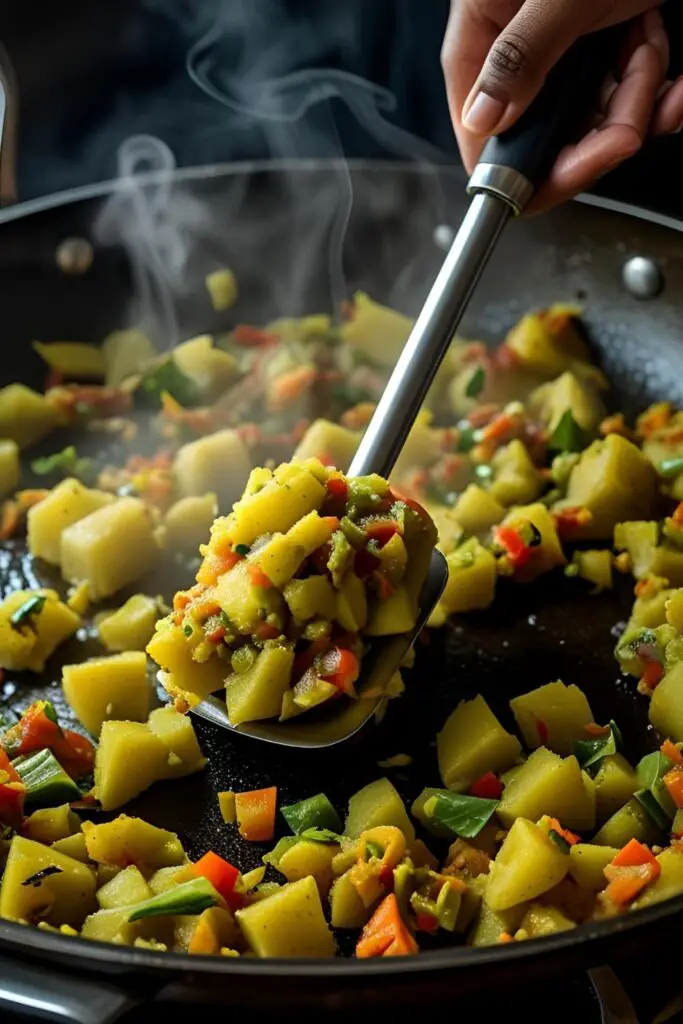
Step 4: The Great Mash-Up
Drain your cooked vegetables, but reserve the cooking water! Add the soft, cooked veggies to the pan with the tomato-onion base. Now, the fun part. Grab your potato masher and begin to mash everything together with glorious, controlled violence. Mash, stir, and mash again until you reach your desired consistency. Add some of the reserved vegetable water as you go to keep it from getting too thick.
Step 5: Simmer and Finish
Let your bhaji simmer on low heat for 10-15 minutes for the flavors to meld together beautifully. Adjust the consistency with more of the reserved water if needed. Now for the grand finale: add another 2-3 tablespoons of butter, a generous squeeze of lemon juice, and a handful of chopped cilantro. Stir it all in. Your bhaji is ready.
Step 6: Toast the Pav
Heat a separate skillet or tawa over medium heat. Slit your pav buns in half horizontally. Slather a generous amount of butter on the pan and toast the pav, cut-side down, until they are golden brown and slightly crispy.
Calories & Nutritional Info (It’s Basically a Salad, Right?)

Let’s be real, the butter is a key food group here. But look at all those veggies!
- Serving Size: A generous cup of bhaji with two pav buns.
- Calories: Approximately 450-600 kcal.
- Good Stuff: Packed with vitamins and fiber from the mountain of vegetables.
- The Fun Stuff: The butter makes it rich, delicious, and the ultimate comfort food.
- The Verdict: It’s a balanced meal of carbs, fats, and veggie goodness. So, pretty much perfect.
Common Mistakes to Avoid (Pav Bhaji Pitfalls)
Don’t let these simple errors stand between you and street food glory.
- Under-cooking the Vegetables: They need to be boiled or pressure-cooked until they are incredibly soft. If they’re firm, you’ll never be able to mash them into that classic, semi-smooth bhaji texture.
- Skimping on the Butter: This is not the time to be health-conscious. The butter is absolutely essential for that authentic, rich, street-style flavor. Embrace the butter.
- Using the Wrong Spice Mix: You cannot substitute garam masala for pav bhaji masala. The latter has a unique blend of spices (like black cardamom, mango powder, and fennel) that gives the dish its signature taste.
- Forgetting the Garnish: The garnishes are not optional! The crunch of the raw onion, the freshness of the cilantro, and the bright, tangy kick from the lemon juice are crucial for balancing the richness of the bhaji.
Variations & Customizations (Choose Your Bhaji Adventure)
The classic is a classic for a reason, but who doesn’t love a twist?
- Paneer Pav Bhaji: Add about ½ cup of crumbled or finely cubed paneer to the bhaji during the last few minutes of simmering for an extra boost of protein and richness.
- Cheese Pav Bhaji: A Mumbai street food favorite. Just before serving, top the hot bhaji with a ridiculously generous amount of shredded Amul or cheddar cheese and let it get all melty and gooey.
- Kala (Black) Pav Bhaji: For a more intense, smoky flavor, you can make or buy a special black pav bhaji masala, which is made with whole spices that are roasted until very dark before being ground.
FAQ: Your Pav Bhaji Predicaments, Solved
Let’s clear up some common questions about this iconic dish.
1. Can I use other vegetables in the bhaji?
Absolutely! Pav bhaji is very forgiving. You can add finely chopped green beans, a small amount of grated beetroot (for a beautiful color), or even some pumpkin or zucchini. Just mash it all up!
2. How do I get that vibrant red color like the street vendors?
The secret is Kashmiri red chili powder, which imparts a brilliant color without a ton of heat. Some vendors also add a small amount of grated beetroot. Please don’t use artificial red food coloring.
3. Can I make the bhaji ahead of time?

Yes, and you should! The bhaji actually tastes even better the next day as the flavors have more time to meld together. Just reheat it thoroughly, adding a splash of water to loosen it up, and finish with a fresh knob of butter.
4. What if I don’t have a pressure cooker?
No problem. You can just boil the vegetables in a large, covered pot on the stovetop. It will take longer, probably 25-30 minutes, but just make sure they are completely soft and mashable.
5. What can I use if I can’t find pav buns?
Any soft, squishy white bread rolls will work. Soft dinner rolls or even hamburger buns are a great substitute.
6. Is pav bhaji vegan?
As written, no, because of the butter. But you can easily make it vegan by substituting the butter with a good quality vegan butter or a neutral oil.
7. My bhaji is too thick/thin. How do I fix it?
If it’s too thick, simply stir in some of the reserved warm vegetable cooking water (or just warm water) until it reaches your desired consistency. If it’s too thin, just let it simmer on low with the lid off for a little longer to allow some of the excess liquid to evaporate.
Final Thoughts
Congratulations! You are now the master of one of the world’s greatest comfort foods. You have the power to transform a humble pile of vegetables into a buttery, spicy, and utterly irresistible meal that will transport you straight to the bustling streets of Mumbai.
So go on, embrace the mash. Be generous with the butter. And serve your creation with a flourish of fresh onion, cilantro, and a big squeeze of lemon. Just be prepared for your family and friends to request this for dinner every single week from now on. It’s a delicious burden to bear.