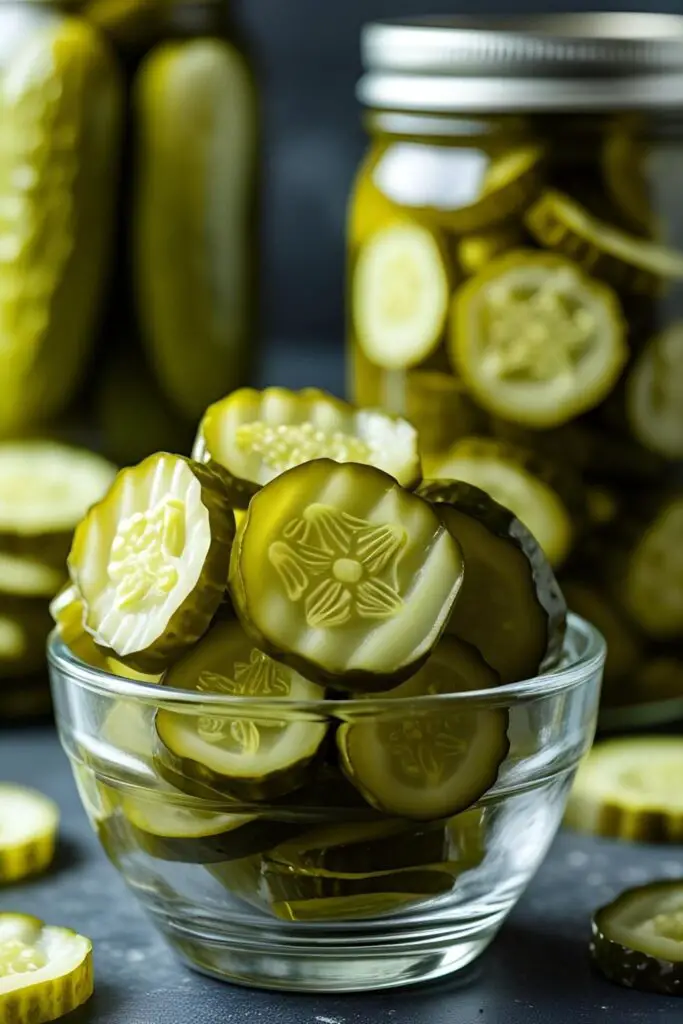
Why These Homemade Dill Pickles Are the Real Dill
Why should you embark on this slightly tangy adventure with me? Because these aren’t your grandma’s overly sweet, mushy pickles (unless your grandma was a pickling ninja, in which case, high five!). These are crisp, garlicky, perfectly salty, and infused with fresh dill. The flavor is bright and complex, a far cry from the one-dimensional taste of most store-bought varieties.
Beyond the superior flavor, making your own pickles is surprisingly easy and incredibly rewarding. Plus, you get the smug satisfaction of knowing exactly what went into them – no weird artificial colors or preservatives here! Imagine pulling out a jar of your own homemade pickles at your next barbecue. Your friends will be all, “Whoa, you made these?” And you can casually reply, “Oh, these old things? Just a little something I whipped up.” You’ll be a pickling rockstar, trust me.
The Essential Players (aka The Ingredients)
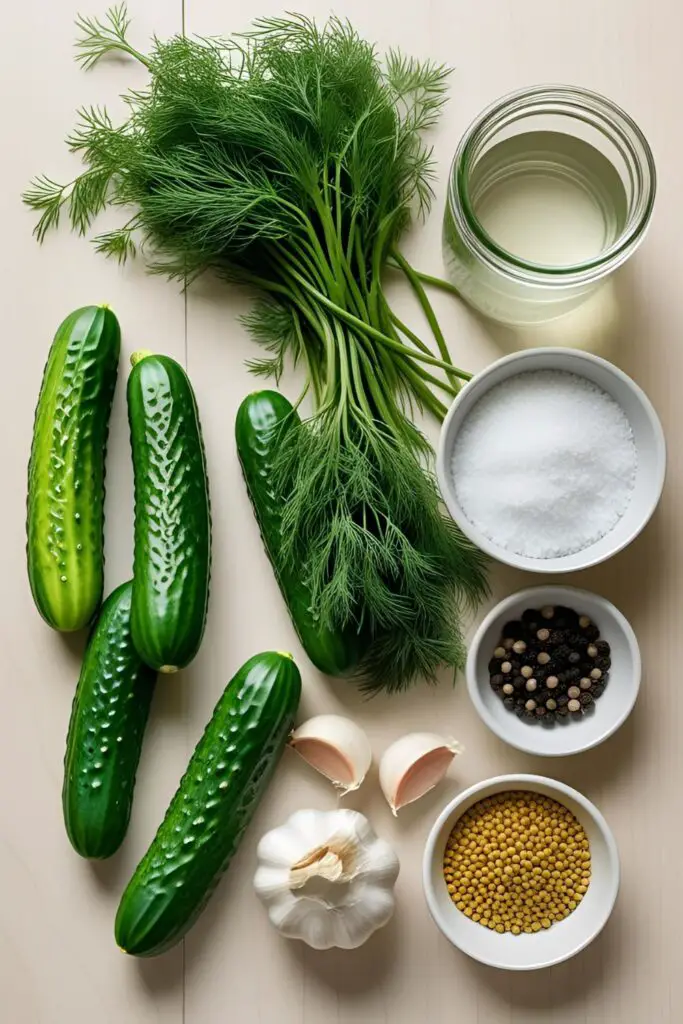
For pickle perfection, you need a few key players. Quality ingredients make all the difference.
- Small Pickling Cucumbers (about 1 pound): Look for firm cucumbers with no soft spots. The smaller they are, the crisper they tend to be.
- Fresh Dill (a generous bunch): Don’t skimp on the dill! It’s what makes a dill pickle a dill pickle.
- Garlic (2-3 cloves): Roughly smashed. Because everything is better with garlic.
- White Vinegar (1 ½ cups): The tangy foundation of our brine. You can use apple cider vinegar for a slightly different flavor profile.
- Water (1 ½ cups): To dilute the vinegar and create the perfect pickling liquid.
- Pickling Salt (3 tablespoons): This is important! Pickling salt (or canning salt) doesn’t have anti-caking agents or iodine, which can make your brine cloudy or affect the color of your pickles. If you absolutely can’t find it, you can use kosher salt, but avoid iodized table salt.
- Whole Black Peppercorns (1 teaspoon): Adds a subtle spice.
- Mustard Seeds (1 teaspoon): Another classic pickling spice that adds a little zing.
- Optional: Red Pepper Flakes (½ teaspoon): For a touch of heat, if you’re feeling spicy.
Your Pickling Power Tools (Tools & Kitchen Gadgets)
You don’t need a fancy setup to make great pickles, but a few key items will make the process smooth.
- Two Clean Quart-Sized Jars with Lids and Rings: Sterilizing your jars isn’t strictly necessary for refrigerator pickles, but make sure they’re very clean.
- A Large Pot: For heating up your brine.
- A Measuring Cup and Spoons.
- A Sharp Knife: For trimming the ends of your cucumbers.
- A Cutting Board.
- Optional: A Jar Funnel: Makes pouring the hot brine into the jars much less messy.
- Optional: Pickle Weights: If you plan on fermenting for longer at room temperature (we’re doing a quicker version here), weights help keep the cucumbers submerged.
Step-by-Step to Pickle Paradise
Follow these simple steps, and soon you’ll be crunching on your very own homemade dill pickles.
Step 1: Prep Your Cucumbers

Wash your cucumbers thoroughly. Trim off the blossom end (the end that had the flower) – this contains enzymes that can make your pickles soft. You can leave the cucumbers whole, halve them lengthwise, quarter them, or slice them into rounds, depending on your preference.
Step 2: Stuff Your Jars
Divide the fresh dill, smashed garlic cloves, black peppercorns, mustard seeds, and optional red pepper flakes evenly between your two clean quart-sized jars. Then, pack your prepared cucumbers tightly into the jars.
Step 3: Whip Up the Brine
In your large pot, combine the white vinegar, water, and pickling salt. Bring the mixture to a boil over medium-high heat, stirring until the salt completely dissolves. Once boiling, remove it from the heat.
Step 4: Pour the Liquid Gold
Carefully pour the hot brine over the cucumbers in the jars, leaving about ½ inch of headspace at the top. If you have a jar funnel, now’s its time to shine!
Step 5: Seal and Cool
Wipe the rims of the jars clean with a damp cloth. Place the lids on the jars and screw on the rings until they are fingertip tight. Let the jars cool to room temperature on your countertop.
Step 6: The Waiting Game (The Hardest Part)
Once cooled, transfer the jars to the refrigerator. These are refrigerator pickles, so they aren’t shelf-stable like traditionally canned pickles. They will start to taste like pickles within a few hours, but they’ll be even better after at least 24-48 hours. The longer they sit, the more flavorful they become.
Calories & Nutritional Info (The Tangy Truth)

Pickles are surprisingly low in calories and can even offer some health benefits. Just watch out for the sodium!
- Serving Size: About 1 spear or a handful of slices.
- Calories: Around 5-10 kcal per serving. Seriously, it’s practically nothing.
- Main Components: Mostly water and flavor.
- Potential Perks: Some studies suggest fermented foods can be good for gut health, and pickles made without excessive sugar are a low-carb option.
- The Catch: They can be high in sodium, so maybe don’t eat the entire jar in one sitting (tempting as it may be!).
Common Mistakes to Avoid (Pickle Pitfalls)
Don’t let these common errors lead to sad, soggy cucumbers.
- Skipping the Blossom End Trim: Seriously, just do it. Those enzymes can lead to mushy pickles, and nobody wants a mushy pickle.
- Using Table Salt: The iodine in table salt can make your brine cloudy and give your pickles a slightly metallic taste. Stick with pickling salt or kosher salt.
- Not Using Enough Dill (You Monster!): Dill is the heart and soul of a dill pickle. Be generous!
- Warm Brine on Warm Cucumbers: If your cucumbers are warm from the store or garden, and you pour hot brine over them, it can start the cooking process, leading to softer pickles. Let the cucumbers cool down a bit before pickling.
- Not Waiting Long Enough: Patience is a virtue, especially when it comes to pickles. Give them at least 24 hours in the fridge for the flavors to develop properly.
Variations & Customizations (Spice Up Your Life… or Your Pickles)
The basic dill pickle is a masterpiece, but feel free to get creative!
- Spicy Dill Pickles: Add a few sliced jalapeños, a couple of dried chili peppers, or a pinch of cayenne pepper to each jar for a fiery kick.
- Sweet and Spicy Pickles: Add a tablespoon or two of sugar to your brine along with the red pepper flakes. This creates a delightful sweet-heat combo.
- Garlic Bomb Pickles: If you’re a garlic fiend (like me!), double or even triple the amount of garlic in each jar. You can also add a few cloves of roasted garlic for a milder, sweeter garlic flavor.
FAQ: Your Burning Pickle Questions, Answered
Let’s tackle some of the most common pickling ponderings.
1. What kind of cucumbers are best for pickling?
Small, firm pickling cucumbers (like Kirby cucumbers) are ideal. They have thinner skins and fewer seeds than slicing cucumbers.
2. Why are my homemade pickles not as crunchy as store-bought ones?
Several factors can affect crispness. Make sure you trim the blossom end, use fresh, firm cucumbers, and don’t let them sit in warm brine for too long. You can also add a grape leaf or a pinch of calcium chloride (Pickle Crisp) to each jar for extra crispness.
3. How long do homemade refrigerator pickles last?

Stored properly in the refrigerator, they should last for about 1-2 months. The quality might start to decline after that, but they should still be safe to eat.
4. Can I reuse the pickle brine?
It’s generally not recommended to reuse pickle brine for a new batch of pickles, as the flavor and salt concentration will have changed. However, you can use leftover brine for marinades or salad dressings.
5. Do I need to sterilize my jars for refrigerator pickles?
While not strictly necessary for refrigerator pickles that will be stored in the fridge and consumed relatively quickly, it’s always a good practice to start with very clean jars. You can wash them in hot, soapy water or run them through a dishwasher cycle.
6. My pickles are cloudy. What did I do wrong?
Cloudiness can sometimes occur due to minerals in your water or the use of iodized salt. It doesn’t necessarily mean the pickles are unsafe to eat, but it can be less visually appealing. Using distilled water and pickling salt can help prevent this.
7. Can I pickle other vegetables using this method?
Absolutely! This basic brine and flavoring combination works well for other vegetables like green beans (dilly beans!), carrots, asparagus, and even red onions. Adjust the cooking time (if any) and the size of the vegetables as needed.
Final Thoughts
Congratulations, you are now officially on your way to becoming a pickle pro! You’ve learned the secrets to creating crispy, flavorful dill pickles that are a far cry from the blandness lurking on supermarket shelves.
So grab those cucumbers, get your dill ready, and prepare for a flavor explosion in every bite. These homemade dill pickles are perfect for snacking, adding to sandwiches, or serving alongside your favorite dishes. Just be warned: once you taste these, you might find yourself suddenly wanting to pickle everything. And honestly? That’s not such a bad problem to have. Now go forth and pickle like you mean it!