How to Freeze Apples So They Don’t Turn into Sad, Brown Mush
We’ve all been there. You go apple picking and return with a haul that could feed a small army. Or maybe you just couldn’t resist that massive sale at the grocery store. Now you’re staring at a mountain of apples on your counter, and a quiet panic begins to set in. There are only so many apples you can eat in a day, and you can practically hear them getting softer by the minute. What do you do? My friend, I’m here to teach you how to freeze apples for later use, and it’s going to make you feel like a certified domestic genius. Say goodbye to food waste and hello to apple pie in February!
Why This Method Is a Total Game-Changer
You might be thinking, “Can’t I just chop them up and throw them in a bag?” Sure, if you want a giant, frozen, brown “apple-berg” that is impossible to use later. This method is about preserving not just the apples, but your future sanity. We’re talking about perfectly separated, beautiful, ready-to-use apple slices that you can grab by the handful.
Imagine it’s a cold winter day, and you suddenly crave a warm apple crisp. Instead of running to the store, you just strut over to your freezer, pull out a bag of peak-season apples you froze months ago, and get straight to baking. It’s a gift to your future self. You’ll save money, reduce food waste, and look like a culinary superstar who has their life completely together.
The Ridiculously Simple Ingredients List

This isn’t a recipe so much as a technique, so the list is delightfully short.
- Apples: The star of the show! Firm, crisp apples are your best friends here. Think Honeycrisp, Granny Smith, Gala, Fuji, Braeburn, or Golden Delicious. Avoid softer, mealy apples like Red Delicious, as they’ll turn to complete mush upon thawing.
- Lemon Juice: About ¼ cup. This is your secret weapon against the dreaded browning. You can also use a powdered product like Fruit-Fresh (which is just ascorbic acid/Vitamin C).
- Cold Water: About 4 cups. This is just to create a little acid bath to keep your apples looking fresh and pretty.
The Tools You’ll Need for Apple Preservation Domination
Having the right gear will make this process fly by. You’ll go from “apple mountain” to “perfectly prepped freezer stash” in no time.
- A Good Vegetable Peeler: A sharp Y-peeler will make quick work of the skins.
- An Apple Corer/Slicer: This gadget is a massive time-saver. It cores the apple and cuts it into perfect wedges in one swift motion.
- A Sharp Chef’s Knife: If you don’t have the gadget above, a trusty knife is essential for slicing.
- A Large Bowl: For your lemon water anti-browning bath.
- Baking Sheets: You’ll need one or two of these for the crucial flash-freezing step.
- Parchment Paper or Silicone Mats: To line the baking sheets so your apples don’t stick. This is a must.
- Freezer-Safe Bags: Good quality zip-top freezer bags work well.
- A Vacuum Sealer: If you’re serious about food preservation, a vacuum sealer is the ultimate tool for preventing freezer burn and keeping your apples fresh for longer.
Step-by-Step Instructions: From Counter to Freezer
Ready to become a master of food preservation? Let’s do this. It’s easier than you think.
Step 1: Prepare the Fountain of Youth

In your large bowl, mix the cold water and lemon juice. This is the magic bath that will keep your apple slices from turning that unappetizing shade of brown while you work.
Step 2: Peel, Core, and Slice
Now for the prep work. Peel your apples. Then, using your handy apple gadget or a knife, core them and slice them to your desired thickness (I like about ¼ to ½-inch thick). If you’re planning to use them for pies, slice them. For applesauce, you can just chop them. Work in batches so the apples aren’t sitting out for too long.
Step 3: Give ‘Em a Quick Swim
As soon as you slice a batch of apples, immediately drop them into the lemon water bath. Give them a gentle stir to make sure all the surfaces are coated. This stops the oxidation process in its tracks. Let them hang out in the water for about 5-10 minutes.
Step 4: Drain and Pat Dry
Drain the apples thoroughly in a colander. Then, spread them out on a clean kitchen towel or paper towels and pat them as dry as you possibly can. Remember, excess water creates ice crystals, which are the enemy of good texture.
Step 5: The Flash Freeze (The Most Important Step!)
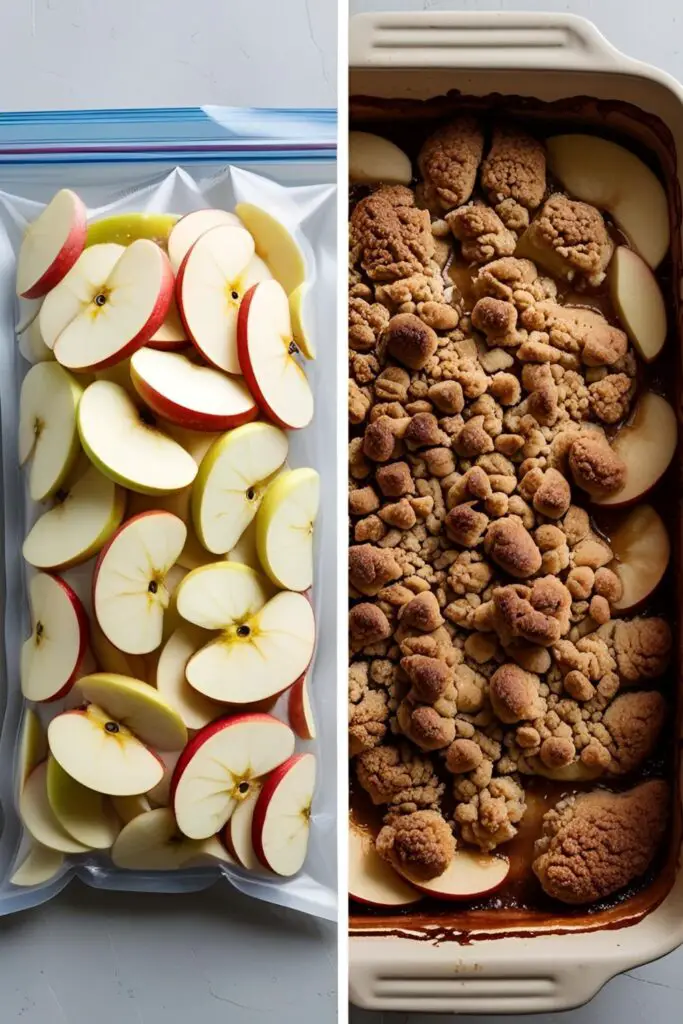
Line a baking sheet with parchment paper. Arrange the dried apple slices in a single, even layer. Make sure the slices aren’t touching each other! They need their personal space, or they’ll freeze into one giant clump. Pop the baking sheet into the freezer and let the apples freeze until they are completely solid, which usually takes 2-3 hours.
Step 6: Bag ‘Em Up
Once the apple slices are frozen solid, you can transfer them into your freezer bags or vacuum-seal bags. If using zip-top bags, try to squeeze out as much air as possible before sealing. Label the bag with the date (trust me, you’ll forget) and toss it back into the freezer. Boom. Done.
Calories & Nutritional Info

We’re talking about apples here, so the news is all good.
- Calories: A medium apple has about 95 calories, and freezing adds virtually none.
- Fiber: Apples are a great source of fiber, which is fantastic for digestion.
- Vitamins: Freezing is one of the best ways to preserve nutrients, so you’re locking in all that Vitamin C and other good stuff.
- No Added Sugar: This method uses no added sugar, making it a perfectly healthy way to preserve fruit.
Common Mistakes to Avoid (Don’t Do This!)
I’ve made these mistakes so you don’t have to. Pay attention, future food-prepping genius.
- Skipping the Lemon Water Bath: Unless you enjoy the aesthetic of sad, brown, oxidized apple slices, don’t skip this. It takes two seconds and makes a world of difference.
- Forgetting to Flash Freeze: This is the cardinal sin. If you just throw fresh, wet apple slices into a bag, you will create a massive, inseparable, frozen “apple-berg.” The flash-freezing step is what keeps them all separate and easy to use.
- Not Getting Them Dry Enough: Leaving too much water on the apples before the flash freeze leads to a thick layer of ice crystals on each slice, which can affect the texture when they thaw.
- Leaving Air in the Bag: Air is the villain that causes freezer burn. Squeeze it, suck it out with a straw, or use a vacuum sealer—just get rid of it.
Variations & Customizations
Once you’ve mastered the basic method, you can get a little fancy.
- Ready-to-Go Pie Filling: Before the flash freeze, toss your drained apple slices in a bowl with your favorite apple pie spices (cinnamon, nutmeg, allspice) and a little bit of sugar or flour. Freeze as directed, and you have instant pie filling ready to go!
- Freeze as Applesauce: If you know you’ll want applesauce later, just make it now! Cook your apples down into a delicious sauce, let it cool completely, and then freeze it in portion-sized containers or freezer bags.
- Smoothie Packs: For an ultra-quick breakfast, you can freeze apple chunks in bags along with other smoothie ingredients like spinach, a scoop of protein powder, and some flax seeds. Just add liquid and blend!
FAQ: Your Apple-Freezing Questions, Answered
Let’s clear up some common queries.
1. Do you have to peel apples before freezing?
For most uses like pies and crisps, yes, it’s best to peel them for a better texture. If you’re just going to use them in smoothies or make applesauce later, you can leave the peel on for extra fiber.
2. How long will frozen apples last?
If stored properly (especially if vacuum-sealed), they will maintain their best quality for about 9-12 months in the freezer. They are still safe to eat after that, but the texture might decline.
3. Will frozen apples be crunchy like fresh apples when they thaw?

No, and it’s important to manage expectations. The freezing process breaks down the cell walls of the fruit, so they will be much softer upon thawing. This is why they are perfect for cooked applications like baking, but not great for eating fresh.
4. What are the best apples for freezing?
To reiterate: firm, crisp apples are key. Granny Smith, Honeycrisp, Gala, Braeburn, and Golden Delicious are all excellent choices.
5. How do I use frozen apples in a recipe?
For most baked goods like pies, crisps, and muffins, you can use them directly from frozen! No need to thaw. This actually helps prevent them from getting overly mushy. For smoothies, just toss them in frozen.
6. Can you freeze whole apples?
You can, but it’s not recommended. They take forever to thaw, and the texture becomes very mealy and unpleasant. It’s worth the extra 20 minutes to slice them first.
7. Help! I forgot to do the lemon water step and my apples turned brown. Are they ruined?
Nope! They might not look as pretty, but they are still perfectly safe and delicious to eat, especially in cooked applications like applesauce or apple butter where the color doesn’t matter as much.
Final Thoughts
You are now officially a food preservation wizard. You’ve conquered the apple mountain, banished the threat of food waste, and armed your future self with the key to delicious, out-of-season baked goods. Pat yourself on the back.
The next time you find yourself with an abundance of apples, you won’t feel panic—you’ll feel power. Go enjoy that smug feeling and, more importantly, enjoy that apple crisp you’re going to make in the middle of March.