How to Make Pie Dough That Doesn’t Suck (A No-Fear Guide)
Let’s be real. You’ve probably heard horror stories about making pie dough. Maybe you even have a few of your own. Tales of tough, chewy crusts, dough that shrinks into a sad little puddle in the pan, or textures that more closely resemble a frisbee than a flaky foundation for your delicious fillings. Many people are downright terrified of it. Well, today we’re putting on our brave pants, because I’m here to show you how to make pie dough that is not only foolproof but will make you wonder why you ever bought that soulless, refrigerated stuff. Prepare to become a Pie Person.
Why This Recipe Is Your New Best Friend
So, why go through the “trouble” of making it from scratch? First, flavor. This is an all-butter crust, and nothing—I repeat, nothing—beats the rich, savory, and slightly sweet taste of real butter. Store-bought crusts often use oils and shortenings that just can’t compete. Second, FLAKES. We’re talking distinct, shatter-on-your-tongue layers that are light, airy, and the perfect contrast to any filling. This is the texture dreams are made of.
Honestly, the real reason is the sheer power you’ll feel. Placing a pie on the table with a crust you made from five simple ingredients is a next-level flex. Your friends and family will assume you’re a baking wizard who trained in a secret French pastry monastery. It’s our little secret that it was actually easy.
The Fab Five (aka The Ingredients)

You’re going to laugh at how simple this is. The magic isn’t in the ingredients themselves, but in how you handle them.
- All-Purpose Flour (2 ½ cups): The foundation of our pie dreams.
- Unsalted Butter (1 cup / 2 sticks): This needs to be ICE COLD. I’m talking straight from the fridge, maybe even popped in the freezer for 15 minutes before you start. This is non-negotiable.
- Ice Water (½ cup): Notice a theme? We’re starting with ½ cup of water with ice cubes floating in it. You’ll add it one tablespoon at a time.
- Salt (1 teaspoon): For flavor. A pie crust without salt is a sad, bland thing.
- Sugar (1 tablespoon, optional): This adds a hint of sweetness and helps with browning, but you can leave it out for savory pies.
Key Substitutions:
- For Extra Flakiness: You can substitute half of the butter with vegetable shortening or lard. You’ll lose some of that buttery flavor but gain an incredibly tender, flaky texture.
The Tools of the Trade
Having the right equipment makes this process feel less like a wrestling match and more like an art form.
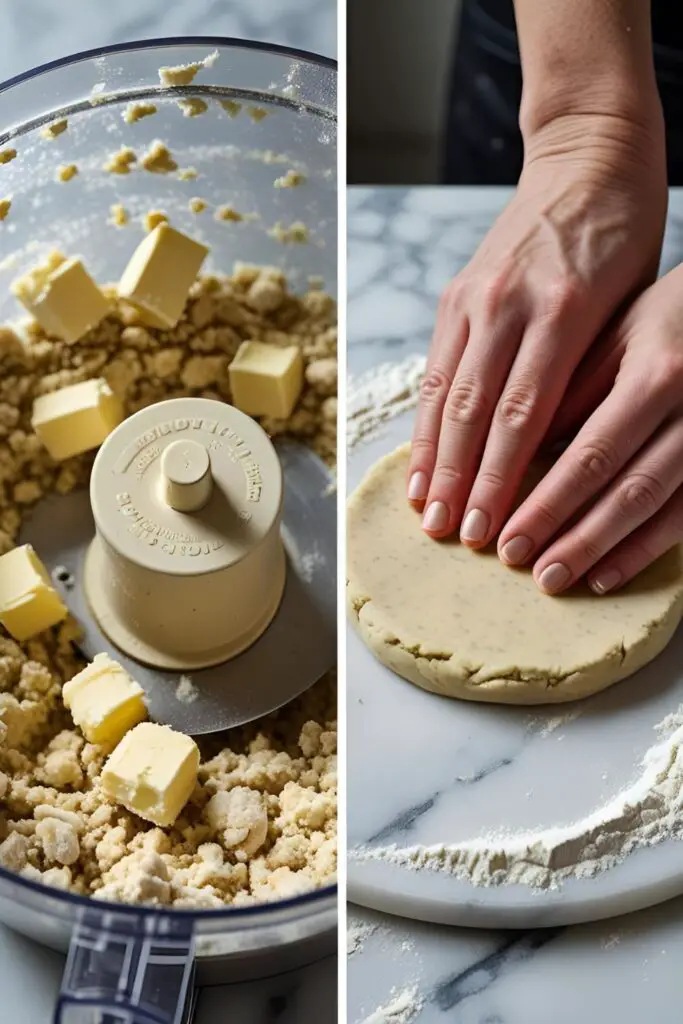
- Food Processor: This is the “easy button” for making pie dough. It cuts the cold butter into the flour in seconds.
- Pastry Blender: If you’re going old-school or don’t have a food processor, a pastry blender is your best friend for cutting in the butter by hand.
- Large Mixing Bowl: Essential if you’re making the dough by hand.
- Rolling Pin: A heavy marble rolling pin stays cold and is fantastic, but a classic wooden one works great too.
- Bench Scraper: Incredibly useful for dividing the dough and cleaning your work surface.
- Plastic Wrap: For chilling the dough. This is a must.
- Kitchen Scale: For the most accurate and consistent results every single time, I highly recommend weighing your flour.
Step-by-Step Instructions: Conquering the Crust
Alright, let’s do this. Remember the #1 rule: KEEP. EVERYTHING. COLD.
Step 1: Combine the Dry Stuff

In your food processor or a large bowl, combine the flour, salt, and sugar (if using). Just give it a quick pulse or whisk to mix everything together. Easy peasy.
Step 2: Cut in the Cold Butter
Cut your very cold butter into ½-inch cubes. Add the cubes to the flour mixture. If using a food processor, pulse 8-10 times until the butter is broken down into a mix of pea-sized and almond-sized pieces. You want visible chunks of butter! If doing this by hand, use your pastry blender to cut the butter into the flour until you get that same coarse, crumbly texture.
Step 3: Add the Ice Water (Slowly!)
This is where most people go wrong. Drizzle in the ice water one tablespoon at a time, pulsing (or mixing with a fork) after each addition. Stop as soon as the dough just starts to clump together when you pinch it. You will likely not use the full ½ cup. Do not over-water your dough! Less is more.
Step 4: Bring It All Together
Dump the crumbly mixture onto a clean counter. Don’t knead it! Just use your hands to quickly and gently press it all together into a rough ball. If it’s too crumbly, add a tiny bit more water with a spray bottle.
Step 5: Divide and Chill (The Most Important Step)
Divide the dough in half and form each half into a flat 1-inch thick disc. Why a disc? Because it will be way easier to roll out later. Wrap each disc tightly in plastic wrap and refrigerate for at least 1 hour, or up to 2 days. This step is mandatory! It lets the gluten relax (no shrinking!) and ensures the butter firms up again (hello, flakes!).
Calories & Nutritional Info
Let’s be honest, we’re not making salad here. This is butter and flour. But for those who are curious, here’s a rough estimate for one-half of the dough (a single crust).
- Calories: Approximately 1,200 for the whole recipe, so ~600 per crust.
- Fat: Around 45-50g per crust. Yes, that’s a lot. It’s butter. Let’s move on.
- Carbohydrates: Roughly 65g per crust.
- Joy Factor: Off the charts. Completely justifies the calories. IMO, it’s worth it. 🙂
Common Mistakes to Avoid (The Pie Killers)

Read this section carefully. This is your shield against pie-saster.
- Using Warm Ingredients: If your butter is soft or your water isn’t ice-cold, the butter will melt into the flour instead of staying in little pieces. This makes a tough, greasy crust. Cold, cold, cold is the mantra.
- Overworking the Dough: The more you handle the dough, the more you develop the gluten. Overdeveloped gluten = a tough, leathery crust. Handle it as little as possible.
- Adding Too Much Water: This is the easiest mistake to make. Too much water also develops the gluten and makes the dough sticky and hard to work with. Be stingy with the water!
- Skipping the Chill: Impatience is the enemy of good pie dough. If you don’t chill the dough sufficiently, the gluten won’t relax (so it will shrink when you bake it) and the butter will be too soft (so it will melt out instead of creating steam for flakes).
Variations & Customizations
Once you’ve nailed the basic recipe, you can start getting fancy.
- Spicy Cheddar Crust: Add 1 cup of finely shredded sharp cheddar cheese and a ¼ teaspoon of cayenne pepper to the dry ingredients. This is absolutely killer for an apple pie or a savory meat pie.
- Herbed Savory Crust: Mix in 2 tablespoons of finely chopped fresh herbs like rosemary, thyme, or sage with the flour. Perfect for quiches, chicken pot pies, or tomato tarts.
- The Vodka Trick: For a super flaky, easy-to-roll dough, replace half of the ice water with ice-cold vodka. Because vodka is only about 60% water, it inhibits gluten development. Don’t worry, the alcohol bakes out completely, leaving no flavor behind—just an incredibly tender crust.
FAQ: Your Pie Dough Problems, Solved
Let’s demystify this once and for all.
1. Why did my pie crust shrink so much in the oven?
Two main reasons: the gluten wasn’t relaxed enough, or it was overworked. The solution is to always chill your dough thoroughly after mixing AND after lining the pie plate.
2. Why is my pie crust tough instead of flaky?
This is usually a result of overworking the dough, adding too much water, or not having large enough pieces of butter in your dough. Remember to handle it minimally and keep those butter chunks visible.
3. Butter vs. Shortening vs. Lard: What’s the deal?
Butter provides the best flavor. Shortening and lard have higher melting points, which makes them easier to work with and creates incredibly tender, flaky layers, but they lack the flavor of butter. A 50/50 mix is a popular compromise.
4. Can I really make this in a food processor?

Yes, and it’s my favorite way! It’s fast and keeps the butter cold. The key is to use the pulse button and stop before it forms a ball in the machine. Dump it out when it’s still crumbly.
5. How far ahead can I make pie dough?
You can store the wrapped discs in the refrigerator for up to 2 days. For longer storage, you can freeze them for up to 3 months. Just thaw it in the fridge overnight before using.
6. What does blind baking mean and do I have to do it?
Blind baking is pre-baking the crust before adding the filling. You must do this for pies with unbaked fillings, like a cream pie or fresh fruit tart. You should also do it for very wet fillings, like quiche, to prevent a soggy bottom.
7. Why do recipes say “pea-sized pieces of butter”?
It’s a visual cue. These little pockets of butter are what melt during baking, creating steam that pushes apart the layers of flour, resulting in a light, flaky crust. If the pieces are too small (like sand), you’ll get a crumbly, shortbread-like texture instead of flakes.
Final Thoughts
You did it. You read the guide. You know the secrets. The power to create a buttery, flaky, ridiculously delicious pie crust is now in your hands. There’s no more fear, only flour, butter, and endless delicious possibilities.
So go forth and bake. Make an apple pie, a chicken pot pie, a quiche, a galette—whatever your heart desires. Just promise me you’ll give that sad, refrigerated tube in the grocery store a pitying look the next time you walk by. You’re better than that now.