The Best Homemade Chocolate Cake (From Scratch!)
So, what makes this recipe the one-and-only chocolate cake you’ll ever need? First, the flavor is out of this world. We’re using a secret weapon that unlocks a deep, dark, sophisticated chocolate taste that box mixes can only dream of. It’s the difference between listening to a live orchestra and a ringtone.
Second, it’s unbelievably moist and tender. This isn’t a dry, crumbly cake that needs a gallon of milk to wash it down. This cake is lush, with a soft crumb that melts in your mouth. And the best part? It’s practically a one-bowl wonder. Minimal fuss, minimal cleanup, maximum glory. You’ll look like a pastry chef, even if you’ve previously managed to burn water.
Ingredients
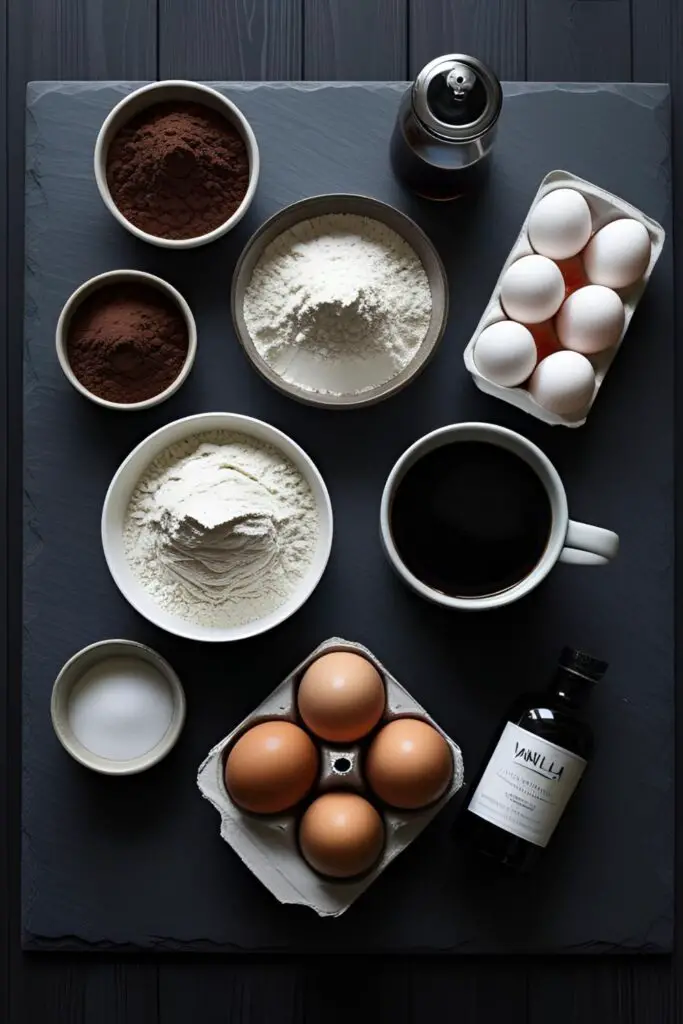
Don’t be scared by the list. It’s all simple stuff you probably have lurking in your pantry.
For the Chocolate Cake:
- 2 cups all-purpose flour
- 2 cups granulated sugar
- 3/4 cup unsweetened cocoa powder (the good stuff, not hot cocoa mix)
- 2 teaspoons baking soda
- 1 teaspoon baking powder
- 1 teaspoon salt
- 1 cup buttermilk, at room temperature (or see notes for a DIY version)
- 1/2 cup vegetable oil (this is key for moisture!)
- 2 large eggs, at room temperature
- 1 teaspoon vanilla extract
- 1 cup freshly brewed hot coffee (or 1 cup of boiling water, but coffee is the secret weapon!)
For the Chocolate Fudge Frosting:
- 1 cup (2 sticks) unsalted butter, softened
- 3/4 cup unsweetened cocoa powder
- 4 cups powdered sugar
- 1/2 cup milk or heavy cream
- 2 teaspoons vanilla extract
- A pinch of salt

A quick note on buttermilk: Don’t have any? No problem! Just add 1 tablespoon of white vinegar or lemon juice to a measuring cup, then fill the rest with regular milk to the 1-cup line. Let it sit for 5-10 minutes, and presto—DIY buttermilk!
Tools & Kitchen Gadgets Used:
To achieve chocolate cake nirvana, you’ll want these trusty tools.
- Two 9-inch round cake pans
- Parchment Paper
- Large Mixing Bowl (for your one-bowl masterpiece)
- Whisk
- Rubber Spatula
- Stand Mixer or Hand Mixer (for the frosting, unless you want a serious arm workout)
- Wire Cooling Rack
- Offset Spatula (for frosting like a pro)
Step-by-Step Instructions
Alright, let’s get down to business. This is going to be fun, I promise.
- Prep Your Station: First, preheat your oven to 350°F (175°C). Grease and flour your two 9-inch cake pans, or better yet, grease them, line the bottoms with parchment paper, and then grease the parchment. This guarantees your cakes will pop right out.
- One Bowl to Rule Them All: In a large mixing bowl, add all your dry cake ingredients: flour, sugar, cocoa powder, baking soda, baking powder, and salt. Give them a good whisk for about 30 seconds. This is your dry-mix-aeration, and it’s basically the same as sifting, but with less mess.
- Add the Wet Ingredients (Almost All of Them): To the same bowl, add the buttermilk, vegetable oil, eggs, and vanilla. Using your whisk, mix everything together on low speed (or by hand) until just combined. Don’t go crazy here; we’re not trying to build gluten.
- Unleash the Secret Weapon: Now for the magic. Carefully pour the hot coffee (or boiling water) into the batter. Whisk on low speed until everything is incorporated. The batter will be very thin! Do not panic. This is normal. This thin batter is what makes the cake so incredibly moist.
- Divide and Conquer: Pour the batter evenly between your two prepared cake pans.
- Bake It: Place the pans in the preheated oven and bake for 30-35 minutes. The cake is done when a wooden toothpick inserted into the center comes out clean or with a few moist crumbs attached.
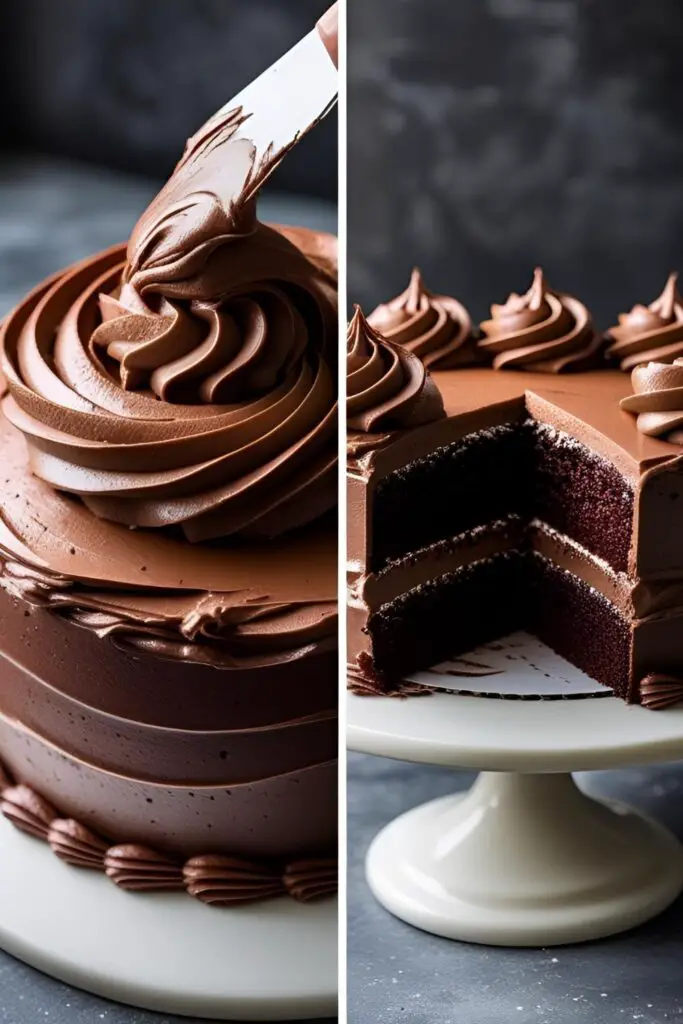
- The Great Cool Down: Let the cakes cool in their pans on a wire rack for about 15 minutes. Then, carefully run a knife around the edges and invert them onto the wire rack to cool completely. And I mean completely. Do not even think about frosting a warm cake unless you want a chocolate mudslide.
- Whip Up the Frosting: While the cakes cool, make the frosting. In a large bowl, beat the softened butter with a mixer until creamy. Add the cocoa powder and salt, and beat until combined. Alternate adding the powdered sugar and the milk, starting and ending with the sugar. Beat on low speed at first (unless you want a sugar storm in your kitchen), then increase to high and beat for 2-3 minutes until light and fluffy. Finally, mix in the vanilla.
- Assemble Your Masterpiece: Place one cake layer on your serving plate. Plop a generous amount of frosting on top and spread it evenly. Top with the second cake layer, and then frost the top and sides of the entire cake. You can make pretty swirls with an offset spatula, or just go for a rustic, “I’m too cool to care” look.
Calories & Nutritional Info (Estimated)
Because you asked. But let’s be honest, this is soul food, not health food. (Per slice, assuming 12 slices).
- Calories: Somewhere around 500-600 kcal.
- Happiness: Off the charts.
- Regret: Zero.
- Note: This is an estimate. Your mileage may vary depending on how generously you “taste-test” the frosting.
Common Mistakes to Avoid
Read this, and you’ll sidestep the common pitfalls of cake-making.
- Overmixing the Batter: After you add the flour, mix until it’s just combined. Overmixing develops gluten and leads to a tough, dense cake. Put. The. Whisk. Down.
- Frosting a Warm Cake: I know I said this already, but it bears repeating. Patience is a virtue. A warm cake will melt your beautiful frosting into a soupy, heartbreaking mess.
- Overbaking: A dry chocolate cake is a tragedy. Start checking for doneness at the 30-minute mark. The moment that toothpick comes out clean, they’re done.
- Skipping the Coffee: You can use hot water, but the coffee doesn’t make the cake taste like coffee. It deepens and intensifies the chocolate flavor in a way that is truly magical. Don’t knock it ’til you try it.
Variations & Customizations
Feel like getting a little wild? I support it.
- Mexican Hot Chocolate Cake: Add 2 teaspoons of ground cinnamon and a 1/4 teaspoon of cayenne pepper to the dry ingredients for a warm, spicy kick that is absolutely divine.
- Mocha Dream Cake: Use strong brewed espresso for the hot liquid. You can also add a tablespoon of instant espresso powder to the frosting to really amp up that coffee-chocolate combination.
- Raspberry Chocolate Delight: Add a layer of raspberry jam or fresh raspberries between the cake layers before frosting. The tartness of the fruit cuts through the richness of the chocolate beautifully.
FAQ Section

You’ve got questions? I’ve got answers.
Q1: Why is the cake batter so thin and watery? This is the most common question! The high liquid content (especially the hot coffee/water) is what creates a super moist, tender crumb. Trust the process!
Q2: Do I have to use coffee? Will my cake taste like coffee? No, it won’t taste like coffee! The coffee’s job is to enhance and deepen the flavor of the cocoa powder. If you’re really opposed, you can use boiling water instead, but I urge you to try the coffee version at least once.
Q3: Can I make this cake in a 9×13 inch pan? Absolutely. Just pour all the batter into a greased and floured 9×13 inch pan. The baking time will be a bit longer, around 35-45 minutes.
Q4: How do I store homemade chocolate cake? You can store it in an airtight container at room temperature for up to 4 days. In my house, it rarely lasts one day, which is another kind of storage solution.
Q5: Can I freeze this cake? Yes! It freezes wonderfully. You can freeze the unfrosted layers wrapped tightly in plastic wrap and foil. You can also freeze the frosted cake. Just chill it in the freezer for about an hour to set the frosting, then wrap it well.

Q6: My frosting is too thick/too thin. How do I fix it? Easy fix! If it’s too thick, add more milk, one tablespoon at a time. If it’s too thin, add more powdered sugar, a 1/4 cup at a time, until it reaches your desired consistency.
Q7: Can I make cupcakes with this recipe? You bet. This recipe will make about 24 cupcakes. Fill the liners about 2/3 full and bake for 18-22 minutes.
Final Thoughts
And there you have it. You are now the proud owner of a recipe for a perfect, from-scratch, ridiculously delicious chocolate cake. You’ve officially graduated from the world of box mixes. Go forth, bake this cake, and accept the shower of compliments that will inevitably come your way. You’ve earned it, you baking rockstar, you.