How to Make Cake Balls (The Easiest, Most Addictive Treat Ever!)
Alright, let’s get a little weird today. I’m going to ask you to bake a perfectly good, delicious cake. I want you to admire its golden-brown top and its fluffy interior. And then, with the full force of your culinary spirit, I’m going to ask you to completely and utterly destroy it. I want you to crumble that beautiful cake into a pile of delicious, fragrant rubble.
Why this act of beautiful, sanctioned culinary vandalism? Because this, my friends, is the first and most glorious step in learning how to make cake balls—the most decadent, fudgy, ridiculously addictive little treats on the planet. This isn’t just a recipe; it’s a delicious act of transformation.
Why This Recipe Is a Work of Genius
So, why should you intentionally destroy a perfectly good cake? Because what rises from the ashes is something even more spectacular.
First, the texture is a complete masterpiece. This is not cake as you know it. By combining the fine cake crumbs with a touch of frosting, you create a dense, fudgy, truffle-like interior that is unbelievably moist and rich. Paired with a snappy candy shell on the outside, it’s a textural experience that will make your brain short-circuit with joy.
Second, this is the ultimate “upcycle” recipe. Did you bake a cake that turned out a little dry? Did the layers break when you tried to flip them out of the pan? Did you trim the domes off a layer cake? Do not throw those “mistakes” away! Cake balls are the delicious redemption story for any cake that isn’t quite perfect.

Finally, they are perfectly portioned and endlessly impressive. These are beautiful, two-bite treats that are perfect for parties, holiday cookie trays, and homemade gift-giving. They look like they came from a fancy chocolatier, but only you need to know that their humble origin story involves a box of cake mix and a can of frosting.
The A-List Ingredients
The beauty of cake balls is that they start with very simple, accessible ingredients. We’re going the semi-homemade route to keep this super easy for beginners.
For the Cake Ball “Dough”:
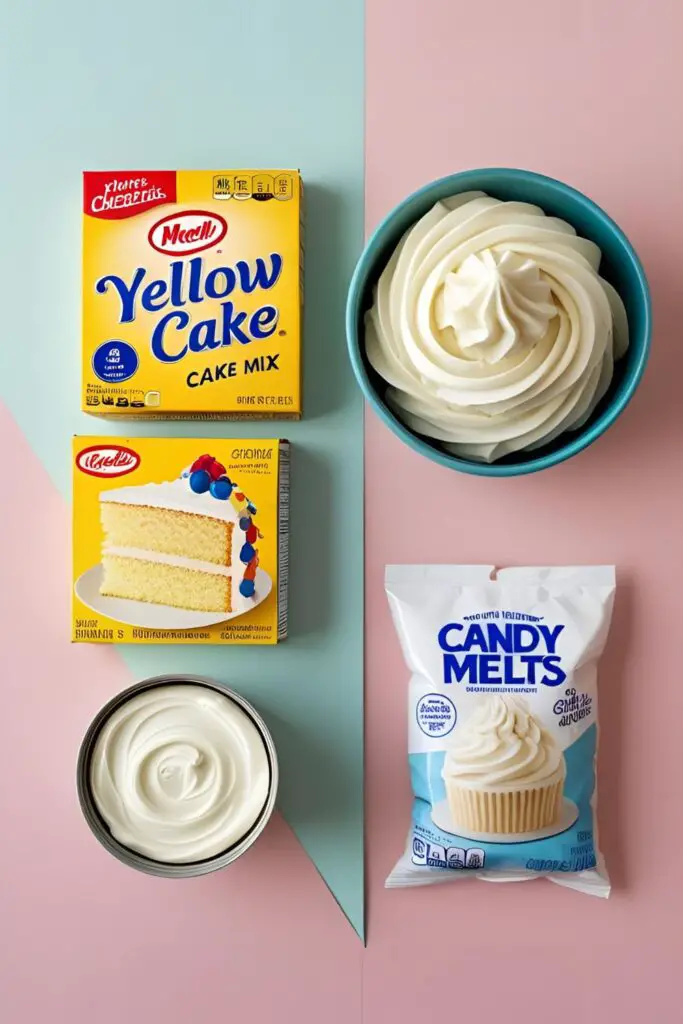
- A Baked & Cooled Cake: One 9×13 inch cake, any flavor. A box of your favorite cake mix (like yellow, chocolate, red velvet, etc.) baked according to the package directions is absolutely perfect for this.
- Canned Frosting: About ½ to ¾ cup of a complementary flavored frosting (e.g., vanilla frosting for a yellow cake, cream cheese frosting for a red velvet cake). We will not be using the whole can! This is very important.
For the Coating:
- Candy Melts: One 12-ounce bag. For beginners, candy melts are your best friend. They are designed to melt smoothly and set up hard and glossy without any complicated tempering. Real chocolate can be fussy.
- Shortening or Paramount Crystals (Optional but highly recommended): 1-2 teaspoons. This is the secret ingredient for thinning your candy melts to the perfect dipping consistency.
- Sprinkles, Drizzles, and Decorations: The fun part!
The Cake Ball Confectioner’s Toolkit
Having the right gear will make this fun, sticky project a whole lot cleaner and more successful.
- A 9×13 inch Baking Pan: For baking your sacrificial cake.
- A Large Mixing Bowl: This is the arena where the magical transformation happens.
- A Small Cookie Scoop: This is the secret weapon for creating perfectly uniform, same-sized cake balls. A 1 to 1.5-tablespoon scoop is ideal.
- A Baking Sheet lined with Parchment Paper: You’ll need this for chilling and setting your cake balls.
- A Microwave-Safe Bowl: For melting your candy coating. A deeper, narrower bowl is better for dipping than a wide, shallow one.
- Two Forks or a Candy Dipping Tool: This is the best way to handle the dipping process without losing your cake ball to the chocolatey abyss.
Step-by-Step: Your Guide to Cake Ball Victory
This is a process of stages. Read through the steps, embrace the potential for a little mess, and let’s create some magic.
Phase 1: The Creation and Glorious Destruction
- Bake Your Cake: Prepare your chosen cake mix in a 9×13 inch pan according to the box directions.
- Cool it Down: Once it’s baked, let the cake cool completely. I’m serious. Completely. A warm cake will turn into a greasy, oily mess in the next step. Let it sit on the counter for a couple of hours.
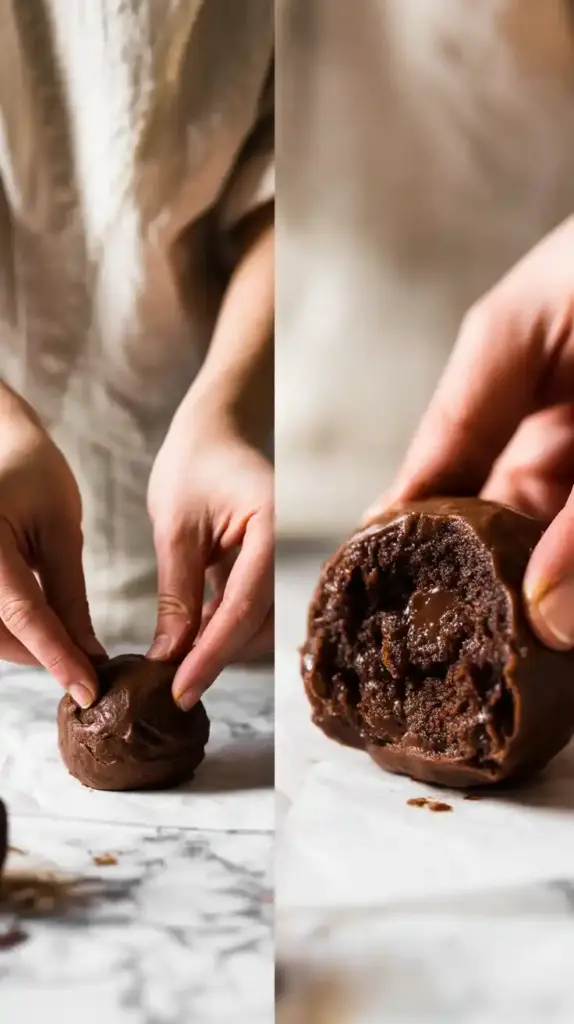
- Unleash the Chaos: Once the cake is completely cool, it’s time for the fun part. Crumble the entire cake into your large mixing bowl. You can use your clean hands, a fork, or even a stand mixer with the paddle attachment. Your goal is to get it into fine, uniform crumbs with no large, stubborn chunks remaining.
Phase 2: The Binding and the Chill
- The Frosting (Use a Light Hand!): Now, we add the frosting. This is where most people go wrong. Start by adding just a couple of heaping tablespoons of frosting to your cake crumbs. Using your hands or a spatula, begin to mix the frosting into the crumbs.
- The “Dough” Formation: Continue to add frosting, just one tablespoon at a time, until the mixture comes together and has the consistency of a slightly moist, pliable play-doh. You should be able to easily roll it into a ball that holds its shape. You will likely use much less frosting than you think!
- Scoop and Roll: Use your small cookie scoop to portion out the cake “dough” to ensure all your cake balls are the same size. Roll each portion between your palms to create a smooth, compact ball. Place the finished balls on your parchment-lined baking sheet.
- The Big Chill: Place the entire baking sheet of cake balls into the refrigerator for at least 2 hours, or into the freezer for about 30-45 minutes. You want them to be very firm and cold, but not frozen solid. This is a non-negotiable step.

Phase 3: The Dip and the Decoration
- The Candy Meltdown: When your cake balls are firm, melt your candy melts in a microwave-safe bowl in 30-second intervals, stirring in between, until smooth. If the coating seems too thick and gloopy, stir in a teaspoon of shortening or paramount crystals until it’s a smooth, fluid consistency that drips easily from a spoon.
- The Dip & Drip: Drop one chilled cake ball into the melted candy. Use two forks or a candy dipping tool to gently roll it around until it’s fully coated. Lift it out of the coating, and gently tap the fork against the side of the bowl to allow all the excess coating to drip off.
- The Transfer: Scrape the bottom of the fork on the lip of the bowl and then carefully place the coated cake ball back on your parchment-lined baking sheet.
- The Sprinkle & Set: If you’re adding sprinkles or other decorations, do it now while the candy coating is still wet. Repeat this process with the remaining cake balls.
- The Final Set: Let the cake balls sit at room temperature or in the refrigerator until the candy shell is completely firm and set.
Calories & Nutritional Info (A Bite-Sized Indulgence)
This is a decadent, confection-style treat. It’s pure, delicious fun.
- Estimated Calories: Around 150-200 kcal per cake ball, depending on the cake/frosting flavors and the thickness of your candy coating.
- A Portion-Controlled Treat: The beauty of a cake ball is that it’s a small, self-contained indulgence. It’s the perfect little bite of cake and frosting without the commitment of a giant slice.
Common Cake Ball Catastrophes to Avoid
Don’t let these simple mistakes ruin your beautiful, bite-sized creations.
- The “Too Much Frosting” Fiasco. This is the cardinal sin of cake ball making, and it’s the most common mistake. Using too much frosting results in a greasy, overly sweet, mushy mess that won’t hold its shape and will feel oily in your mouth. You want a dense, fudgy, play-doh consistency, not a wet mud pie. Start with a tiny amount of frosting and add more only as needed.
- Dipping a Warm, Soft Ball. If your cake balls are at room temperature when you try to dip them, they will likely disintegrate the moment they hit the warm candy coating, leaving you with a heartbreaking mess of crumbs in your beautiful melted candy. They must be chilled and firm before dipping.
- The “Seized” Candy Coating Sob Story. If you overheat your candy melts or accidentally get even a single drop of water in them, they will seize up into a thick, lumpy, unusable paste. Melt your candy gently in the microwave in short bursts, stirring frequently.
- The Thick, Lumpy, Bumpy Coating. This happens when your candy melts are too thick. You won’t be able to get a nice, smooth coat, and the heavy coating can make the cake balls fall apart. Thin your melts with a teaspoon of shortening until you have a smooth, fluid consistency.
Variations & Customizations (The Ball is in Your Court)
Once you’ve mastered the basic technique, you can create endless flavor combinations!
- Classic Red Velvet Cake Balls: A stunning and delicious choice. Use a red velvet cake mix for your base, a can of cream cheese frosting for the binder, and coat them in white candy melts.
- Zesty Lemon Cake Balls: Use a lemon cake mix and a can of lemon frosting. Coat them in white or yellow candy melts and sprinkle with a little yellow sanding sugar for sparkle.
- “Birthday Cake” Cake Balls: Use a funfetti cake mix and vanilla frosting. Coat them in white candy melts and immediately cover them in a shower of rainbow nonpareils or sprinkles.
Your Burning Cake Ball Questions, Answered
Let’s clear up some of the most common questions about these tiny treats.
What is the difference between a cake ball and a cake pop?
The only difference is the stick! A cake pop is a cake ball that has been put on a lollipop stick. This recipe is the perfect base for making cake pops; just be sure to follow the specific steps for inserting the stick securely.
My cake balls feel greasy or oily. What did I do wrong?

You added too much frosting. The frosting is what contains most of the fat, and when you add too much, the cake crumbs become oversaturated, leading to a greasy, oily texture and a ball that won’t hold its shape well.
Can I use real chocolate instead of candy melts for the coating?
You can, but it is much more difficult for beginners. Real chocolate (especially white or milk chocolate) needs to be properly “tempered” to set up hard and shiny at room temperature. If you just melt regular chocolate chips, they will be soft and melt to the touch even after they’ve set. Candy melts are designed for easy dipping and a hard finish.
How do I get my cake balls so perfectly round?
The key is the consistency of your cake/frosting mixture. It should be firm enough to roll smoothly between your palms without being sticky. A small cookie scoop also ensures that you start with the same amount of “dough” every time, which leads to uniform balls.
Can I make cake balls ahead of time? How should I store them?
Yes! They are a fantastic make-ahead treat. Once the candy shell has completely set, you can store them in an airtight container in the refrigerator for up to a week.
What is the best cake-to-frosting ratio?
There is no exact magic ratio, as different cake mixes and frosting brands have different moisture and fat levels. A great starting point is to use about ½ to ¾ cup of frosting for a full 9×13 inch cake. The best method is to always start with less and add more only as needed.
Can I freeze homemade cake balls?
Absolutely! Let the coating set completely, then you can freeze them in a single layer on a baking sheet before transferring them to an airtight container or freezer bag. They will last for up to 3 months. Let them thaw in the refrigerator.
Final Thoughts
You’ve done it. You have successfully committed a beautiful act of culinary alchemy, transforming a humble cake into a tray of decadent, professional-looking truffles. You are now a master of the cake ball, a champion of the candy melt.
So go forth and share these addictive little bites of deliciousness. And when your friends and family ask you which fancy bakery you bought them from, just give them a little wink and a mysterious smile. Your secret is safe with me.