How to Make Mochi Ice Cream at Home (It’s Easier Than You Think!)
Let’s talk about that first bite of mochi ice cream. That moment when your teeth sink through a soft, pillowy, slightly chewy, magical outer layer to find a core of cold, creamy, perfect ice cream. It’s a textural masterpiece, a delightful little puzzle for your mouth. It’s a dessert that seems like it could only be created by mystical elves in a secret, futuristic food laboratory.
I am here today to pull back the curtain and tell you that the elves are a lie. The futuristic lab is just your microwave. You, a mere mortal with a kitchen and a slight tolerance for chaos, can make these incredible little treats. Today, we’re going to learn how to make mochi ice cream, and you’ll be shocked at how this seemingly impossible dessert is a totally achievable, and incredibly fun, project.
Why This Recipe Is a Certified Kitchen Adventure
So, why should you dive into the world of sticky rice flour and frozen ice cream spheres? What makes this project so worthwhile?
First, it’s a wildly fun, hands-on experience. This isn’t your standard “mix things in a bowl and bake” situation. You get to create a strange and wonderful dough, play with its unique, stretchy texture, and feel like a true culinary artist as you assemble these little jewels. It’s like edible Play-Doh for grown-ups.
Second, the customization is absolutely endless. Your favorite ice cream flavor in the entire world? Guess what? That can be a mochi ice cream flavor. Mint chip? Yes. Salted caramel? Absolutely. That weird, artisanal lavender-honey flavor you love? Go for it! You are the master of your mochi destiny.
Finally, it is insanely impressive. Showing up to a gathering with a tray of beautiful, pastel-colored, homemade mochi ice cream is a serious power move. People will be baffled. They will be in awe. They will assume you are a wizard. Let them. You’ve earned it.
The A-List Ingredients
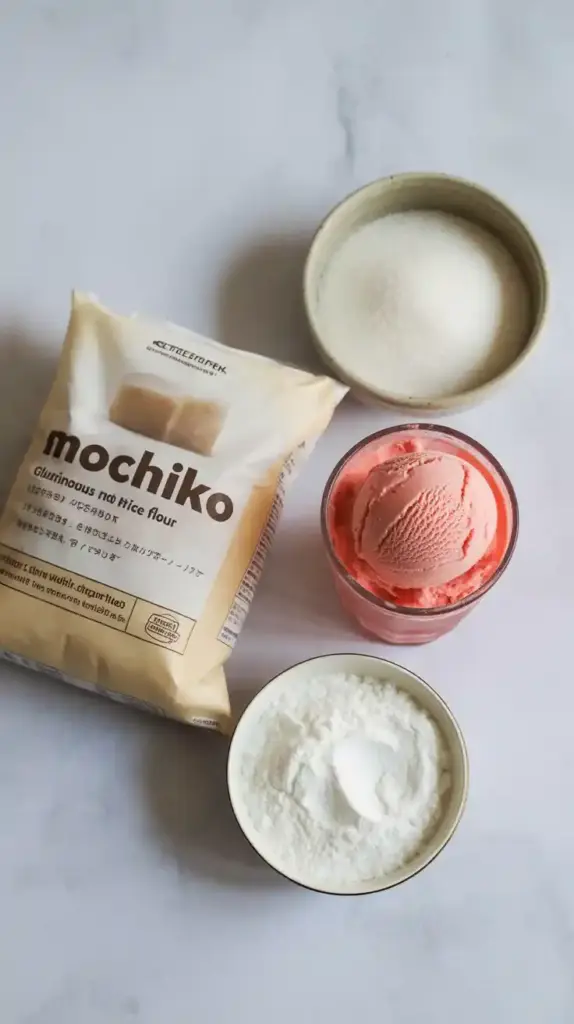

The magic of mochi is born from a surprisingly short list of ingredients. The key is using the right kind of flour.
For the Mochi Dough (The Magical Wrapper):
- Glutinous Rice Flour (like Mochiko brand): 1 cup. THIS IS THE MOST IMPORTANT INGREDIENT AND IS NON-NEGOTIABLE. This is not the same as regular rice flour. It’s made from a specific type of sticky rice and is the only thing that will give you that signature chewy, stretchy texture. You can find it in most Asian markets or in the international aisle of larger grocery stores.
- Granulated Sugar: ¾ cup.
- Water: 1 cup.
- Cornstarch or Potato Starch: At least ½ cup, for dusting. This will be your best friend.
- A few drops of food coloring (Optional): To make your mochi pretty pastel colors.
For the Filling:
- Your Favorite Ice Cream: 1 pint. Choose a high-quality ice cream that freezes firm.
The Mochi-Maker’s Toolkit
Having the right gear will be the difference between a fun, sticky adventure and a full-blown kitchen meltdown.
- A Microwave-Safe Bowl: A large glass or ceramic bowl is perfect for making the mochi dough.
- A Whisk and a Silicone Spatula: For mixing and handling the sticky dough.
- A Muffin Tin and Paper Liners: This is the pro-secret for getting perfectly uniform, frozen scoops of ice cream.
- A Small Ice Cream Scoop or a Melon Baller: For creating those perfect little ice cream spheres.
- A Rolling Pin: For rolling out your mochi dough.
- A 3 to 4-inch Round Cookie Cutter: For cutting out perfect circles of dough. The rim of a glass also works in a pinch.
- A Large, Clean Work Surface: You’ll need plenty of space for your cornstarch-dusted battlefield.
- Plastic Wrap: Essential for wrapping and storing.
Step-by-Step: Your Guide to Chewy, Creamy Bliss
This is a process of stages. The key is to work smart and work fast. Read through all the steps first, take a deep breath, and let’s get sticky.
Phase 1: The Ice Cream Prep (Do This First!)
- The Pre-Scoop: Line a standard muffin tin with paper liners. Use your small ice cream scoop to create 12 compact, round scoops of your chosen ice cream. Place one scoop in each liner.
- The Deep Freeze: Place the entire muffin tin in the freezer and let the scoops freeze until they are rock-solid. This will take at least 1-2 hours. This is a critical, non-negotiable first step. Working with soft ice cream is a recipe for a soupy, sticky disaster.
Phase 2: The Magical Mochi Dough
- Mix the Dough: In your large, microwave-safe bowl, whisk together the 1 cup of glutinous rice flour and the ¾ cup of sugar. Add the 1 cup of water and whisk until you have a smooth, milky, lump-free batter. If you’re using food coloring, add a few drops now.
- The First Microwave Zap: Cover the bowl loosely with plastic wrap. Microwave on high for 1 minute.
- The First Stir: Carefully remove the hot bowl. The mixture will have started to set around the edges. Use a wet silicone spatula to stir and fold the mixture together. It will be lumpy and weird. This is normal.
- The Second Zap and Final Cook: Cover the bowl again and microwave for another 1 to 1 ½ minutes. The mochi dough is done when it’s translucent, incredibly sticky, and has puffed up. When you stir it, it should be a thick, stretchy, cohesive mass. If you see any opaque white spots, give it another 30 seconds.
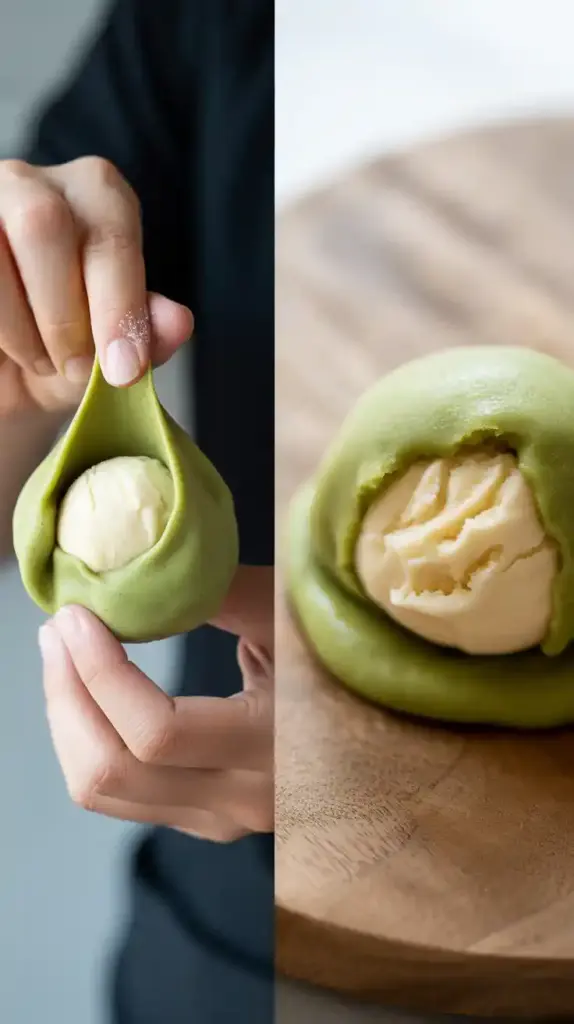
Phase 3: The Cornstarch Battlefield and Assembly
- Prepare Your Surface: Generously, and I mean GENEROUSLY, dust a large, clean work surface with cornstarch. This is your non-stick shield.
- The Dough Dump: Scrape the incredibly hot and sticky mochi dough out onto the prepared surface. Dust the top of the dough with more cornstarch. Dust your hands. Dust your rolling pin. When in doubt, add more cornstarch.
- Roll and Cut: Carefully roll the warm mochi dough out until it’s about ¼-inch thick. Use your round cookie cutter to cut out as many circles as you can.
- THE ASSEMBLY (Work Fast!): Take one of your rock-solid ice cream balls from the freezer. Place it in the center of a mochi circle. Working quickly, use your hands to stretch the mochi dough up and around the ice cream ball, pinching the edges together at the bottom to seal it completely.
- The Wrap and Freeze: Immediately wrap the finished mochi ice cream ball tightly in a small piece of plastic wrap. Place it back in the muffin tin (or on a plate) and return it to the freezer. Repeat this process with the remaining ice cream and mochi circles, working one or two at a time to prevent a meltdown.
- The Final Freeze: Let the finished mochi ice cream balls freeze for at least another 1-2 hours to firm up completely before serving.
Calories & Nutritional Info (A Little Bite of Happiness)

This is a sweet, unique dessert. Let’s look at the numbers for one mochi ice cream ball.
- Estimated Calories: Around 150-200 kcal per piece, depending on the ice cream you use.
- Naturally Gluten-Free: Mochi is made from rice flour, making this a fantastic gluten-free treat.
- A Sweet Indulgence: It’s a confection made of sticky rice, sugar, and ice cream. It’s meant to be a fun, special treat.
Common Mochi Mishaps to Avoid
This recipe can be tricky. Here’s how to avoid the most common disasters.
- Using the Wrong Flour. I will carve this on a stone tablet if I have to. If you use regular rice flour instead of glutinous rice flour (Mochiko), you will not get mochi. You will get a sad, crumbly, non-stretchy paste and a profound sense of disappointment. It must be glutinous (sticky) rice flour.
- The Sticky Apocalypse. I’m not exaggerating when I say that mochi dough is one of the stickiest substances in the universe. Cornstarch is your best friend, your shield, and your everything. Be ridiculously generous with it on your hands, your work surface, your rolling pin, and the dough itself. You cannot use too much.
- The Great Ice Cream Meltdown. This is a race against the clock. Your ice cream balls must be frozen completely solid, and you must work quickly to wrap the warm mochi dough around them. If you dawdle, you’ll have a puddle of ice cream soup and a sticky mochi wrapper. Work one or two at a time, keeping the rest of the ice cream in the freezer.
- Under-cooking the Mochi Dough. If your finished mochi has a gritty, floury taste, it means you didn’t cook it long enough in the microwave. It needs to be cooked until it’s translucent, shiny, and very sticky and stretchy. An undercooked dough won’t have the right chewy texture.
Variations & Customizations (The Mochi-verse Awaits)
Once you’ve mastered the technique, you can create an endless array of flavors.
- Classic Matcha Mochi: A traditional and delicious choice. Sift 1-2 tablespoons of high-quality matcha powder in with your glutinous rice flour and sugar at the beginning. Fill with a simple vanilla bean or red bean ice cream.
- Decadent Chocolate Mochi: Sift 2-3 tablespoons of unsweetened cocoa powder in with the dry ingredients. This chocolate mochi is incredible when filled with chocolate, coffee, or even peanut butter ice cream.
- Fruity Strawberry or Mango Mochi: Use strawberry or mango ice cream for the filling. Add a single drop of pink or yellow gel food coloring, respectively, to the mochi batter to create a beautiful, vibrant pastel color that matches the filling.
Your Burning Mochi Questions, Answered
Let’s clear up some of the most common questions about this magical treat.
What exactly is glutinous rice flour and where can I find it?
Glutinous rice flour, often sold under the brand name Mochiko, is a flour made from a specific type of short-grain rice that is very high in starch, which makes it “sticky” or “gluey” when cooked. You can find it in the international aisle of most well-stocked grocery stores, at any Asian market, or online.
Why is my mochi dough so incredibly sticky? How do I handle it?
That stickiness is the entire point! It’s what gives mochi its signature chewy texture. The only way to handle it is to use a liberal, almost comical amount of cornstarch on every surface it might touch: your hands, your counter, your tools.
Can I make the mochi dough on the stovetop instead of the microwave?

Yes. You can combine the ingredients in a non-stick skillet and cook over medium-low heat, stirring constantly with a spatula, until the dough thickens, becomes translucent, and forms a sticky mass. It’s more work, but the result is the same.
Can I use a different filling besides ice cream?
Traditionally, mochi is often filled with a sweet red bean paste (anko) or a whole strawberry. You could also fill it with a thick chocolate ganache or a small ball of cookie dough.
How long does homemade mochi ice cream last in the freezer?
When wrapped tightly in plastic wrap and stored in an airtight container, it will last for about 2-3 weeks in the freezer. After that, the mochi can start to get a bit dry.
My mochi is rock-hard right out of the freezer. Why?
This is completely normal! The mochi wrapper gets very firm when frozen solid. Just let your mochi ice cream sit on the counter for 3-5 minutes before eating. It will soften up to that perfect, chewy consistency.
Can I make this recipe dairy-free or vegan?
Absolutely! The mochi dough itself is naturally dairy-free and vegan. Just fill it with your favorite dairy-free or vegan ice cream, and you’re good to go!
Final Thoughts
You’ve done it. You have tamed the sticky beast. You have harnessed the power of the microwave to create a magical, chewy, creamy dessert that most people are too scared to even try. You are a mochi-making warrior. You are a culinary champion.
So go on, grab one of your beautiful creations from the freezer. Let it soften on the counter for just a minute or two. Take a bite, close your eyes, and enjoy the glorious, textural masterpiece that you, a brilliant and capable human, made with your own two hands.