How to Make a Sandwich Like You Actually Know What You’re Doing
You think you know how to make a sandwich, don’t you? It seems simple enough. You grab two slices of sad, floppy bread from a plastic bag, slap a lonely, folded-over piece of lunch meat in the middle, maybe a sweaty slice of cheese, and you call it lunch. I am here today, as your friend and culinary guide, to tell you that you’ve been doing it all wrong. That wasn’t a sandwich; it was a cry for help.
Today, we’re staging an intervention for mediocre lunches. We’re not just assembling ingredients between bread; we’re practicing the high art of sandwich architecture. We’re going to build a masterpiece of textures and flavors so perfect, it will make you weep a single, mayonnaise-tinged tear of joy. Today, my friend, you are going to learn how to make a sandwich.
Why This “Recipe” Is a Foundational Life Skill
Why dedicate over a thousand words to something you’ve been doing since you were five? Because mastering the art of the sandwich is a skill that will pay delicious dividends for the rest of your life.
First, this is a masterclass in flavor dynamics. A great sandwich isn’t just a pile of ingredients; it’s a carefully constructed balance of salty, savory, fresh, creamy, and crunchy. We’re going to talk about building layers of flavor that make every single bite an interesting and delightful experience.
Second, this is a guide to preventing Sandwich Sadness™. What is Sandwich Sadness? It’s soggy bread. It’s when all your fillings slip out the back in a tragic avalanche. It’s a structurally unsound lunch. We will build a sandwich with integrity, a sandwich that holds together until the very last bite.
Finally, a well-built sandwich turns a boring lunch into a culinary event. When you present someone (or just yourself) with a beautifully constructed, perfectly layered, and neatly sliced sandwich, it’s an act of love. It’s impressive. It shows you care. It says, “I am a person who has their life together, at least for this one glorious lunch.”
The Ingredients: Anatomy of a Perfect Sandwich

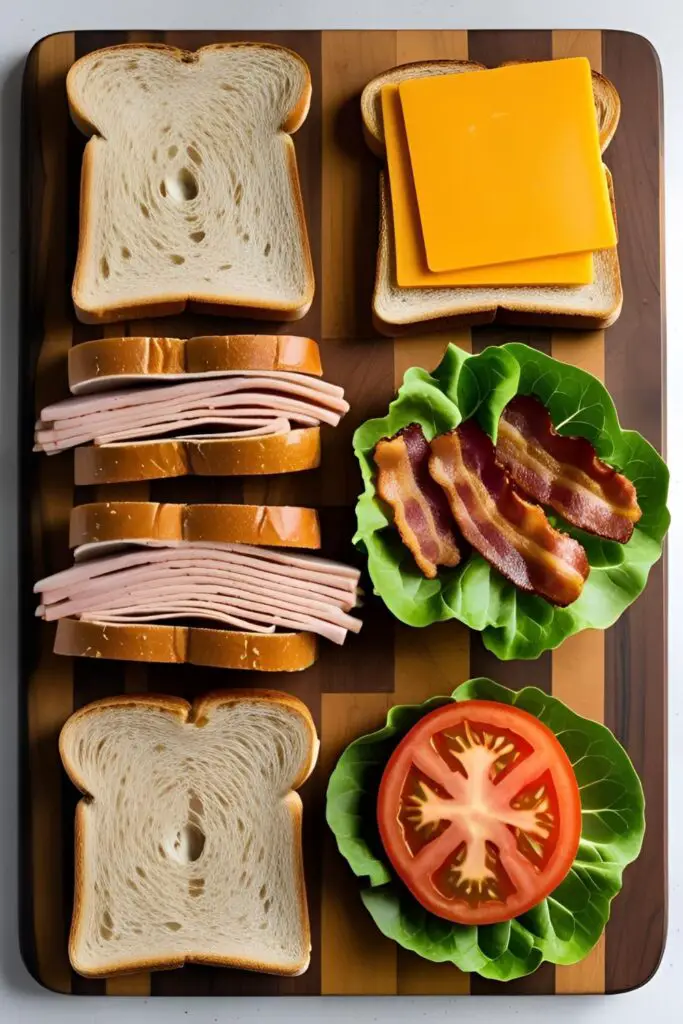
For our masterclass today, we will be constructing a true icon, a titan of the sandwich world: The Ultimate Turkey Club. This sandwich has it all: multiple layers, a variety of textures, and a classic flavor profile.
- The Foundation (The Bread): 3 slices of high-quality bread. Sourdough, a sturdy Pullman loaf, or a thick-cut whole wheat are all excellent choices.
- The Moisture Barrier (The Spread): ¼ cup of good quality mayonnaise. This is not just for flavor; it’s a crucial, fat-based shield that protects your bread from getting soggy.
- The Protein (The Stars):
- 6-8 slices of high-quality, thinly sliced roasted turkey breast.
- 4 slices of crispy, perfectly cooked bacon.
- The Cheese (The Creamy Factor): 2 slices of sharp cheddar, provolone, or Swiss cheese.
- The Freshness & Crunch (The Veggies):
- A few leaves of crisp lettuce. Iceberg or Romaine work best for pure, unadulterated crunch.
- 2-3 slices of a ripe, juicy tomato.
- The Structural Pins (Non-Negotiable): 4 frilly toothpicks. Yes, the frilly ones.
The Sandwich Architect’s Toolkit
You don’t need a lot of fancy equipment, but a few key tools will make your sandwich construction far more successful.
- A Toaster or a Skillet: For toasting your bread to a perfect golden brown.
- A Good Serrated Bread Knife: For that clean, professional, diagonal slice at the end.
- A Spreading Knife or an Offset Spatula: For applying your moisture barrier (mayo) in a smooth, even layer.
- Frilly Toothpicks: I mentioned them once, and I’ll mention them again. They are the decorative rebar of your sandwich skyscraper.
- A Large Cutting Board: Your construction site.
- A Skillet: For cooking your bacon to crispy perfection.
The Architectural Blueprint: A Step-by-Step Construction Guide
Read this carefully. The order of operations is crucial for the structural integrity of your creation. We are building, not just piling.
Step 1: The Prep Phase Cook your bacon until it’s perfectly crispy, then drain it on a paper towel. While it cooks, toast your 3 slices of bread to a beautiful, even golden brown. Slice your tomato and wash your lettuce leaves. Have all your components ready. A good architect prepares their materials before construction begins.
Step 2: Apply the Moisture Barrier Lay your 3 slices of toasted bread on your cutting board. Spread a thin, even layer of mayonnaise on one side of each slice. Make sure to go all the way to the edges. This fatty layer is what will prevent the moisture from the tomato and turkey from turning your beautiful, crisp toast into a sad, soggy sponge.
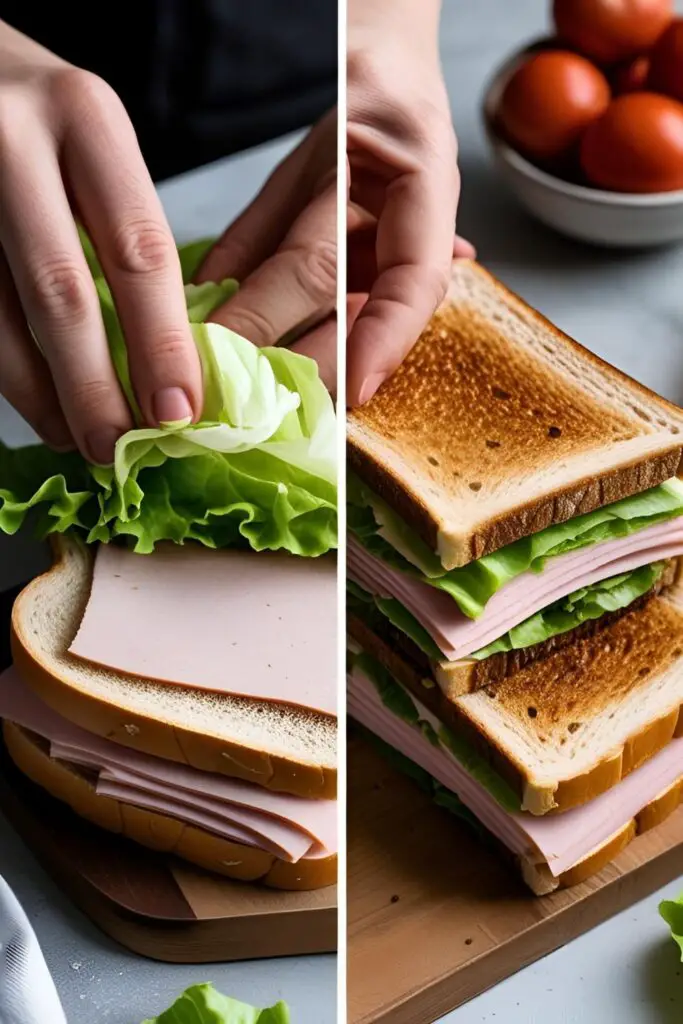
Step 3: The First Story (Bottom Layer) Take one slice of bread (mayo-side up) and place it on your board. This is your foundation. On top of this, place a layer of lettuce. The lettuce acts as a “grip tape” for the next layer. Now, place your sliced turkey on top of the lettuce, followed by the two slices of cheese.

Step 4: The Mezzanine (The Middle Layer) Take your second slice of toast and place it, mayo-side down, on top of the cheese. You have now completed the first level of your club sandwich. Give it a gentle press.
Step 5: The Second Story (Top Layer) On top of your middle slice of bread, spread another thin layer of mayo. Now, add another leaf of lettuce (more grip tape!). Place your 4 slices of crispy bacon on the lettuce, and finally, top with the sliced tomatoes. Sprinkle the tomatoes with a tiny pinch of salt and pepper.
Step 6: The Roof Take your third and final slice of bread and place it, mayo-side down, on top of the tomatoes. Gently but firmly press the entire sandwich down with the palm of your hand to compact the layers.
Step 7: Install the Structural Pins This is a crucial step for stability. Take your four frilly toothpicks and insert one into each of the four quadrants of the sandwich, about an inch in from the corners. This will hold everything together for the final, most important step.
Step 8: The Grand Slice Take your long, sharp, serrated bread knife. A club sandwich must, by law, be sliced on the diagonal. Place your hand firmly on top of the sandwich and use a confident, sawing motion to slice it in half, from one corner to the opposite corner. Repeat to slice the other way, creating four perfect, triangular quarters. The toothpicks will prevent everything from sliding apart.
Serve immediately, and admire your beautiful, structurally sound masterpiece.
Calories & Nutritional Info (A Glorious Breakdown)

This is a hearty, substantial sandwich. Let’s look at the numbers for the whole glorious thing.
- Estimated Calories: Around 700-900 kcal. This is a full meal, not a light snack.
- Protein Powerhouse: Packed with protein from the turkey, bacon, and cheese, this sandwich will keep you full and satisfied.
- A Balanced Meal?: Hey, you’ve got your carbs (bread), protein (meat/cheese), fat (mayo/bacon), and vegetables (lettuce/tomato). It’s practically a food pyramid.
Common Sandwich Sabotage to Avoid
Don’t let these rookie mistakes ruin your architectural triumph.
- The Soggy Bread Catastrophe. I know I sound like a broken record, but this is the #1 sandwich crime. It’s caused by using untoasted bread or putting wet ingredients (like tomatoes) directly against the bread. Toast your bread. Use your mayo as a waterproof shield.
- The Slip-n-Slide Effect. Placing a slippery tomato slice directly onto a slippery piece of turkey is an invitation for an ingredient avalanche. The lettuce is not just for crunch; it’s edible grip tape. Use it to separate slippery layers and hold everything in place.
- Using Flimsy, Weak Bread. Trying to build a hearty, multi-layered sandwich on flimsy, soft white bread is like trying to build a skyscraper on a foundation of Jell-O. It will collapse under the weight of its own ambition. Choose a sturdy, high-quality bread.
- The Cowardly Straight Slice. A club sandwich must be sliced on the diagonal. It’s not just for looks (though it does look a million times better). It creates a wider surface area of the beautiful cross-section, and it makes the sandwich points easier to handle and eat. Be bold. Slice diagonally.
Variations & Customizations (Building Your Own Masterpiece)
Once you’ve mastered the architecture, you can change the materials.
- The Californian Club: A West Coast classic. Swap the regular mayo for a garlic aioli, use a hearty sourdough bread, and add a generous layer of fresh, sliced avocado on top of the bacon and tomato layer.
- The Spicy Italian Stallion: Ditch the turkey. Use layers of salami, capicola, and pepperoni instead. Use provolone cheese, and instead of just lettuce and tomato, add some tangy and spicy giardiniera (chopped pickled vegetables).
- The Ultimate Veggie Stack: For a vegetarian version that’s just as hearty, use a sturdy, seedy whole wheat bread. Use hummus as your moisture barrier and main spread. For the layers, use thick slices of grilled halloumi cheese, roasted red peppers, crisp cucumber slices, and a generous pile of fresh sprouts.
Your Burning Sandwich Questions, Answered
Let’s clear up some of the most common sandwich-related queries.
What is the absolute best bread for making a sandwich?
It depends on the sandwich! For a hearty, layered sandwich like a club, you want something sturdy that can be sliced thick, like a good sourdough, a Pullman loaf, or a rustic Italian loaf. For a simple grilled cheese, a softer sandwich bread is great.
How do you keep a sandwich from getting soggy if you’re packing it for lunch?
The secrets are: 1) Toast the bread. 2) Use your mayo/butter barrier. 3) Pack wet ingredients like tomatoes and pickles separately and add them right before you eat.
What is the correct order to layer a sandwich?
A good general rule is: Bread, Spread, Lettuce (or other leafy green), Meat/Main Protein, Cheese, Other Veggies (like tomato/onion), and then Bread with Spread. The lettuce acts as a secondary barrier and a grip layer.
Do I really have to toast the bread?
For a cold sandwich like this? Yes. One hundred percent. Toasting provides flavor, textural contrast, and most importantly, structural integrity. It’s the difference between a sandwich and a sad, floppy mess.
What is the actual point of the third slice of bread in a club sandwich?
It provides stability and separation between the two different sets of ingredients (the turkey/cheese layer and the bacon/tomato layer), ensuring that each bite is perfectly balanced. Also, it just looks cool.
Why do people cut sandwiches diagonally? Is it just for looks?
It’s mostly for looks, but there are practical reasons too! It exposes more of the interior, making the sandwich look more appealing. It also creates two long, pointy ends that are often easier to take the first bite from than a flat edge.
How can I make my everyday sandwiches more interesting?
Think beyond basic mustard and mayo! Try using different spreads like pesto, hummus, or garlic aioli. Add something crunchy like a layer of potato chips (yes, inside the sandwich). Use different cheeses, or add some tangy pickled onions.
Final Thoughts
You did it. You are no longer a mere assembler of ingredients between two pieces of bread. You are a Sandwich Architect, a master of layers, a connoisseur of the crunch, a warrior against sogginess. You have taken a simple lunch and elevated it into a work of art.
So go forth and build the sandwiches of your dreams. Use sturdy bread, respect the moisture barrier, and always, always slice on the diagonal. Your lunch hour will never be the same again.