How to Make Fondant for Beginners (The Easy Way That Actually Tastes Good!)
Let’s be brutally honest for a moment: fondant has a terrible reputation. It’s that thick, chewy, often completely flavorless blanket on wedding cakes that people dutifully peel off and leave on the side of their plate like a sugary shame-puddle. It looks stunning, sure, creating those impossibly smooth surfaces and perfect shapes. But the taste? Not so much. It’s the edible equivalent of a beautiful but uncomfortable pair of shoes.
But what if I told you that it doesn’t have to be this way? What if I told you there’s a way to make fondant at home that is ridiculously easy, costs a fraction of the store-bought stuff, and actually tastes… good? Like, “vanilla-marshmallow-cloud” good? Today, my friend, I’m showing you how to make fondant for beginners using a magical, game-changing ingredient: marshmallows. Prepare to have your cake-decorating world rocked.
Why This Recipe Is a Baking Game-Changer
So, why should you, a perfectly sane person, willingly invite a potentially sticky situation into your kitchen? Oh, the reasons are sweet and plentiful.
First and foremost, it actually tastes delicious. This is the number one advantage. Unlike traditional fondant, which can have a bland, pasty flavor, marshmallow fondant tastes exactly like what it is: a soft, sweet, vanilla-flavored marshmallow confection. It’s a pleasant addition to a slice of cake, not something to be discarded. People will be shocked when they discover they like the fondant.
Second, it is unbelievably easy to make. If you can melt marshmallows in a microwave and operate a mixer, you have all the prerequisite skills. There’s no cooking sugar to specific, terrifying temperatures. There are no weird, hard-to-find ingredients like glycerin or glucose. It’s the most accessible entry point into the world of fondant.

Finally, it’s so much cheaper. A single tub of pre-made fondant can be surprisingly pricey. A bag of marshmallows and a bag of powdered sugar? That’s just a few bucks. You can make a huge batch of high-quality, delicious fondant for a fraction of the cost. Your wallet will thank you.
The A-List Ingredients
This magical, edible clay comes together with just a few pantry staples. It’s beautiful in its simplicity.
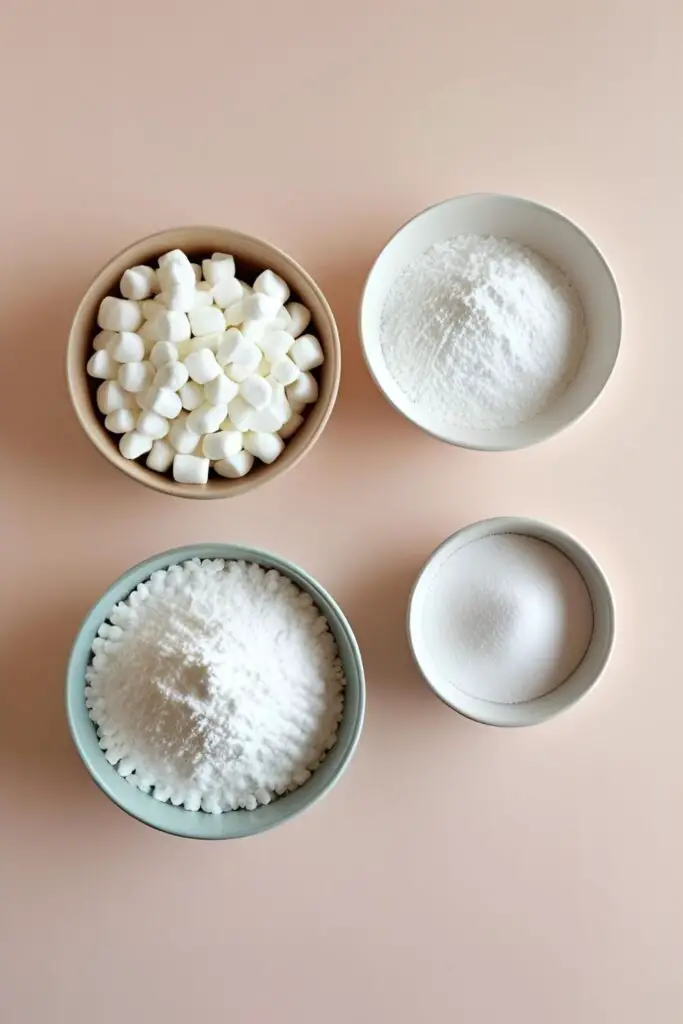
- Miniature Marshmallows: 1 bag (16 ounces). Minis melt more evenly and quickly than the big campfire ones.
- Powdered Sugar (Confectioners’ Sugar): About 2 pounds (or 7-8 cups), sifted. You will be using a LOT of this.
- Water: 2-3 tablespoons.
- Shortening: About ½ cup. This is not an ingredient for flavor; it is your secret weapon against stickiness. Do not skip this.
- Vanilla Extract: 1 teaspoon. Use a clear vanilla extract if you want to keep your fondant a pure, bright white.
The Fondant-Wrangler’s Toolkit
Having the right gear will be the difference between a fun project and a sticky, kitchen-wide disaster.
- A Large Microwave-Safe Bowl: The bigger, the better. Marshmallows puff up to an alarming size when melted.
- A Stand Mixer with a Dough Hook: This is highly, highly recommended. Kneading this sticky dough by hand is possible, but it is a serious arm workout and a test of your sanity. The dough hook will do all the hard work for you.
- A Sturdy, Greased Spatula: For the initial mixing.
- Measuring Cups and Spoons: For your water and vanilla.
- A Large, Clean Work Surface: You’ll need plenty of space for kneading.
- Plenty of Plastic Wrap: For storing your finished fondant.
- Gel Food Coloring (Optional): If you plan on coloring your fondant.
Step-by-Step: From Marshmallow Goop to Silky Smooth Fondant
Ready to create some edible Play-Doh for adults? Let’s do this. The key to this whole process is to embrace the grease.
Step 1: The Great Greasing Ritual This is the most important step of the entire process. Take a generous scoop of shortening and grease EVERYTHING. Grease the inside of your large microwave-safe bowl. Grease your spatula. Grease the dough hook of your stand mixer. Grease a large patch of your countertop. When you think you’ve used enough, add a little more. If it’s going to touch the fondant, it needs to be greased.
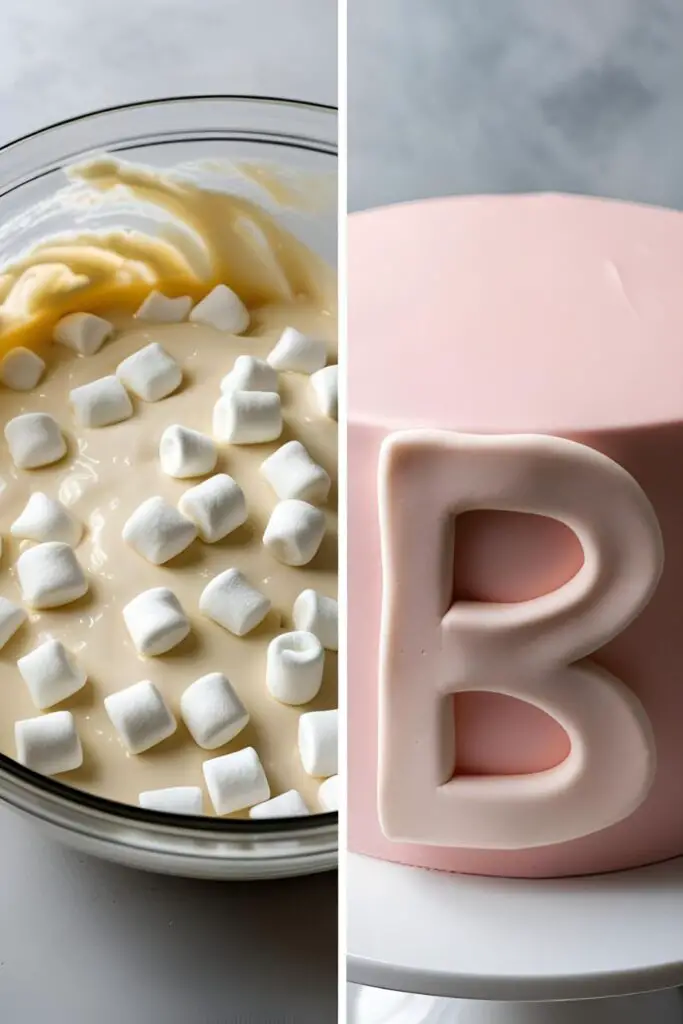
Step 2: The Marshmallow Meltdown Pour the entire bag of mini marshmallows into your greased bowl. Add the 2-3 tablespoons of water. Microwave on high for 30-second intervals, stirring with your greased spatula in between, until the marshmallows are completely melted and have puffed up into a glorious, gooey blob. This usually takes about 2 minutes total.

Step 3: The Initial Mix Once the marshmallows are melted and smooth, stir in your vanilla extract. Now, add about 4-5 cups of the sifted powdered sugar to the bowl. Stir with your greased spatula until it starts to come together into a ridiculously sticky, thick paste. It will look like a disaster. This is normal.
Step 4: Let the Mixer Do the Work (The Smart Way) Scrape the sticky blob from your bowl into the greased bowl of your stand mixer fitted with the greased dough hook. Turn the mixer on low speed and begin gradually adding the remaining powdered sugar, about a cup at a time. The mixer will knead the sugar into the marshmallow goo. Keep adding sugar until the dough starts to pull away from the sides of the bowl and forms a soft, pliable ball. It might not use all of the powdered sugar, so add it slowly.
Step 5: The Hand-Kneading Finale Scoop a generous amount of shortening onto your hands. Turn the fondant out onto your greased work surface and knead it by hand for just a minute or two, until it’s smooth and no longer sticky to the touch. It should feel like a soft, pliable dough.
Step 6: The Mandatory Rest This is a crucial step for the texture. Coat the entire ball of fondant with a thin layer of shortening, then wrap it tightly in two layers of plastic wrap. Place it in an airtight container or a Ziploc bag and let it rest at room temperature for at least 8 hours, or preferably overnight. This allows the fondant to firm up and develop the perfect texture for rolling and decorating.
Fondant Facts & Figures (The “Nutrition”)
Let’s be very clear about what we just made.
- It’s Sugar: Fondant is, at its core, a sugar dough. It’s made of marshmallows (which are sugar, corn syrup, and gelatin) and a whole lot of powdered sugar. It is a confection, meant for decoration.
- A Little Goes a Long Way: You typically only eat a small amount of fondant along with your slice of cake.
- Allergen Information: This recipe is naturally nut-free. Most commercial marshmallows are also gluten-free, but be sure to check the packaging on your specific brand if you have a gluten sensitivity.
Common Fondant Fails (And How to Avoid Them)
Making fondant is easy, but it can be a sticky situation. Here’s how to avoid the most common disasters.
- The Sticky Apocalypse. This is the number one issue for beginners. The cause? You didn’t use enough shortening. I know it feels weird to grease everything so aggressively, but marshmallow goo is one of the stickiest substances known to humankind. Shortening is your non-stick force field. Grease your hands, your tools, your counter. You cannot over-grease.
- Adding All the Powdered Sugar at Once. If you dump all two pounds of sugar into the melted marshmallows, you will create a stiff, unmixable brick. The mixture will seize up, and your mixer will cry for help. You must add the sugar gradually, allowing it to be incorporated slowly.
- Using Granulated Sugar. Do not, under any circumstances, try to use regular granulated sugar for this. You will end up with a grainy, crunchy, weeping, terrible mess. You must use powdered sugar (also called confectioners’ sugar or icing sugar).
- Skipping the Overnight Rest. I know you’re excited to use your beautiful, homemade fondant. But if you try to roll it out right after you make it, it will be too soft, sticky, and prone to tearing. The overnight rest is non-negotiable. It allows the fondant to set, firm up, and develop the perfect stretchy, pliable consistency for covering a cake.
Variations & Customizations (Playing with Your Food)

Now that you have this amazing, edible clay, you can do all sorts of fun things with it!
- How to Color Your Fondant: The best way to color fondant is with gel food coloring. Liquid food coloring will make your fondant too wet and sticky. Just dip a toothpick into the gel, swipe it onto your fondant, and knead until the color is uniform. Wear gloves if you don’t want to have rainbow hands for three days.
- How to Flavor Your Fondant: The sky’s the limit! Instead of vanilla extract, try using other oil-free extracts like almond, lemon, peppermint, or even cake batter flavoring. Just add it in Step 3.
- Making Simple Decorations: You don’t have to cover a whole cake! Roll your fondant out and use small cookie cutters to create beautiful, simple shapes to decorate cupcakes or cookies. You can also use it like Play-Doh to sculpt simple figures, flowers, and bows.
Your Burning Fondant Questions, Answered
Let’s demystify this magical marshmallow dough.
What’s the real difference between marshmallow fondant and traditional fondant?
Traditional fondant is made by cooking sugar, water, and glucose to a specific temperature, then adding gelatin and glycerin. It has a stiffer texture and a more neutral (some would say bland) flavor. Marshmallow fondant uses melted marshmallows as its base, making it much easier to make at home and giving it a sweeter, more pleasant vanilla-marshmallow flavor.
How do I store my homemade fondant, and how long does it last?
Keep it tightly wrapped in plastic wrap and stored in an airtight container or Ziploc bag at room temperature. Do not refrigerate it, as this can cause it to become hard and create condensation. It will last for several weeks.
My fondant is tearing when I try to cover a cake. What’s wrong?
It’s likely either rolled too thin, or it didn’t rest long enough to develop its strength. Also, make sure your cake has a smooth, even layer of buttercream underneath for the fondant to grip onto.
Can I really make this without a stand mixer?
You can, but prepare for an epic arm workout. You will have to do all the kneading by hand on a very well-greased surface. It’s a great way to earn your slice of cake!
How do I actually get the fondant to stick to the cake?
You need a “glue.” A thin, smooth layer of buttercream frosting is the perfect adhesive. Frost your cake with a thin layer, let it crust slightly, then apply your fondant.
My fondant is too dry and cracking / too soft and sticky. How do I fix it?
If it’s too dry and cracking, knead in a tiny bit of shortening until it becomes pliable again. If it’s too soft and sticky (often due to humidity), knead in a little more powdered sugar until it reaches the right consistency.
Can I make chocolate marshmallow fondant?
Yes! When you add your first batch of powdered sugar, also sift in about ½ cup of unsweetened cocoa powder. You’ll have a rich, delicious chocolate fondant.
Final Thoughts
You’ve done it. You have officially conquered the final boss of cake decorating. You’ve created beautiful, edible, and—most importantly—delicious Play-Doh for adults. You have stared into the face of a sticky, intimidating project and emerged victorious with a perfect, smooth ball of marshmallowy goodness.
The world of cake decorating is now your oyster. Go forth and cover things in a smooth, sweet, marshmallowy blanket of victory. You’ll never look at that sad, peeling layer on a wedding cake the same way again.