How to Make Sorbet From Scratch (So Much Better Than Store-Bought!)
Let’s have a moment of silence for every pint of store-bought sorbet that has ever wronged us. You know the one. You bought it expecting a burst of intense, refreshing fruit flavor, but what you got was a grainy, vaguely fruit-flavored ice block that immediately bent your spoon and your will to live. It’s a tragedy, a dessert betrayal of the highest order.
What if I told you that making silky-smooth, intensely flavorful, perfectly scoopable sorbet at home is not only possible, but it’s also ridiculously easy? Forget that sad, icy pint in the freezer aisle. Today, you’re going to learn how to make sorbet that captures the pure, unadulterated soul of a piece of fruit, and you’ll never look back.
Why This Recipe Is Basically Sunshine in a Bowl
So, why should you bother making your own when you can just buy it? Oh, let me count the ways this homemade version will change your life.
First, the flavor is explosive. When you make sorbet from scratch with fresh, ripe fruit, the taste is pure and unbelievably vibrant. It tastes more like the fruit than the fruit itself. It’s a concentrated blast of summer that no artificial flavoring or high-fructose corn syrup can ever hope to replicate.
Second, it’s incredibly simple. At its heart, sorbet is just three things: fruit, sugar, and water. That’s it. It’s a minimalist masterpiece. We’ll add a couple of optional secret weapons to perfect the texture, but the core recipe is as easy as it gets.

Finally, it’s naturally elegant and inclusive. Sorbet is dairy-free, gluten-free, and vegan. It’s the perfect, sophisticated dessert to serve to guests with dietary restrictions, and it never feels like a “substitute.” It’s just glorious, refreshing, and delicious in its own right.
The (Refreshingly Simple) Ingredients List
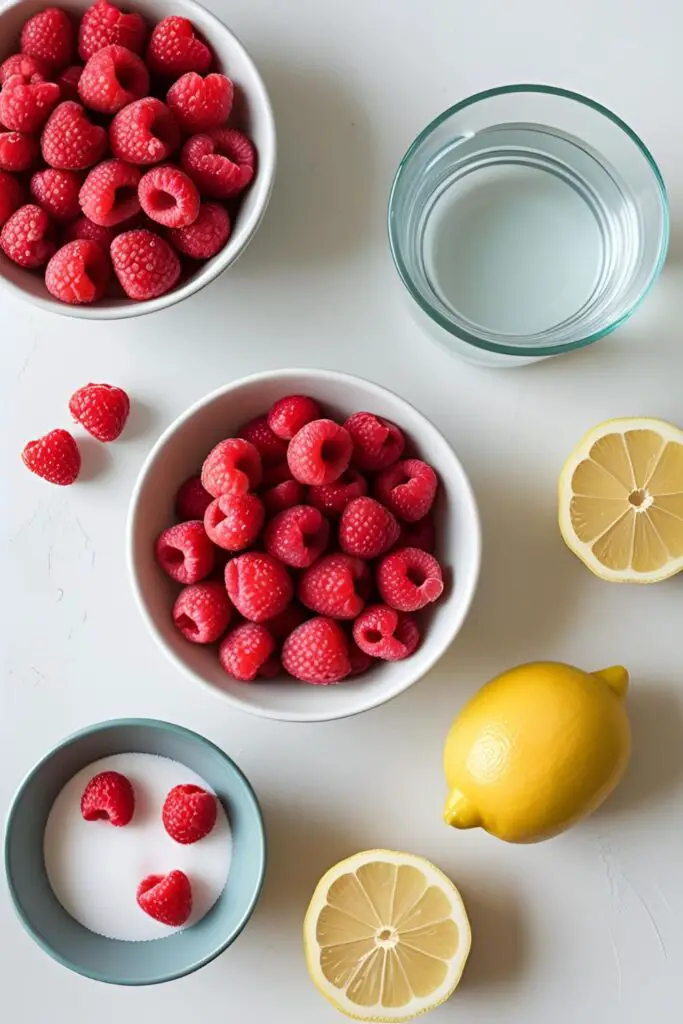
We’re going to use raspberry as our example because its flavor is bold and it makes for a stunningly beautiful sorbet. But you can substitute almost any fruit!
- Fresh or Frozen Raspberries: 1 pound (about 16 oz or 450g). If using frozen, no need to thaw.
- Granulated Sugar: 1 cup.
- Water: 1 cup.
- Fresh Lemon Juice: 1-2 tablespoons. This brightens the fruit flavor and is not optional, IMO.
- Optional Secret Weapon #1 (for scoopability): 1 tablespoon of light corn syrup or glucose.
- Optional Secret Weapon #2 (the boozy version): 1 tablespoon of vodka or a complementary liqueur like Chambord.
A Quick Word on the Secret Weapons: Don’t worry, these won’t make your sorbet taste like corn or a cocktail. A small amount of corn syrup or alcohol acts as a natural “antifreeze.” It lowers the freezing point of the mixture, which is the scientific way of saying it prevents your sorbet from turning into a rock-solid ice cube and keeps it smooth and scoopable. Trust the science!
The Sorbet-Maker’s Toolkit
To achieve silky-smooth perfection, a few tools are highly recommended.
- An Ice Cream Maker: This is the #1 tool for getting the best texture. It churns the sorbet base while freezing it, which keeps the ice crystals tiny and the final product smooth.
- A Blender or Food Processor: Essential for pureeing your fruit into a smooth liquid.
- A Fine-Mesh Sieve or Strainer: If you’re using a seedy fruit like raspberries, this is absolutely critical for removing the seeds. No one wants a crunchy, seedy sorbet.
- A Medium Saucepan: For making the simple syrup that forms the base of our sorbet.
- An Airtight Freezer-Safe Container: For storing your finished masterpiece. A shallow, flat container is better than a deep one.
- An Ice Cream Scoop: For serving up those perfect, beautiful spheres.
Step-by-Step: From Fruit to Frozen Bliss
We’re going to walk through the process for an ice cream maker, and then I’ll tell you how to do it without one.
Phase 1: Creating the Sorbet Base
- Make a Simple Syrup: In your medium saucepan, combine the 1 cup of sugar and 1 cup of water. Heat over medium heat, stirring occasionally, until the sugar has completely dissolved. You don’t need to boil it. Once dissolved, remove it from the heat and let it cool.
- Puree the Fruit: While the syrup cools, place your raspberries (fresh or frozen) and the fresh lemon juice in a blender or food processor. Blend until the mixture is completely smooth and liquidy.
- Strain Like Your Life Depends on It: Place your fine-mesh sieve over a large bowl. Pour the raspberry puree into the sieve and use a spatula to press the liquid through, leaving all the tiny, annoying seeds behind. This step takes a minute, but it is SO worth it.
- Combine and Conquer: Pour the cooled simple syrup into the bowl with your beautiful, seedless raspberry puree. Stir in your optional “antifreeze” (the corn syrup or vodka) if you’re using it.
- THE MOST IMPORTANT STEP: CHILL. COMPLETELY. You now have your sorbet base. Cover the bowl and place it in the refrigerator for at least 4-6 hours, but overnight is even better. The base must be thoroughly chilled (below 40°F or 4°C) for it to churn properly. Do not skip this step!

Phase 2: The Final Freeze
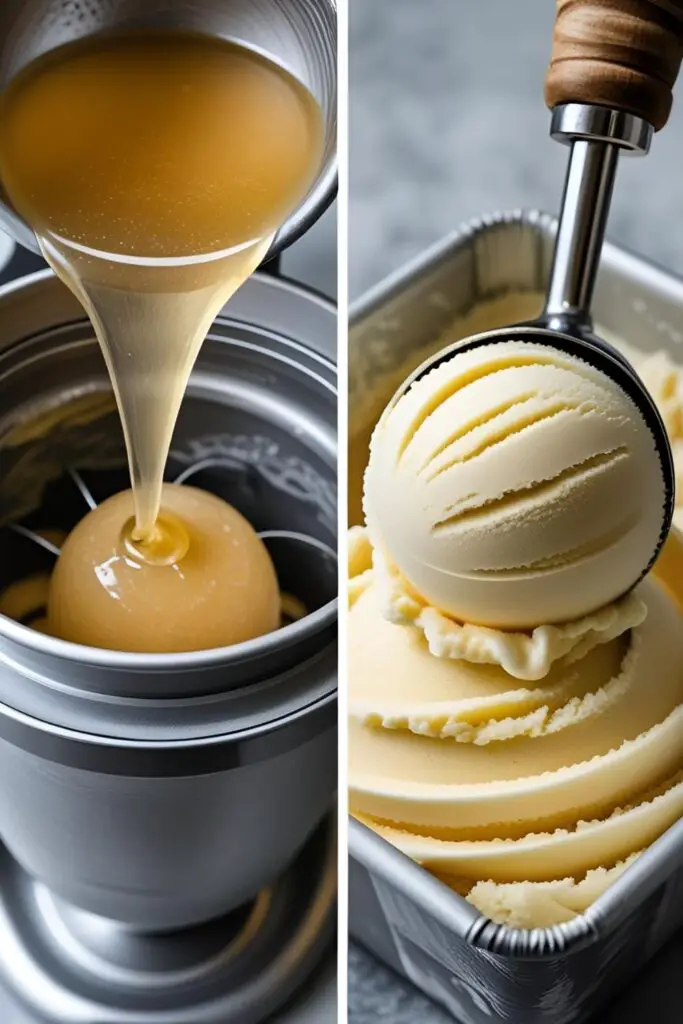
- Method 1: With an Ice Cream Maker (The Best Texture)
- Pour your very cold sorbet base into your pre-frozen ice cream maker bowl.
- Churn according to the manufacturer’s instructions, usually for about 20-25 minutes. It will look like a thick, glorious, soft-serve slushie.
- Transfer the churned sorbet to your airtight freezer container, press a piece of parchment paper on the surface, and freeze for at least 4 hours to “ripen” and harden to a scoopable consistency.
- Method 2: Without an Ice Cream Maker (The No-Churn Hack)
- Pour your very cold sorbet base into a shallow, freezer-safe container (like a metal baking pan).
- Place it in the freezer. After 45 minutes, use a fork to scrape and stir the mixture, breaking up any large ice crystals.
- Return it to the freezer. Repeat the scraping and stirring process every 30-45 minutes for the next 2-3 hours. The more you break up the ice crystals, the smoother your final sorbet will be.
- Once it’s too firm to scrape, it’s ready. The texture won’t be quite as silky as the churned version, but it will still be delicious!
Calories & Nutritional Info (The Good News)
Sorbet is often seen as a lighter alternative to ice cream, and for good reason.
- Estimated Calories: Around 150-180 kcal per ½ cup serving.
- Fat-Free & Fabulous: Sorbet is naturally fat-free, dairy-free, and vegan.
- It’s All About the Fruit (and Sugar): The calories come primarily from the natural fruit sugars and the added sugar in the simple syrup. The sugar is essential for both taste and texture.
Common Sorbet Sins to Avoid
Don’t let these simple mistakes turn your vibrant sorbet into a sad, icy brick.
- The Rock-Hard, Icy Mess. This is the #1 sorbet problem, and it’s almost always because the sugar-to-fruit ratio is off. Sugar does more than sweeten; it lowers the freezing point of water, preventing large ice crystals from forming. Not enough sugar, and you get a solid block of ice. This is why following the recipe and using the optional corn syrup/vodka is so helpful.
- Churning a Warm Base. I know you’re excited, but pouring a room-temperature sorbet base into your ice cream maker will only result in disappointment. The machine can’t freeze it fast enough, leading to large ice crystals and a grainy texture. Your base must be thoroughly fridge-cold.
- Skipping the Strainer. If you are making sorbet with a seedy fruit like raspberries, blackberries, or some passionfruit, you must strain the puree. Biting into a mouthful of tiny, hard seeds is an unpleasant experience that will ruin your silky-smooth sorbet dreams.
- Forgetting the Acid. That small squeeze of lemon or lime juice does wonders. It balances the sweetness and makes the fruit flavor pop. Without it, your sorbet can taste a little flat and one-dimensional.
Variations & Customizations
This basic method works for almost any fruit. Get creative!
- Boozy Sorbet Slushies: Turn your dessert into a cocktail. Increase the alcohol to 2-3 tablespoons per quart of sorbet base. Use vodka for a neutral kick, or a complementary liqueur (Chambord with raspberry, Cointreau with orange, Limoncello with lemon). The result will be a softer, more slushie-like sorbet perfect for a grown-up party.
- Herbal Infusion Sorbet: Make your simple syrup, and while it’s still hot, toss in a handful of fresh herbs like mint, basil, or rosemary. Let it steep for 30 minutes, then strain out the herbs before chilling. Strawberry-Basil or Lemon-Mint sorbet? Yes, please.
- Spicy & Tropical Sorbet: Make a mango or pineapple sorbet base. Add the zest of one lime and a pinch (1/8 teaspoon) of cayenne pepper or chili powder to the base before chilling. The combination of sweet, tangy, and spicy is absolutely addictive.
Your Burning Sorbet Questions, Answered
Let’s tackle the most common questions about this frozen treat.
What’s the difference between sorbet, sherbet, and ice cream?
Ice Cream has a dairy base (cream and/or milk) and contains at least 10% milkfat. Sherbet is like sorbet’s cousin; it’s primarily fruit and sugar but contains a small amount of dairy (usually milk or buttermilk), giving it a slightly creamier texture. Sorbet contains no dairy at all; it’s just fruit, sugar, and water.
Do I absolutely have to use an ice cream maker?

No, you can use the no-churn method described above. However, an ice cream maker will give you a significantly smoother, less icy texture because it constantly scrapes the sides of the bowl while freezing.
My sorbet won’t freeze solid! It’s too soft. Why?
You likely have too much sugar or too much alcohol in your base. Both of these ingredients lower the freezing point. If your fruit was extremely ripe and sweet, you might need to slightly reduce the sugar in the simple syrup next time.
Can I use less sugar to make it healthier?
You can, but it will directly impact the texture. Less sugar means a harder, icier sorbet. If you want to cut back, do so gradually and consider adding one of the “secret weapon” ingredients (corn syrup or vodka) to help compensate for the loss of smoothness.
What are the best fruits for making sorbet?
Fruits with high pectin and fiber content, like berries (raspberries, strawberries), stone fruits (peaches, apricots), and mangoes, make wonderfully smooth sorbet. Citrus fruits (lemon, lime, orange) are also fantastic.
How do I properly store homemade sorbet?
Store it in a shallow, airtight container in the coldest part of your freezer (usually the back). To prevent ice crystals from forming on top, press a piece of parchment paper or plastic wrap directly onto the surface of the sorbet before putting the lid on.
My sorbet is frozen rock-solid and I can’t scoop it. What do I do?
This is totally normal for homemade sorbet! It doesn’t have the commercial stabilizers that keep store-bought versions soft. Simply take the container out of the freezer and let it sit on the counter for 5-10 minutes to soften up before scooping.
Final Thoughts
You’ve done it. You have harnessed the very essence of a piece of fruit, combined it with a little bit of science, and transformed it into a stunning, sophisticated, and ridiculously refreshing dessert. You are a flavor wizard. You are a master of the frozen arts.
So go on, grab your scoop, and serve yourself a bowl of that vibrant, silky-smooth creation. This is what real sorbet tastes like. You’ll never be tempted by that sad, icy pint again.