How to Make Momos From Scratch (The Ultimate Dumpling Guide)
Let’s be real for a moment: is there any food more universally loved than a dumpling? Think about it. That delicate, tender wrapper giving way to a juicy, savory, flavor-packed filling… it’s one of life’s purest joys. And sitting at the very top of the dumpling pantheon, looking down from its majestic Himalayan throne, is the mighty momo.
For too long, these perfect little parcels of happiness have been something we only order out or buy frozen. We look at their intricate pleats and assume they require some ancient, secret technique passed down through generations of dumpling masters. Well, I’m here to tell you that’s a myth. Today, you’re going to learn how to make momos from scratch, and you’re going to realize that you are a dumpling-making machine.
Why This Recipe Is Your New Favorite Kitchen Project
Okay, so why should you dedicate an afternoon to folding little pouches of dough? I’m so glad you asked.
First, it’s a ridiculously fun project. Making momos isn’t just cooking; it’s an activity. It’s like edible origami. It’s the perfect thing to do on a lazy Sunday, with a good playlist on, maybe with a friend or partner. The rhythmic process of rolling, filling, and folding is surprisingly therapeutic.
Second, the flavor is on a whole other level. When you make the dough from scratch and use fresh ingredients for the filling, the taste is infinitely brighter, juicier, and more delicious than anything you can buy. You control the spice, the salt, the aromatics. This is your momo, your way.

Finally, the bragging rights are immense. Imagine placing a steaming basket of your own perfectly pleated, homemade momos on the table. The silence, followed by the chorus of “You made these?!” is a reward in itself. You will officially be known as “the friend who makes amazing momos,” which is a pretty great title to have.
The Ingredients: Your Momo-Making Blueprint
We’re going to break this down into three parts: the dough, the filling, and the essential dipping sauce. Don’t be scared by the list; it’s all simple stuff.
For the Simple Momo Dough:
- All-Purpose Flour: 2 cups.
- Salt: ½ teaspoon.
- Warm Water: About ¾ cup. You might need slightly more or less.
- Neutral Oil: 1 teaspoon.
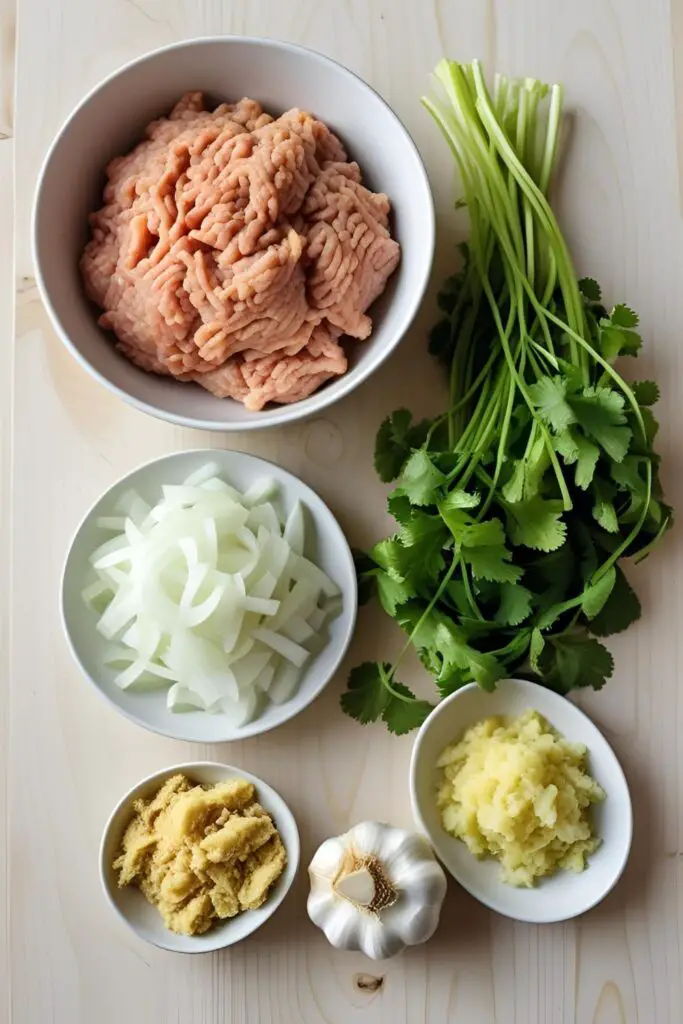
For the Juicy Chicken Filling:
- Ground Chicken: 1 pound (about 450g). Don’t use extra-lean; a little fat equals a juicy momo.
- Yellow Onion: 1 small, very finely minced.
- Ginger: 1 tablespoon, freshly grated.
- Garlic: 3-4 cloves, freshly minced.
- Cilantro: ¼ cup, finely chopped.
- Soy Sauce: 1 tablespoon.
- Neutral Oil: 1 tablespoon.
- Salt & Black Pepper: To taste.
For the Quick & Spicy Momo Chutney (Dipping Sauce):
- Ripe Tomatoes: 2 large, roughly chopped.
- Garlic: 3 cloves.
- Dried Red Chilies: 3-4 (or more, if you’re brave).
- Salt: To taste.
The Dumpling Maker’s Toolkit
Having the right gear makes the process smoother, but don’t worry, we’ve got hacks if you don’t have everything.
- A Steamer: A multi-tiered bamboo steamer is classic and works beautifully. A metal steamer insert for a pot is also perfect.
- A Large Pot: To boil water for your steamer.
- Mixing Bowls: At least two—one for the dough and one for the filling.
- A Rolling Pin: A small, thin one (like a dowel) is actually easier to use for the small wrappers than a big, heavy one.
- A Small Round Cookie Cutter (Optional): A 3 to 4-inch cutter helps you make perfectly uniform wrappers, but a glass rim works too.
- A Small Blender or Food Processor: For making the chutney smooth and dippable.
- The Basics: A sharp knife, a cutting board, and a clean work surface.
Step-by-Step: Your Journey to Momo Mastery
This is a process, not a race. Put on some music, relax, and enjoy it. We’ll do it in phases.
Phase 1: Make the Dough (The Foundation)
- In a large bowl, whisk together the flour and salt. Create a well in the center.
- Pour in the teaspoon of oil and about half of the warm water. Use your fingers to start mixing the flour into the water.
- Gradually add more water, a little at a time, mixing and kneading until a shaggy dough forms. You want a dough that is soft and pliable, but not sticky.
- Turn the dough out onto a lightly floured surface and knead for 5-7 minutes until it’s smooth and elastic.
- Place the dough back in the bowl, cover it with a damp cloth, and let it rest for at least 30 minutes. This is a crucial step that allows the gluten to relax, making the dough much easier to roll out later.
Phase 2: The Filling & The Chutney (The Flavor Core)
- While the dough rests, make the filling. In a large bowl, combine the ground chicken, minced onion, grated ginger, minced garlic, chopped cilantro, soy sauce, oil, salt, and pepper.
- Mix everything together with your hands until it’s just combined. Do not over-mix, or the filling can become tough. Set it aside.
- Now for the chutney! In a small saucepan, add the chopped tomatoes, garlic cloves, and dried red chilies. Add about ½ cup of water and bring to a boil. Let it simmer for 10-15 minutes until the tomatoes are very soft and the skins are peeling.
- Let the mixture cool slightly, then transfer it to a blender. Add salt and blend until you have a smooth, vibrant sauce. Taste and adjust the salt. Your chutney is ready!

Phase 3: The Assembly Line (The Fun Part!)
- Divide your rested dough into two halves. Roll one half into a long, even log. Cut the log into small, equal-sized pieces, about the size of a large grape.
- Take one piece of dough and roll it into a thin circle, about 3-4 inches in diameter. The edges should be thinner than the center. This prevents the bottom from getting soggy and the pleated top from being too thick.
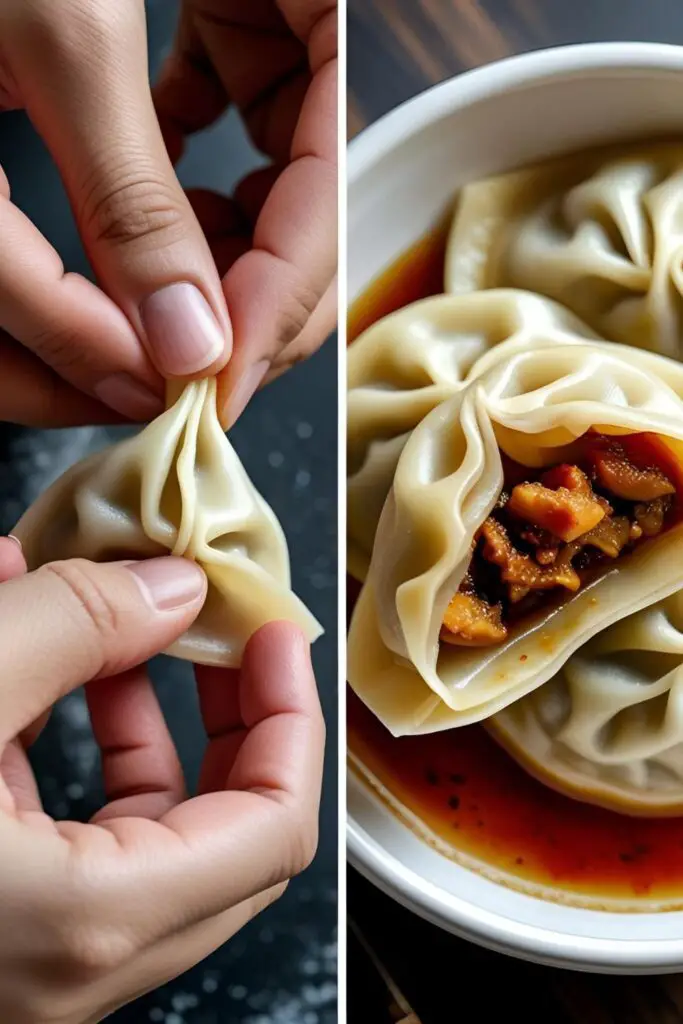
- Place about a tablespoon of filling in the center of the wrapper. Do not overfill!
- Time to fold! For a simple half-moon: Fold the wrapper in half over the filling, creating a semi-circle. Firmly pinch the edges together to seal it completely. You can then make little pleats along the curved edge for a classic look. Don’t stress about making them perfect. A well-sealed momo is a successful momo.
- Place the finished momo on a lightly floured plate or tray and cover with a cloth while you work on the rest.
Phase 4: The Steaming Process
- Fill your large pot with a few inches of water and bring it to a rolling boil.
- Lightly oil the inside of your steamer baskets or line them with cabbage leaves to prevent the momos from sticking. This is a very important step!
- Arrange the momos in the steamer basket, leaving a little space between each one as they will expand slightly.
- Place the steamer over the boiling water, cover with the lid, and steam for 10-12 minutes. The wrappers will become slightly translucent and feel cooked, not doughy.
- Serve immediately with your homemade chutney!
Calories & Nutritional Info (A Guesstimate)
This will vary wildly based on your filling, but here’s a rough idea for the chicken momos.
- Estimated Calories: Around 40-50 kcal per momo.
- A Balanced Bite: You’re getting protein from the chicken, carbs from the wrapper, and a ton of flavor from the aromatics.
- Steamed, Not Fried: Steaming is a very healthy cooking method, keeping the fat content much lower than fried dumplings.
Common Momo Mishaps to Avoid
Everyone makes mistakes their first time. Here’s how to sidestep the most common ones.
- The Thick, Doughy Wrapper. This is the most common beginner mistake. You need to roll the wrappers thinner than you think. The wrapper is a delicate vehicle for the glorious filling, not a thick, doughy blanket. Aim for almost paper-thin edges.
- The Dry, Boring Filling. The secret to a juicy, flavorful momo is moisture and fat. Using super-lean ground meat can result in a dry filling. The small amount of oil and the moisture from the onions are crucial. Make sure your aromatics are minced very finely to distribute their flavor.
- The Dreaded Momo Explosion. This happens for two reasons: you overfilled the wrapper, or you didn’t seal it properly. Be modest with your filling (about a tablespoon is plenty) and pinch those edges together with conviction.
- The Sticking Tragedy. You spent all that time beautifully pleating your momos, only to have them fuse to the bottom of the steamer. Heartbreaking. Always, always oil your steamer basket or line it with cabbage or lettuce leaves.
Variations & Customizations (The Momo-verse)
Once you’ve mastered the classic, the world of momos opens up.
- Classic Veg Momos: The most popular alternative. For the filling, use 2 cups of very finely shredded cabbage, 1 cup of finely grated carrots, 1 finely minced onion, and the same aromatics (ginger, garlic, cilantro, soy sauce). Squeeze out as much water as you can from the cabbage and carrots before mixing to avoid a soggy filling.
- Pan-Fried Momos (Kothey): For a crispy bottom, heat a little oil in a non-stick pan. Place the momos in the pan and fry for 2-3 minutes until the bottoms are golden brown. Then, pour in about ¼ cup of water, immediately cover the pan with a lid, and let them steam for 6-8 minutes until cooked through.
- Spicy Chili Momos (C-Momos): A popular street food style. After steaming your momos, toss them in a fiery, tangy sauce made with soy sauce, vinegar, chili-garlic paste, and some chopped onions and bell peppers. It’s messy and absolutely incredible.
Your Burning Dumpling Questions, Answered
Let’s tackle some common queries.
What’s the difference between momos, wontons, and gyoza?

While all are delicious dumplings, momos are typically from the Tibetan/Nepalese region and have a thicker, chewier dough and are often round with intricate pleats. Gyoza are Japanese pan-fried dumplings with a thinner wrapper. Wontons are Chinese dumplings, usually served in soup, with a very thin, delicate skin.
Can I use store-bought dumpling wrappers to save time?
Yes, absolutely! It’s a fantastic shortcut. Look for the round “gyoza” or “dumpling” wrappers in the refrigerated section of most grocery stores. They work perfectly.
How do I steam momos if I don’t have a steamer?
The DIY Steamer Hack! Place a small, heatproof plate or a metal colander upside down in a large pot. Add a few inches of water (making sure it doesn’t touch the top of the plate). Bring the water to a boil, place your momos on a greased plate on top of your makeshift stand, cover the pot, and steam away.
Can I make and freeze momos for later?
Yes! This is a great way to have momos on demand. After you fold the momos, arrange them on a baking sheet (not touching) and freeze them solid. Then, transfer them to a freezer bag. You can steam them directly from frozen; just add about 4-5 minutes to the steaming time.
My momo filling is always dry. What am I doing wrong?
You might be using meat that’s too lean, or if you’re making veg momos, you didn’t add a little oil for richness. The moisture from finely minced onions is also a key component that many people miss.
My dough is too sticky or too dry. How do I fix it?
If it’s too sticky, add flour one tablespoon at a time while kneading. If it’s too dry and won’t come together, add warm water one teaspoon at a time. Dough is forgiving!
What is the easiest momo shape for a beginner to fold?
The simple half-moon is the easiest. Just fold the circular wrapper in half over the filling and pinch the edges tight. It might not look as fancy, but it will be just as delicious.
Final Thoughts
Look at you. You took flour and water, some simple savory bits, and you created one of the world’s most beloved comfort foods from scratch. You are now a dumpling master, a pleating prodigy, a steaming savant. You have unlocked a new level of kitchen badassery.
So go on, grab a plate of those hot, juicy momos. Dip one generously in that spicy chutney you also made from scratch. Take a bite, close your eyes, and enjoy the taste of your delicious, hard-earned victory.