The Best 5-Minute Chocolate Cake in a Mug (An Easy Recipe!)
It’s 10 PM on a Tuesday. You’ve conquered the day, you’re finally relaxing on the couch, deep into a streaming binge, and then it happens. It starts as a whisper, a faint craving that quickly grows into a roaring, undeniable, primal need for… cake. A warm, gooey, chocolate cake. But the thought of preheating an oven, dragging out the mixer, and dirtying a dozen bowls at this hour? It’s a non-starter.
What if I told you that you are less than five minutes, one mug, and one fork away from fulfilling that craving? No, this isn’t a fever dream. This is the magic of the microwave. I am here to bestow upon you the ultimate life hack, the recipe for a perfect, single-serving cake in a mug. Welcome to the glorious future of instant gratification.
Why This Recipe Is Basically a Superpower
Why is this simple little recipe about to become your go-to for every emergency chocolate situation? Let me count the ways.
First, it is insanely fast. I am not exaggerating when I say you can go from “I want cake” to “I am eating warm, delicious cake” in under five minutes. It takes longer to choose what to watch next than it does to make this dessert. It’s the pinnacle of efficiency.
Second, it’s the definition of portion control. We’ve all been there, facing down an entire 9-inch cake, telling ourselves “just one more sliver.” This recipe makes exactly one perfect, satisfying serving. It’s designed for one person to enjoy without the looming threat of finishing a whole cake over the next 24 hours. It’s responsible indulgence! Kinda.

Finally, the cleanup is an absolute joke. You mix it in the mug you cook it in. You eat it out of the mug you cooked it in. When you’re done, you have one mug and one fork to wash. That’s it. It’s so simple, it feels like cheating.
The Pantry-Raiding Ingredients List
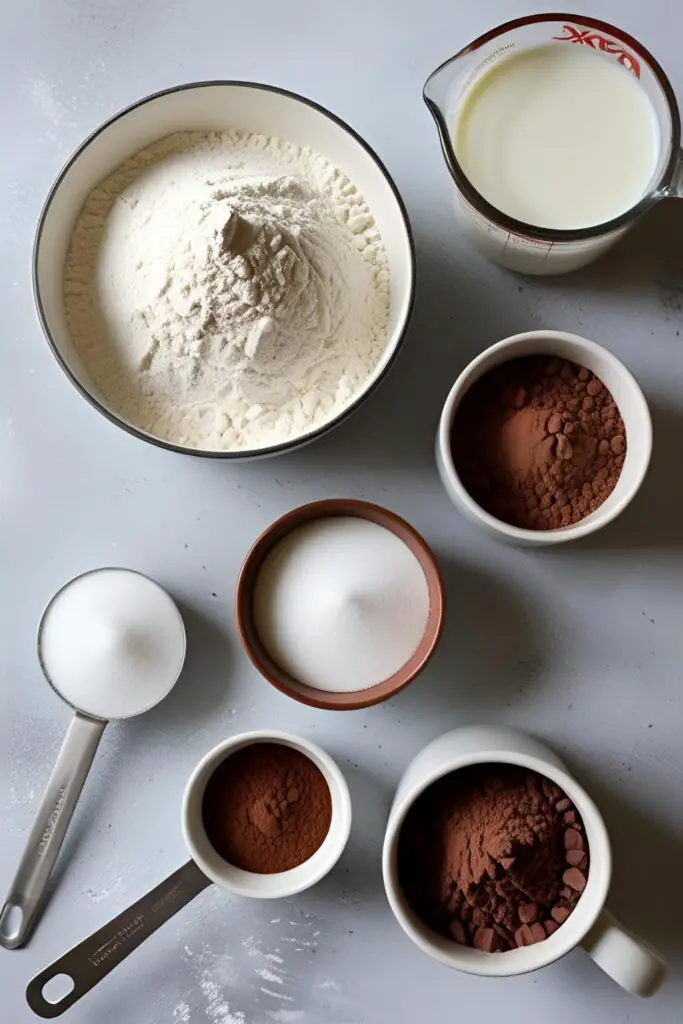
You almost certainly have everything you need to make this right now. Go ahead, check your cupboards.
- All-Purpose Flour: 4 tablespoons.
- Granulated Sugar: 4 tablespoons.
- Unsweetened Cocoa Powder: 2 tablespoons. The better the cocoa, the better the cake.
- Baking Powder: 1/4 teaspoon. This gives it the lift it needs.
- Salt: A tiny pinch. Don’t skip it; it makes the chocolate taste more chocolatey.
- Milk: 3 tablespoons. Whole milk, 2%, almond milk, oat milk… it all works.
- Vegetable Oil or Melted Butter: 3 tablespoons. Oil makes it super moist, butter gives it a richer flavor. Your call!
- Vanilla Extract: 1/2 teaspoon.
- Chocolate Chips (Optional but Recommended): 1-2 tablespoons. This is the secret to creating a molten, gooey center.
A Note on the Mug: You need a standard, microwave-safe ceramic mug that holds at least 12 ounces. Don’t use your grandma’s antique teacup with the gold trim unless you enjoy sparks and a side of danger.
The (Hilariously Short) List of Tools
Prepare to be underwhelmed by the complexity of this setup. It’s beautiful.
- A Microwave-Safe Mug: The vessel, the mixing bowl, and the serving dish all in one.
- A Fork: Your all-in-one whisk and eating utensil.
- Measuring Spoons: For the sake of accuracy. Don’t just eyeball it, you heathen.
- A Microwave: The magical cooking chamber.
Step-by-Step: Your 5-Minute Path to Glory
This is so easy, it’s almost insulting to call it a “recipe.” But here we are.
Step 1: The Dry Ingredient Dump In your chosen microwave-safe mug, add all the dry ingredients: the flour, sugar, cocoa powder, baking powder, and salt. Use your trusty fork to whisk them together thoroughly right in the mug. Make sure there are no lumps of cocoa hiding in the corners.

Step 2: The Wet Ingredient Flood Pour the milk, oil (or melted butter), and vanilla extract directly on top of the dry ingredients. Now, mix everything together with your fork until the batter is smooth and there are no dry patches at the bottom. Do not over-mix! Just stir until it comes together. A few lumps are fine.
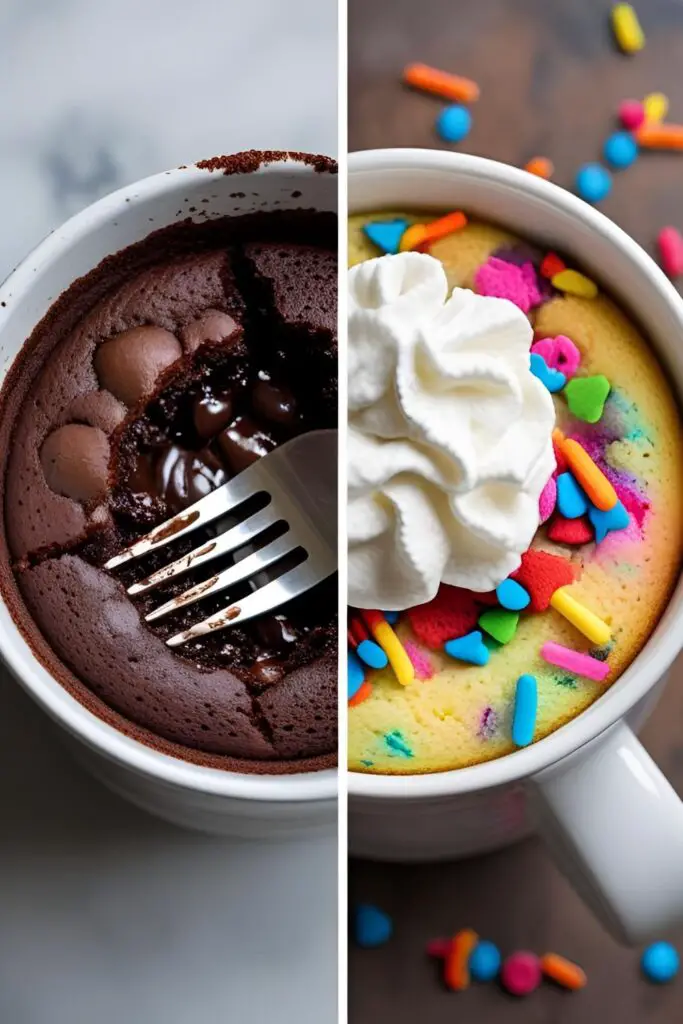
Step 3: The Molten Core (Optional) If you’re using chocolate chips—and I highly recommend you do—gently stir them into the batter, or for a true lava-like center, just drop them in the middle and let them sink. This is a pro move.
Step 4: The Microwave Moment of Truth Place your mug in the center of the microwave. Cook on high for 70 to 90 seconds. This is the most crucial step. Every microwave has its own personality; some are gentle giants, others are raging infernos. 90 seconds is the sweet spot for a 1000-watt microwave. If yours is more powerful, start with 60-70 seconds. The cake should be puffed and set on top, but still moist.
Step 5: Let It Rest (Seriously) The mug and the cake inside will be scalding hot, like the surface of the sun. Let it sit on the counter for at least a minute to cool down. This also allows the cake to finish setting up. Now you can dive in, preferably with a scoop of ice cream or a dollop of whipped cream on top.
Calories & Nutritional Info (For Those Who Must Know)
It’s a single-serving cake you make in five minutes. Let’s manage our expectations.
- Estimated Calories: Around 400-500 kcal per mug, depending on your milk choice and if you add chocolate chips.
- It’s Cake: It’s a dessert designed for pure pleasure and instant gratification. It’s not a health food, and that’s perfectly okay.
- Built-in Moderation: The beauty is that you can’t mindlessly eat an entire sheet cake. You get one perfect, warm, gooey mug of happiness, and then it’s over.
Common Mug Cake Mistakes (And How to Avoid Them)
It’s easy, but it’s not entirely foolproof. Here’s how people mess it up.
- The Rubbery Puck Disaster. The number one cause of a rubbery mug cake is over-mixing the batter. When you vigorously whisk flour and liquid, you develop gluten, which makes things tough and chewy. Gently mix until just combined and then stop.
- The Great Mug-splosion. If your mug cake overflows and makes a huge mess in your microwave, it’s because your mug was too small. The batter will rise significantly, so you need a mug that’s at least 12 ounces, and you should only fill it about halfway to two-thirds full.
- The Dry, Sad Crumbly Mess. This is the heartbreaking result of over-cooking. A microwave cooks from the inside out, and the line between gooey perfection and a dry, brown sponge is razor-thin. It’s always better to undercook it slightly. Start with 70 seconds; you can always add 10 more if it’s too liquidy.
Variations & Customizations (Pimp Your Mug)

This basic recipe is a blank canvas for your wildest late-night cravings.
- Funfetti Birthday Cake in a Mug: The perfect way to celebrate yourself. Omit the cocoa powder, use 5-6 tablespoons of sugar instead of 4, add a whole teaspoon of vanilla, and stir in 2 tablespoons of rainbow sprinkles at the very end.
- Peanut Butter & Chocolate Paradise: After you’ve mixed the batter, drop a heaping tablespoon of creamy peanut butter right into the center. Don’t mix it in. As it cooks, it will create a molten peanut butter core. It’s life-changing.
- Vegan-Friendly Mug Cake: This recipe is already egg-free, which is a huge plus! To make it fully vegan, simply use your favorite plant-based milk (oat milk is fantastic) and ensure your sugar and chocolate chips are certified vegan. Easy peasy.
Your Burning Mug Cake Questions, Answered
I know you have questions. Here are the answers.
Why is my mug cake so rubbery?
You either over-mixed the batter, which developed too much gluten, or you over-cooked it in the microwave, which zapped all the moisture out of it. Be gentle when you mix, and be conservative with your cooking time.
Can I make a cake in a mug without an egg?
Yes! You just did. This recipe is specifically designed to be egg-free, which makes it faster, easier, and accessible to more people.
Can I bake this in a regular oven?
You could, but it completely defeats the purpose of a 5-minute microwave dessert. If you insist, bake it in an oven-safe ramekin at 350∘F (175∘C) for about 15-20 minutes. But really… just use the microwave.
What’s the best kind of mug to use for this?
A standard, wide-bottomed ceramic mug that holds 12-14 ounces is perfect. Avoid mugs that are very tall and narrow, as they can cook unevenly. And again, make sure it is microwave-safe.
Why did my mug cake overflow and make a mess?
Your mug was probably too small for the amount of batter. The baking powder creates a lot of lift, so the batter needs room to rise without staging a jailbreak. Use a larger mug or scale down the recipe slightly.
Can I use a boxed cake mix for a mug cake?
Yes, you can! For a quick hack, mix about 3-4 tablespoons of any cake mix with 2 tablespoons of water in a mug and microwave for about a minute. It’s not as good as from scratch, but it works in a pinch.
My cake is always dry. What am I doing wrong?
You are over-cooking it. Microwave wattages vary wildly. Start with the lowest recommended time (70 seconds) and check it. If the top looks wet, add 10-second intervals until it’s set but still moist.
Final Thoughts
You are now in possession of a dangerous piece of knowledge. You have the power to summon a warm, personal-sized chocolate cake into existence, on demand, in less time than it takes to find your slippers. This is a culinary superpower.
Use it for good. Use it to comfort a friend. Use it to celebrate a small win. Or just use it on a random Wednesday night because you are an adult and you can have cake whenever you want. Go on, you’ve earned it.