So, You Want to Ice a Cake Without Crying? You’ve Come to the Right Place.
Let’s be honest. You’ve baked a beautiful cake. It smells divine. You’re feeling like a domestic god or goddess. Then comes the icing, and suddenly your masterpiece looks like a lumpy, crumb-riddled tragedy. If you’ve ever wanted to know how to ice a cake for beginners without having a complete meltdown, I am here for you.
We’ve all been there. We see those pristine, perfectly smooth cakes on social media and think, “What sorcery is this?” Well, it’s not sorcery. It’s just a few simple tricks and the right tools. Forget your past cake-tastrophes. Today, we conquer the buttercream beast.
Why This Guide is Your New Best Friend
Why should you trust me? Because I’ve made all the mistakes so you don’t have to. I’ve tried to frost a warm cake (spoiler: it melts). I’ve skipped the crumb coat (hello, crumb city). This guide is the culmination of my trials and tribulations, distilled into a simple, no-nonsense method that actually works.
Following these steps will not only give you a stunningly smooth cake but will also boost your baking confidence tenfold. You’ll go from being scared of frosting to looking for any excuse to whip up a layer cake. Birthday? Cake. Tuesday? Cake. You get the idea.
Ingredients (For a No-Fail American Buttercream)
This makes enough to fill and frost a standard 8-inch, two-layer cake.
- 1 cup (2 sticks) unsalted butter, softened to room temperature (This is non-negotiable! Cold butter = lumpy frosting.)
- 4 cups powdered sugar, sifted to remove lumps
- 1 tsp pure vanilla extract
- 2-4 tbsp milk or heavy cream
- Pinch of salt
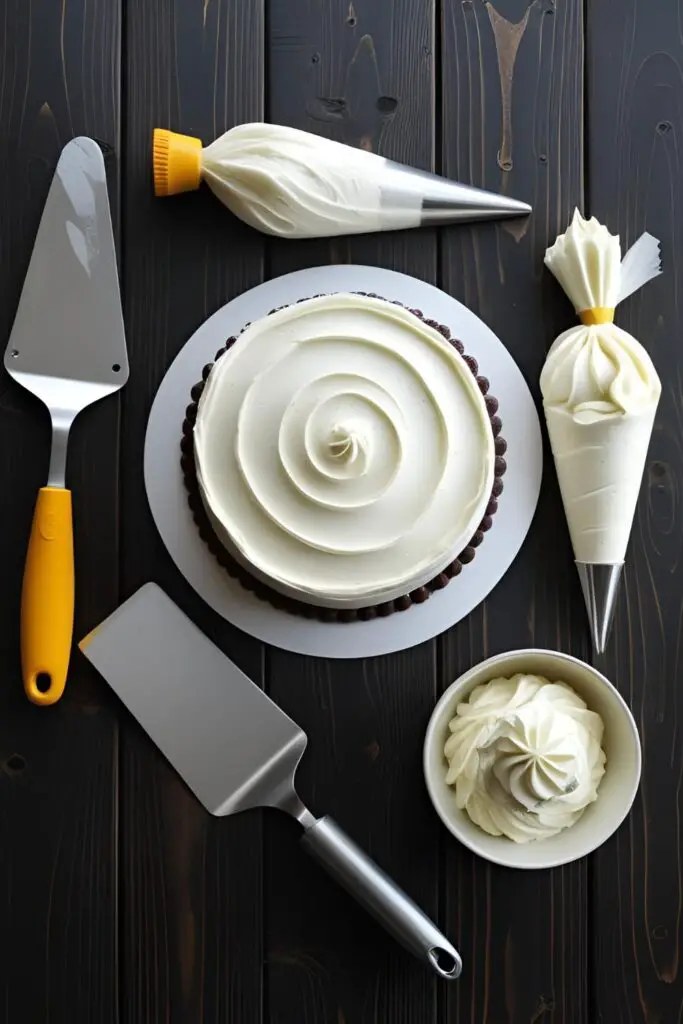
Tools & Kitchen Gadgets
This is where the magic happens. Don’t try to be a hero and use a butter knife. Just don’t.
- Cake Turntable: The single most important tool. It’s your secret weapon for smooth sides.
- Offset Spatula: The long, angled blade is perfect for spreading frosting evenly. Get a large and a small one.
- Bench Scraper (or Dough Scraper): This is how you get those razor-sharp, professional-looking sides.
- Cake Leveler or a long serrated knife: To get flat, even cake layers.
- Piping Bag and a large round tip (optional): For applying the frosting evenly.
- Stand Mixer or Hand Mixer: Unless you want an arm workout worthy of a pro athlete.
Step-by-Step Instructions: Icing a Cake Like a Boss

First, let’s make that glorious buttercream. In a large bowl or the bowl of your stand mixer, beat the softened butter until it’s light and fluffy, about 2-3 minutes. Gradually add the sifted powdered sugar, one cup at a time, mixing on low until combined. Add the vanilla extract and salt. Turn the mixer up to medium-high and beat for another 3-5 minutes until it’s incredibly smooth. Add milk or cream, one tablespoon at a time, until you reach a smooth, spreadable consistency.
Now for the main event!
- Level Your Cakes. Your cakes need to be completely cool. I repeat, COMPLETELY COOL. Use a serrated knife or cake leveler to slice off the domed tops so you have a perfectly flat surface. Save those scraps for snacking—baker’s privilege!
- The Secret Weapon: The Crumb Coat. Place a dab of frosting on your cake board or plate, then place your first cake layer on top. This glues it down. Add a generous layer of frosting on top and spread it evenly. Place your second cake layer on top. Now, cover the entire cake (top and sides) with a very thin layer of frosting. It will look ugly and full of crumbs. That’s the point! This layer traps all the loose crumbs.
- Chill Out. Seriously. Put the crumb-coated cake in the refrigerator for at least 30 minutes. This firms up the frosting and locks the crumbs in place so they don’t ruin your final coat.
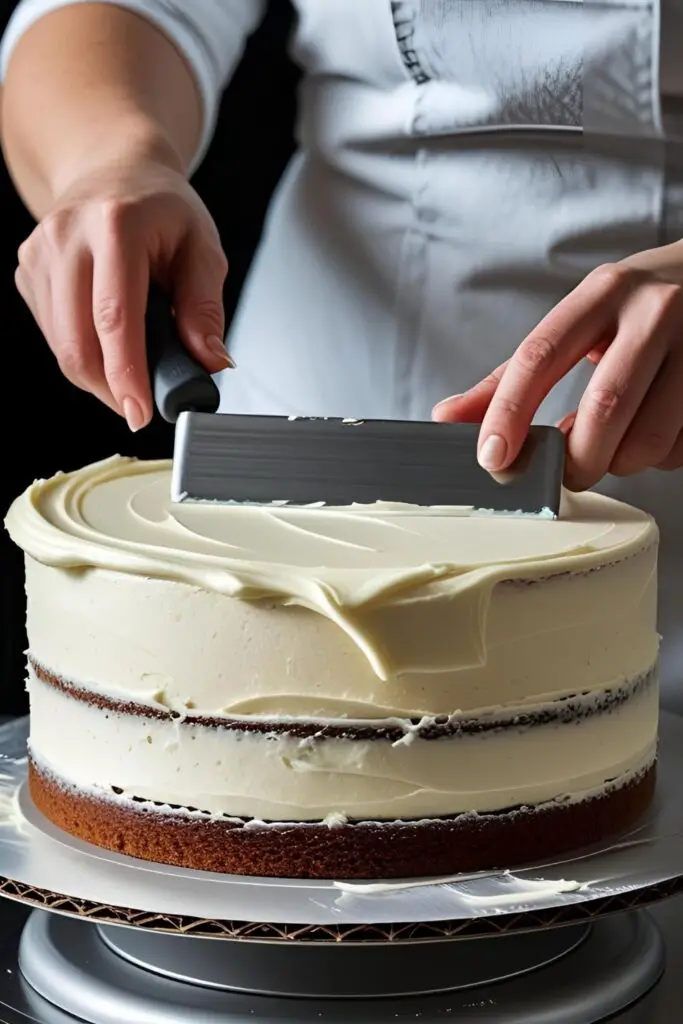
- Apply the Final Coat. Place your chilled cake on the turntable. Using your offset spatula, apply a generous amount of frosting to the top and sides. Be liberal here—it’s easier to scrape excess frosting off than to add more.
- Smooth the Sides. This is the fun part. Hold your bench scraper vertically against the side of the cake at a 45-degree angle. Keep your hand steady and use your other hand to slowly and smoothly spin the turntable. The scraper will smooth the frosting and remove the excess. Scrape the excess frosting from your scraper into a separate bowl (to keep your main bowl of frosting crumb-free). Repeat until the sides are silky smooth.
- Get That Sharp Edge. You’ll now have a “crown” of frosting around the top edge of the cake. Take your offset spatula, hold it parallel to the top of the cake, and gently swipe the excess frosting from the edge toward the center of the cake. Wipe the spatula clean after each swipe.
- Admire Your Work. You did it! You iced a cake! Now you can add sprinkles, piped borders, or just leave it as is in all its glorious, smooth perfection.
Calories & Nutritional Info (Per Serving of Buttercream)
Let’s not kid ourselves, this is butter and sugar. But for those who are curious:
- Calories: Approximately 250-300 kcal per serving.
- Fat: High in fat, primarily from the butter.
- Sugar: Yes. Lots of it.
- Nutritional Value: Mostly provides joy and happiness, which are essential nutrients, IMO.
Common Mistakes to Avoid
- Frosting a Warm Cake: This will result in a soupy, sliding mess. Patience is a virtue. Let it cool completely.
- Skipping the Crumb Coat: You will regret this. Your final layer will be a battlefield of crumbs and regret. Just do the crumb coat.
- Using Frosting That’s Too Stiff or Too Soft: If it’s too stiff, it will tear your cake. If it’s too soft, it will slide right off. Aim for a smooth, peanut butter-like consistency.
- Not Using Enough Frosting: Be generous with your final coat. You need enough frosting to be able to scrape it away to get a smooth finish.
Variations & Customizations
- Chocolate Dream: Replace ½ cup of powdered sugar with ½ cup of unsweetened cocoa powder for a rich chocolate buttercream.
- Cream Cheese Tang: For a tangier frosting, swap half the butter for a block of full-fat, brick-style cream cheese.
- Rustic Swirls: Don’t have a bench scraper or just want a different look? Use the back of a spoon or your offset spatula to create beautiful, rustic swirls in the final coat of frosting. Effortlessly chic!
FAQ Section
1. Why is my buttercream full of crumbs? You probably skipped the crumb coat or didn’t chill the cake long enough after applying it. The crumb coat is your best defense against a crumb-filled finish.
2. How do I get my frosting perfectly white? Use a clear vanilla extract instead of a brown one. Also, beating the butter for a good 5 minutes before adding sugar helps lighten its color.
3. My frosting is too sweet! How can I fix it? A pinch of salt is your best friend. It cuts the sweetness. You can also add a tiny splash of lemon juice to balance the flavor.

4. Why is my frosting grainy? You likely didn’t sift your powdered sugar, or you didn’t beat it long enough. Make sure to sift out any lumps and beat the frosting until it’s completely smooth.
5. How much frosting do I need for a layer cake? The recipe provided is perfect for a standard 8-inch, two-layer cake. For a three-layer cake or a larger cake, you’ll want to make 1.5x the recipe.
6. Do I really need a cake turntable? TBH, yes. Can you do it without one? Maybe. Will it be 100 times harder and more frustrating? Absolutely. A turntable is a cheap investment that pays huge dividends in smooth frosting and saved sanity.
7. How do I store a frosted cake? Store it in a cake carrier or covered in the refrigerator. If it’s American buttercream, it’s generally fine at a cool room temperature for a day.
Final Thoughts
Look at you, a cake-decorating virtuoso! You’ve tamed the buttercream, mastered the crumb coat, and now possess a cake that looks as good as it tastes. Go ahead, take that picture for the ‘gram. You’ve earned every last like. Welcome to the world of beautiful, stress-free cake decorating.