The Ultimate Strawberry Poke Cake Recipe (So Easy It’s Almost Cheating!)
Let’s take a trip back in time. To a simpler era. A time when the most impressive dessert at any gathering involved a box of cake mix, a vibrant packet of Jell-O, and a fluffy cloud of Cool Whip. My friends, I’m here to tell you that this glorious, retro-chic creation is back, and it is better than ever. Today, we are making the legendary strawberry poke cake.
This is the cake of potlucks, summer barbecues, and happy childhood memories. It’s a dessert so fun, so incredibly moist, and so ridiculously easy to make, you’ll wonder why it ever went out of style (spoiler: it didn’t).
So, if you’re ready to create a show-stopping dessert that requires minimal effort but yields maximum compliments, you’re in the right place. Let’s get poking.
Why This Recipe is Awesome
If you’re not already having delightful flashbacks, let me tell you why this cake is a certified genius-level dessert.
- It’s Practically Foolproof: This is the ultimate beginner-friendly cake. We are fully embracing the convenience of a box cake mix and Jell-O. It is almost impossible to mess this up. In fact, the main technique involves aggressively poking a cake with a stick. You can do this.
- It’s Unbelievably Moist and Refreshing: You are literally injecting a light, fluffy cake with sweet, fruity strawberry goodness. The result is an ultra-moist, cool, and creamy cake that is the perfect antidote to a hot summer day, especially here in Khulna. It’s a slice of pure, refreshing joy.
- The “Wow” Factor is Real: When you cut into this cake and reveal the beautiful, vibrant red stripes running through the fluffy white crumb, people are genuinely impressed. It looks like you performed some kind of complicated baking magic. They don’t need to know that your main tool was the handle of a wooden spoon.
Ingredients
We are leaning into the spirit of simplicity and fun. No need to make everything from scratch unless you really want to!
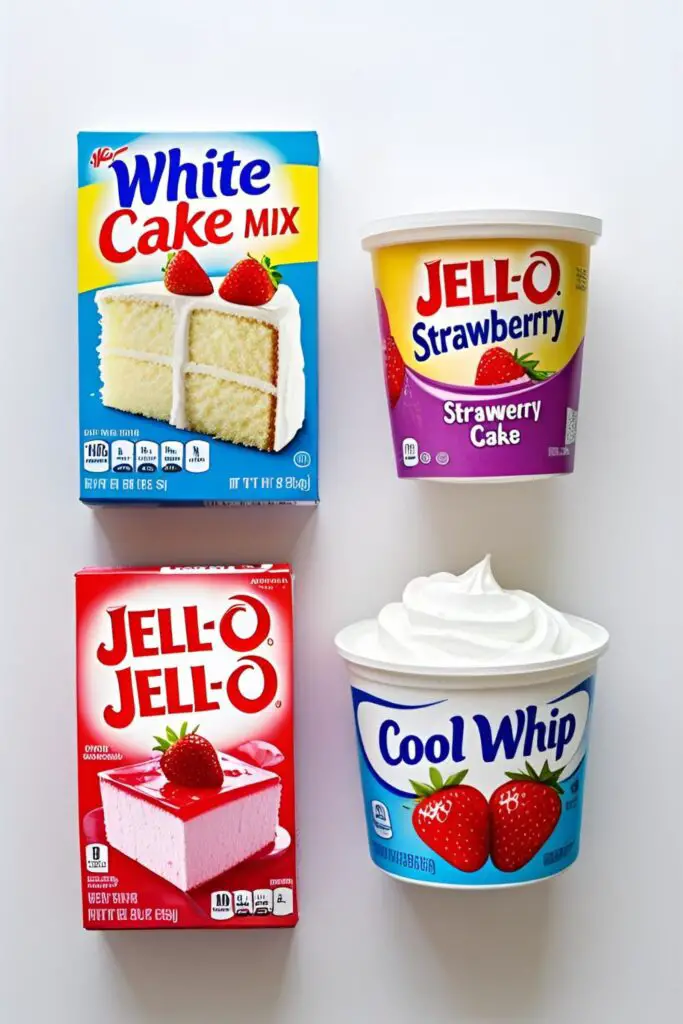
- 1 box (about 15.25 ounces) of white or yellow cake mix, plus the ingredients called for on the box (usually oil, water, and eggs)
- 1 box (3 ounces) of Strawberry Jell-O (or any red-colored gelatin, like raspberry or cherry)
- 1 cup boiling water
- ½ cup cold water
- 1 container (8 ounces) of Cool Whip, thawed in the refrigerator (or your favorite homemade stabilized whipped cream)
- 1 pound of fresh strawberries, for garnish
Tools & kitchen gadgets used
You don’t need any fancy equipment for this retro masterpiece. Just the basics!
- A 9×13 inch Baking Pan (metal or glass is fine)
- Mixing Bowls
- A Hand Mixer or a good old-fashioned Whisk
- The “Poker”: The round handle of a wooden spoon is the perfect tool. A thick straw or a chopstick also works.
- An Offset Spatula or a regular silicone spatula for spreading the topping.
- A Liquid Measuring Cup
Step-by-step instructions

This is one of the most fun and satisfying cakes you will ever make. Let’s do it!
Step 1: Bake the Cake (The “Hard” Part) First, bake your 9×13 inch cake according to the directions on the box. This is the hardest part of the entire recipe, and it’s not even hard. It’s basically foolproof. Once the cake is baked, let it cool on a wire rack for about 15-20 minutes. You want it to be still warm, but not piping hot.
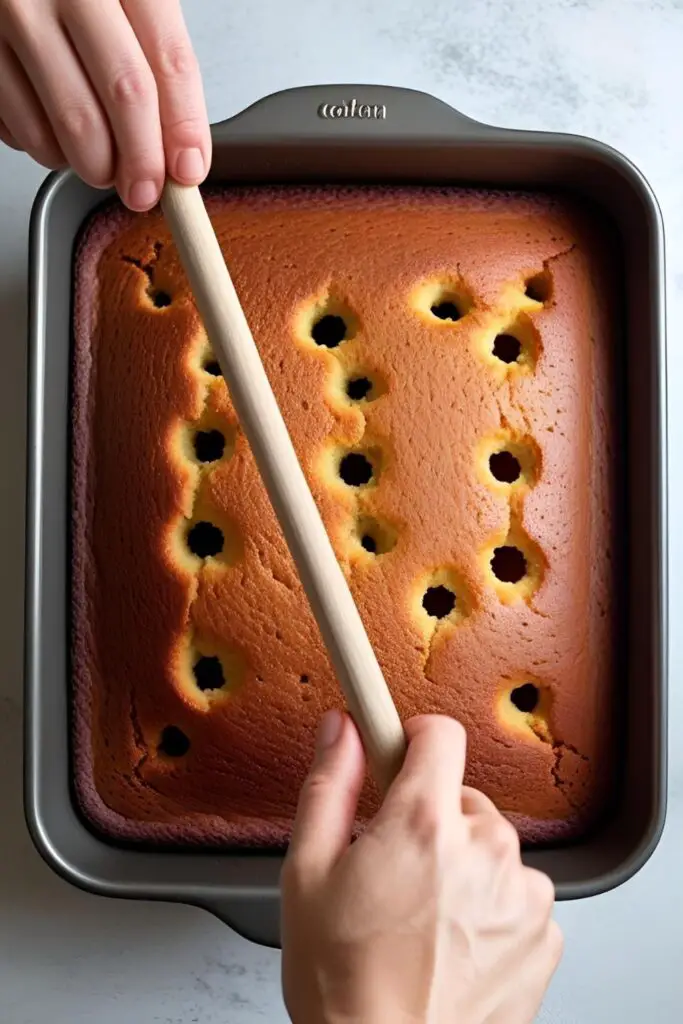
Step 2: The Therapeutic Poking Now for the main event! It’s time to get out some aggression. Take the round handle of a wooden spoon (or a thick straw) and poke holes all over the surface of the warm cake. Space the holes about an inch apart. Go all the way down to the bottom of the pan.
Step 3: Mix the Magic Potion In a medium bowl or a large liquid measuring cup, add the strawberry Jell-O powder. Carefully pour in the 1 cup of boiling water and whisk for about 2 minutes, until the Jell-O is completely dissolved. Now, whisk in the ½ cup of cold water.
Step 4: The Great Flood This part is going to feel weird, but you must trust the process. Slowly and as evenly as possible, pour the entire Jell-O mixture over the warm, hole-poked cake. Try to aim for the holes! It will look like you’ve created a soupy, red swimming pool on top of your beautiful cake. Have faith.
Step 5: The Big Chill Now, the cake needs to take a long nap. Carefully cover the pan with plastic wrap and place it in the refrigerator for at least 3 hours, or until the Jell-O is completely firm and set. This is not a suggestion; it is a requirement.

Step 6: The Final Fluffy Flourish Once the cake is completely chilled and the Jell-O is set, it’s time for the grand finale. Spread the thawed Cool Whip evenly over the top of the cake, creating a beautiful, fluffy white cloud.
Step 7: Garnish and Admire Slice up your fresh strawberries and arrange them beautifully on top of the Cool Whip. You can cover the whole surface, create a pretty border, or just make a simple, elegant design. Keep the cake refrigerated until you’re ready to serve it.
Calories & Nutritional Info
It’s a celebration cake! Let’s just enjoy it for the glorious, jiggly treat that it is.
- Serving Size: 1 slice (assuming the cake is cut into 15 slices)
- Estimated Calories: Around 250-300 kcal per slice.
- Contains: A delightful amount of nostalgia and fruity, creamy goodness.
Common Mistakes to Avoid
Avoid these simple slip-ups for a perfect, moist, and beautiful poke cake every time.
- Poking a Completely Cold Cake: You need to poke the cake while it’s still warm. A warm cake is softer and more receptive. Poking a cold cake can cause it to tear and crumble into a sad, messy pile.
- Pouring Boiling Hot Jell-O on the Cake: While your cake should be warm, your Jell-O mixture should have a chance to cool down a bit after you mix it. Pouring boiling hot liquid directly onto the cake can sometimes make the texture a bit gummy. Let the Jell-O cool down for 5-10 minutes before pouring.
- Not Chilling it Long Enough: This is the most crucial step for success. If the Jell-O isn’t fully set, you’ll have a soupy, weeping cake when you try to frost it, and the Cool Whip will slide right off. A minimum of 3 hours in the fridge is non-negotiable. Overnight is even better.
- Making the Holes Too Small: Using a fork or a toothpick won’t cut it. You need substantial holes for those beautiful, dramatic stripes of Jell-O to form inside the cake. The round handle of a wooden spoon is the perfect tool for the job.
Variations & Customizations
The “cake + Jell-O + topping” formula is a playground of possibilities!
- Piña Colada Poke Cake: Use a yellow cake mix. For the liquid, use a can of crushed pineapple (with its juice) instead of Jell-O. You can even add a splash of rum or coconut extract for more flavor! Top with Cool Whip and a generous amount of toasted coconut flakes.
- Lemon-Blueberry Poke Cake: Use a lemon cake mix. Poke the holes and fill it with a beautiful Berry Blue Jell-O. Top with Cool Whip and a garnish of fresh blueberries and some lemon zest for a bright, fresh, and beautiful dessert.
- Chocolate “Cherry Cordial” Poke Cake: Use a devil’s food cake mix. Poke the holes and fill with a rich cherry Jell-O. Top with chocolate-flavored Cool Whip or your favorite chocolate frosting and garnish with maraschino cherries.
FAQ Section
All your jiggly, cakey questions, answered.

1. Do you let a poke cake cool completely before putting the Jell-O in? No, you want the cake to be still warm but not hot from the oven. Let it cool for about 15-20 minutes. This helps it absorb the liquid perfectly without becoming mushy.
2. How long does a Jell-O poke cake need to set? It needs a minimum of 3 hours in the refrigerator. The Jell-O needs to become completely firm. For best results, let it chill overnight.
3. Why is my poke cake soggy? This can happen if your holes are too large and close together, causing the cake’s structure to collapse, or if your cake was too hot when you poured the liquid in.
4. Can I make a poke cake with a cake from scratch? Absolutely! A simple, sturdy white or yellow sponge cake made in a 9×13 inch pan is the perfect from-scratch base for this recipe.
5. How do you properly store a strawberry poke cake? Because of the Jell-O and the Cool Whip topping, this cake must be stored in the refrigerator. Keep it covered tightly. It will stay moist and delicious for up to 4 days.
6. Can you freeze a poke cake? Yes, you can! It freezes surprisingly well. You can freeze it before or after adding the whipped topping. Just cover it tightly and freeze for up to 3 months. Thaw it in the refrigerator overnight.
7. Can I use something other than Cool Whip for the topping? Of course. A homemade stabilized whipped cream (whipped cream with a little softened cream cheese or instant pudding mix beaten in) is a fantastic and delicious substitute.
Final Thoughts
And there you have it. A glorious blast from the past that is still one of the most delicious, crowd-pleasing, and secretly simple cakes on the entire planet. You’ve created a masterpiece of moist, fruity, creamy goodness, and you barely even broke a sweat.
Now go on, claim your rightful title as the Potluck King or Queen. You’ve earned it. And be prepared for everyone to ask you for the recipe.