The Ultimate Guide to Gluten-Free Baking (Feat. Fudgy, Foolproof Brownies!)
Let’s be honest for a second. For years, the term “gluten-free baking” conjured images of sad, crumbly, cardboard-like imposters of our favorite treats. It was the stuff of health food stores and disappointment. You’d bite into a gluten-free cookie and it would disintegrate into a cloud of flavorless dust. But what if I told you that you can have decadent, fudgy, mind-blowingly delicious baked goods that just happen to be gluten-free?
This isn’t a guide to settling for a lesser dessert. This is your official, myth-busting entry into the world of amazing gluten free baking, and our first stop on this delicious journey is the holy grail: the perfect, rich, and ridiculously fudgy brownie.
So, forget everything you thought you knew. We’re about to make a brownie so good, you’ll be tempted to keep the fact that it’s gluten-free a secret.
Why This Recipe is Awesome
This isn’t just a recipe; it’s a gateway drug to the glorious world of gluten-free baking that doesn’t suck.
- It’s Undetectably Gluten-Free: This is the ultimate secret weapon. You can serve these brownies to a crowd of the most discerning gluten-lovers, and I promise you, no one will have a clue. They’re not “good for gluten-free”; they’re just that good.
- The Perfect Starter Recipe: Brownies are incredibly forgiving, which makes them the perfect first foray into the world of gluten-free baking. Their naturally dense, fudgy texture doesn’t rely on gluten for structure, so it’s an easy, guaranteed win to boost your confidence.
- It’s a One-Bowl Wonder: We are keeping things as simple as humanly possible. This entire recipe comes together in one large, microwave-safe bowl. Fewer dishes, less fuss, and more time for what’s really important: eating brownies.
Ingredients
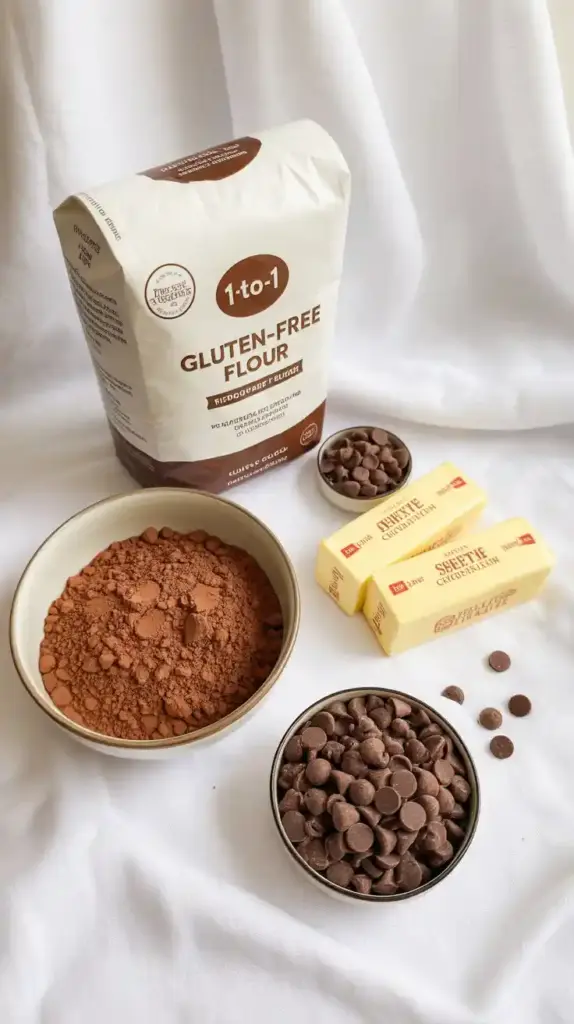
The key to great gluten-free baking is using the right ingredients. Pay close attention to the flour—it’s the most important player on the team.
- 1 cup (2 sticks) unsalted butter, or 1 cup of melted coconut oil for a dairy-free option
- 1 cup semi-sweet chocolate chips
- 1 ½ cups granulated sugar
- 4 large eggs, at room temperature
- 2 teaspoons pure vanilla extract
- ½ cup unsweetened cocoa powder
- 1 cup all-purpose 1-to-1 gluten-free flour blend (this is critical!)
- 1 teaspoon salt
- Optional: 1 cup of extra chocolate chips or chopped walnuts

A Very Important Note on Flour: Do not, I repeat, do not just grab a bag of almond flour or coconut flour and think it will work. For this recipe to be foolproof, you need a “1-to-1” or “measure for measure” all-purpose gluten-free flour blend. Critically, you must check the ingredients list and make sure it already contains xanthan gum. Brands like Bob’s Red Mill (in the blue bag) or King Arthur Flour’s Measure for Measure are perfect.
Tools & kitchen gadgets used
No specialty equipment needed here, just your trusty baking basics.
- An 8×8 inch square baking pan
- Parchment Paper
- A Large, Microwave-Safe Mixing Bowl (this is for our one-bowl method!)
- A Whisk
- A Silicone Spatula
- Measuring Cups and Spoons
- A Wire Cooling Rack
Step-by-step instructions
Get ready for the easiest, most decadent brownie-making experience of your life.
Step 1: Get Ready for Action Preheat your oven to 350°F (175°C). Line your 8×8 inch pan with parchment paper, leaving an overhang on two sides to act as “handles.” This will make removing the brownies a breeze later on.
Step 2: The Chocolate Melt In your large, microwave-safe bowl, combine the butter (or coconut oil) and 1 cup of the chocolate chips. Microwave in 30-second intervals, stirring well after each one, until the mixture is completely melted and smooth.
Step 3: Whisk in the Sugar Remove the bowl from the microwave. Pour the granulated sugar into the hot chocolate-butter mixture and whisk vigorously for about a minute until it’s well combined and slightly glossy.

Step 4: Add the Eggs and Vanilla Add the eggs, one at a time, whisking well after each addition until the batter is thick, smooth, and shiny. Stir in the vanilla extract.
Step 5: Fold in the Dry Stuff Add your 1-to-1 gluten-free flour blend, the cocoa powder, and the salt to the bowl. Switch from the whisk to your silicone spatula. Gently fold the dry ingredients into the wet ingredients until just combined. Be careful not to overmix!
Step 6: Go for Extra Decadence (Optional) If you’re a true chocolate lover, now is the time to fold in your optional cup of extra chocolate chips or walnuts. You won’t regret it.
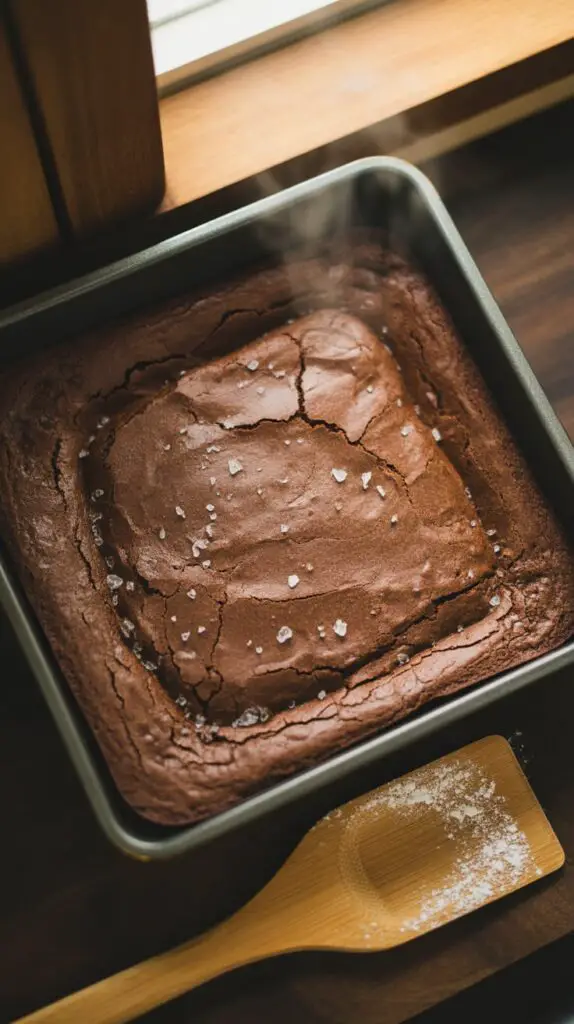
Step 7: Bake It Off Pour the thick, glorious batter into your prepared pan and spread it into an even layer with your spatula. Bake for 30 to 35 minutes. The edges should look set, and a wooden toothpick inserted into the center should come out with moist, fudgy crumbs attached. If it comes out clean, you’ve gone too far and are headed for cakey-brownie-town.
Step 8: The Agonizing but Necessary Cool Down This is the hardest, most crucial step for achieving that perfect, fudgy texture. You must let the brownies cool completely in the pan on a wire rack. I’m serious. Don’t even think about touching them for at least 2-3 hours. For super clean, perfect squares, you can even chill them in the fridge for an hour before cutting.
Calories & Nutritional Info
It’s a brownie. It’s delicious. Let’s not get too bogged down in the details.
- Serving Size: 1 brownie (assuming you cut the pan into 16 squares)
- Estimated Calories: Around 250-300 kcal.
- Bonus: This recipe is gluten-free, and can easily be made dairy-free!
Common Mistakes to Avoid
Gluten-free baking is easy, as long as you avoid these common pitfalls.
- Using the Wrong Type of Gluten-Free Flour: I’m going to sound like a broken record, but this is the most important rule. You cannot just use a single type of GF flour like almond or coconut. You need a balanced 1-to-1 or “measure for measure” all-purpose gluten-free flour blend. And for the love of all that is delicious, make sure it already contains xanthan gum.
- Over-baking Your Brownies into Sad, Dry Bricks: The difference between a fudgy, gooey brownie and a dry, cakey one is a matter of a few minutes in the oven. The goal is to slightly under-bake them. A toothpick inserted into the center should come out with moist, fudgy crumbs attached, not clean.
- Cutting into Warm, Molten Brownies: I know the temptation is immense. The house smells incredible, and you want that warm, gooey brownie now. But cutting warm brownies results in a messy, gooey tragedy, not clean squares. For that perfect, dense, fudgy texture and clean cuts, they must be completely cool.
- Overmixing the Batter: Even without gluten, overmixing can incorporate too much air and change the texture of your brownies, making them more cakey than fudgy. Fold the dry ingredients in with a spatula until just combined and then stop.
Variations & Customizations
This brownie is a perfect canvas. Get creative!
- Dairy-Free and Gluten-Free Brownies: This is an easy swap. Use melted coconut oil instead of butter and make sure your brand of chocolate chips is certified dairy-free. The results are just as decadent and fudgy.
- Mexican Hot Chocolate Brownies: Add 1 teaspoon of ground cinnamon and a pinch (about ⅛ teaspoon) of cayenne pepper to the dry ingredients. The subtle warmth and spice is an incredible contrast to the rich chocolate.
- “Cosmic” Gluten-Free Brownies: For a nostalgic twist, let the brownies cool completely. Top them with a simple chocolate ganache (equal parts heated heavy cream and chocolate chips, stirred until smooth) and a very generous shower of rainbow candy-coated chocolate chips.
FAQ Section
All your gluten-free baking questions, answered.
1. What is the most important secret to good gluten-free baking? The #1 secret is using the right kind of flour blend. A high-quality, 1-to-1 blend that contains xanthan gum will do 90% of the work for you and give you results that are remarkably similar to traditional baking.
2. What is xanthan gum and why do I need it? Xanthan gum is a binder and thickener that essentially mimics the role of gluten. It provides the structure and elasticity that’s missing in gluten-free flours, preventing your baked goods from being a crumbly mess.
3. Can I just make my own gluten-free flour blend? You can, but it’s more advanced. It involves buying several different types of flours (like white rice, brown rice, tapioca starch, potato starch) and xanthan gum and whisking them together in specific ratios. For beginners, a pre-made 1-to-1 blend is the easiest and most reliable option.
4. Why is my gluten-free baking often so dry and crumbly? This can be due to using the wrong flour blend (one without enough binders like xanthan gum) or over-baking. Gluten-free baked goods can sometimes brown a little differently, so it’s easy to over-bake them. Trust your toothpick!
5. How should I store gluten-free baked goods? Gluten-free treats can sometimes dry out a bit faster than their gluten-filled counterparts. It’s best to store them in a well-sealed, airtight container at room temperature. These brownies will stay fudgy and delicious for up to 4 days.
6. Are oats gluten-free? This always confuses me. Oats themselves are naturally gluten-free. However, they are very often grown and processed in facilities that also handle wheat, barley, and rye, leading to cross-contamination. If you’re baking for someone with Celiac disease or a severe sensitivity, you must use oats that are specifically labeled and certified as “gluten-free.”
7. Do I need to bake gluten-free goods for a longer or shorter time? It depends on the recipe, but often they bake in about the same amount of time. The most important thing is to watch for the signs of doneness (like the toothpick test) rather than just relying on the clock.
Final Thoughts
And there you have it. You didn’t just make a pan of ridiculously delicious brownies; you’ve officially kicked the door down and entered the world of gluten-free baking. You’ve proven to yourself that you don’t need gluten to create something that is truly decadent, satisfying, and worthy of all the compliments.
Now go on, cut yourself a big, fudgy square. You’ve earned it. Welcome to the tastier side of gluten-free.