How to Make a Stunning Purple Butterfly Cake (It’s an Easy Hack!)
Ever wanted to make a cake that looks like it flew straight out of a fairy tale? A cake that’s whimsical, magical, and almost too pretty to eat? Today, we are bringing that enchanting vision to life with a stunning purple butterfly cake. And before you start having nightmares about carving intricate shapes or buying a ridiculously specific pan you’ll only use once, let me tell you a secret: it’s a trick.
That’s right. We are about to perform some simple cake alchemy. We’ll take one ordinary round cake and, with a single clever cut, transform it into a beautiful, winged creature. It’s a brilliant kitchen hack that will make you look like a certified cake artist.
So, are you ready to let your baking skills take flight? Let’s create something truly magical.
Why This Recipe is Awesome
If the idea of making a magical cake isn’t enough to get you excited, here’s why this project is a must-try.
- Absolutely No Special Pans Needed: This is the best part. You don’t need to hunt down a butterfly-shaped pan that will gather dust in your cabinet for the next decade. All you need is a standard round cake pan you already own. It’s minimalist, it’s clever, and it’s pure genius.
- It’s a Visual Masterpiece: Let’s be honest, this cake is made for the ‘gram. The elegant butterfly shape combined with a beautiful purple ombre frosting is a total showstopper. It looks incredibly professional, but the technique is surprisingly easy to master.
- Perfect for Any Whimsical Celebration: This is a guaranteed hit at any birthday party (for any age!), a baby shower, a spring celebration, or a “just because we felt like making something pretty” day. It’s a cake that makes people happy just by looking at it.
Ingredients
We need a cake that’s not only delicious but also sturdy enough to handle being cut and arranged. A classic white cake is perfect because it provides a beautiful canvas for our purple masterpiece.
For the Classic White Cake:
- 2 ½ cups cake flour, sifted
- 1 ½ cups granulated sugar
- 1 tablespoon baking powder
- ½ teaspoon salt
- ½ cup (1 stick) unsalted butter, softened
- 4 large egg whites, at room temperature
- 1 cup buttermilk, at room temperature
- 2 teaspoons clear vanilla extract (to keep the cake nice and white!)

For the Perfect Purple Buttercream:
- 1 ½ cups (3 sticks) unsalted butter, softened
- 5-6 cups powdered sugar, sifted
- ⅓ cup heavy cream or milk
- 2 teaspoons clear vanilla extract
- Pinch of salt
- Purple, Red, and Blue gel food coloring
For Assembly & Decoration:
- 1 Twix bar, pretzel rod, or a piece of licorice for the “body”
- Sprinkles, edible glitter, or sugar pearls
Tools & kitchen gadgets used
The real magic here comes from a few basic tools and one very clever cut.
- One 9-inch Round Cake Pan
- A Long, Sharp Serrated Knife (like a bread knife)
- A Large Cake Board or Serving Platter
- An Offset Spatula (both a large and small one are helpful)
- Piping Bags and Tips (like a small round tip for antennae)
- Three Small Bowls (for mixing your frosting colors)
- A Stand Mixer or a powerful Hand Mixer
- A Wire Cooling Rack
Step-by-step instructions
Ready for the big reveal? Follow these steps to transform a simple cake into a work of art.
Step 1: Bake Your Round Cake Preheat your oven to 350°F (175°C). Grease and flour your 9-inch round cake pan and line the bottom with parchment paper. Prepare the white cake batter as directed: cream the butter and sugar, beat in the egg whites and vanilla, then alternate adding the dry ingredients and the buttermilk. Pour the batter into the pan, smooth the top, and bake for 30-35 minutes until a toothpick comes out clean.
Step 2: Cool It Down (Completely!) Let the cake cool in the pan for 15 minutes before inverting it onto a wire rack. Now, and this is crucial, let it cool completely. Patience is a baker’s greatest virtue, especially when knives are involved. A warm cake will crumble into a sad mess.

Step 3: The Magical Butterfly Cut Once the cake is cool, level the top with your serrated knife to create a flat surface. Now for the magic trick. Place your knife in the dead center of the cake and cut it cleanly in half, creating two perfect semi-circles.
Step 4: Arrange the Wings Take your two cake halves and arrange them on your large cake board. Place them so the two straight, cut sides are touching each other in the middle. Voila! You now have the shape of butterfly wings.
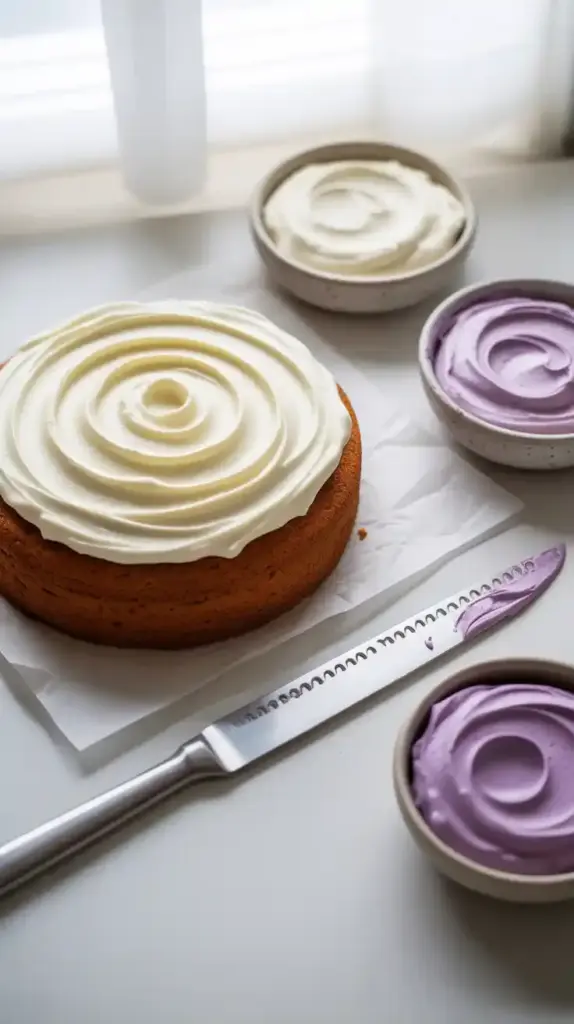
Step 5: The Crumb Coat (Aka, Sanity Saver) This is the most boring but most important step in cake decorating. Apply a very thin layer of white buttercream all over the surface of your “wings.” This traps all the loose crumbs. Pop the whole thing in the fridge for 30 minutes to firm up.
Step 6: The Ombre Art Project Divide your remaining buttercream into three bowls. Leave one bowl white. In the second bowl, add a tiny speck of purple food coloring (or a bit of red and blue) and mix to create a light lilac. In the third bowl, add more color to create a deeper, vibrant purple.
Step 7: Frost the Wings Now for the fun part. Using your offset spatula, apply the three colors of frosting to the wings. You can do this in stripes, sections, or random patches. To create the ombre effect, gently use the tip of your clean spatula to swipe and blend the areas where the colors meet. There’s no right or wrong way—just have fun with it!
Step 8: Bring Your Butterfly to Life Place your Twix bar or pretzel rod down the center seam between the two “wings” to create the butterfly’s body. Take a small amount of dark purple frosting in a piping bag with a small round tip and pipe two antennae onto the cake board, coming from the “head” of your butterfly. Finish by decorating your beautiful wings with a dusting of edible glitter or a scattering of sprinkles.
Calories & Nutritional Info

It’s a magical cake. Let’s assume the calories are, too. But for the curious…
- Serving Size: 1 slice (assuming the cake is cut into 12 slices)
- Estimated Calories: Around 400-500 kcal per frosted slice.
- Contains: A healthy dose of whimsy and creative expression.
Common Mistakes to Avoid
Avoid these simple slip-ups to ensure your butterfly soars.
- Performing Surgery on a Warm Cake: I cannot stress this enough. If you try to cut a cake that is even slightly warm, you will have a crumbly disaster of epic proportions. Your cake must be completely cool, or even chilled, before you take a knife to it.
- Using Runny, Sad Frosting: For a design this beautiful, you need a medium-stiff buttercream that holds its shape. If your frosting is too soft and runny, your beautiful ombre colors will just meld into a single, muddy puddle.
- Going Wild with the Food Coloring: Remember that gel food colors are incredibly potent. Start with a tiny toothpick-dip of color and mix it in completely before adding more. You can always make the color darker, but you can’t make it lighter.
- Skipping the Crumb Coat: If you skip this step, your beautiful purple ombre frosting will be contaminated with unsightly white cake crumbs. It will look messy and unprofessional. The crumb coat is your best friend.
Variations & Customizations
Purple is just the beginning! Let your imagination take flight.
- Magical Marble Butterfly: Before you bake, divide your white cake batter into three bowls. Leave one white, tint one a light lilac, and one a deep purple. Alternate spoonfuls of the colored batters into your round cake pan. Swirl once with a knife, then bake. When you cut the cake in half, the wings will have a beautiful marbled interior.
- Dramatic Chocolate Butterfly: Use your favorite chocolate cake recipe and a rich chocolate fudge frosting. You can create the ombre effect with dark chocolate, milk chocolate, and white chocolate frostings. Decorate with chocolate sprinkles and delicate chocolate curls for a dramatic, moody butterfly.
- Ube Butterfly Cake (A Natural Purple!): For a truly unique flavor and color, use ube extract and/or ube halaya to naturally flavor and color both your cake and frosting a stunning purple. Ube has a wonderful, nutty-vanilla flavor that is absolutely delicious.
FAQ Section
All your butterfly-related baking questions, answered.
1. How do you make a butterfly cake shape from a round cake? It’s a simple hack! You bake one round cake, let it cool completely, and then cut it directly in half. You then place the two semi-circles on a board with the straight, cut edges touching in the middle to form the wings.
2. What’s the best frosting for decorating a butterfly cake? A classic American buttercream is perfect because it’s sturdy, easy to color, and holds its shape well for piping details.
3. How do you make an ombre frosting effect? You divide your frosting into 3 or 4 bowls and tint each one a progressively darker shade of the same color. You then apply the colors in sections or stripes to the cake and use a clean spatula to gently blend the edges where the colors meet.
4. Can I use a box cake mix for this? Absolutely! To keep it simple, a standard white or vanilla box cake mix will work perfectly for this design.
5. How should I store the finished cake? Because of its large, flat shape, it’s best stored in a large, airtight container or a cake box. It will keep at room temperature for up to 2 days, or in the refrigerator for up to 4 days.
6. What else can I use for the butterfly’s body and antennae? Get creative! You can use a line of M&M’s or other round candies for the body. For the antennae, you can use thin pieces of licorice, Pocky sticks, or even carefully shaped pieces of fondant.
7. Can I make this cake in other colors? Of course! A pink and red butterfly for Valentine’s Day, a rainbow butterfly for a Pride celebration, or a blue and white one for a winter theme would all be beautiful. The technique is the same, just swap out the colors!
Final Thoughts
And just like that, with one clever cut and a bit of colorful frosting, you’ve created a magical, edible work of art. You didn’t need a special pan or any advanced pastry skills—just a little creativity and a touch of purple. You’ve proven that the most impressive creations are often born from the simplest ideas.
Now go on, present your masterpiece. You’ve earned your wings as a truly creative baker.