The Ultimate Half Cake Design Tutorial (Perfect for Half-Birthdays!)
Ever find yourself in a situation where you desperately want to celebrate with a cake, but a whole, giant, multi-layered cake feels like… a bit much? I’m talking about celebrating a six-month birthday, a “half-iversary,” or just a cozy Friday night party for you and your cat. In these moments, a full-sized cake can feel like overkill. Enter the brilliant, adorable, and incredibly clever half cake design.
This isn’t some baking tragedy where a cake broke in half. Oh no. This is intentional. This is art. It’s the perfect solution for a modern celebration, giving you all the joy and festivity of a beautiful cake in a perfectly manageable portion.
So, are you ready to master this trendy, smart, and ridiculously cute cake technique? Let’s get to baking… half a cake.
Why This Recipe is Awesome
If you’re not already sold on the sheer genius of a cake that’s perfectly portioned for small celebrations, let me give you a few more reasons to be obsessed.
- It’s the Perfect Portion: It’s literally half the cake, which means half the leftovers and zero waste. It’s the ideal amount for a small group, an intimate celebration, or for when you want cake but don’t want to commit to eating cake for breakfast, lunch, and dinner for the next week.
- The “Wow” Factor is HUGE: It’s an illusion! The exposed, “cut” side with its visible layers and fillings looks incredibly professional and cool. People will think you’re a legitimate cake artist with fancy, secret tools. They don’t need to know you just used a knife.
- It’s a Baker’s Two-for-One Deal: Here’s the best part: you bake one normal round cake, you cut it in half, and… you suddenly have the foundation for two half cakes. You can decorate one now and freeze the other for later. It’s the ultimate baking BOGO deal.
Ingredients
To pull off this design, you need a cake that’s both delicious and structurally sound. A flimsy cake will just crumble under the pressure. Here’s a sturdy, classic butter cake that’s perfect for the job.

For the Sturdy Butter Cake:
- 1 ½ cups all-purpose flour
- 1 ½ teaspoons baking powder
- ¼ teaspoon salt
- ½ cup (1 stick) unsalted butter, softened
- 1 cup granulated sugar
- 2 large eggs, at room temperature
- 2 teaspoons vanilla extract
- ½ cup whole milk, at room temperature
For the Stable Buttercream Frosting:
- 1 cup (2 sticks) unsalted butter, softened
- 3-4 cups powdered sugar, sifted
- 2-3 tablespoons heavy cream or milk
- 1 ½ teaspoons vanilla extract
- Pinch of salt
- Optional: Gel food coloring, sprinkles, fresh berries for decorating.
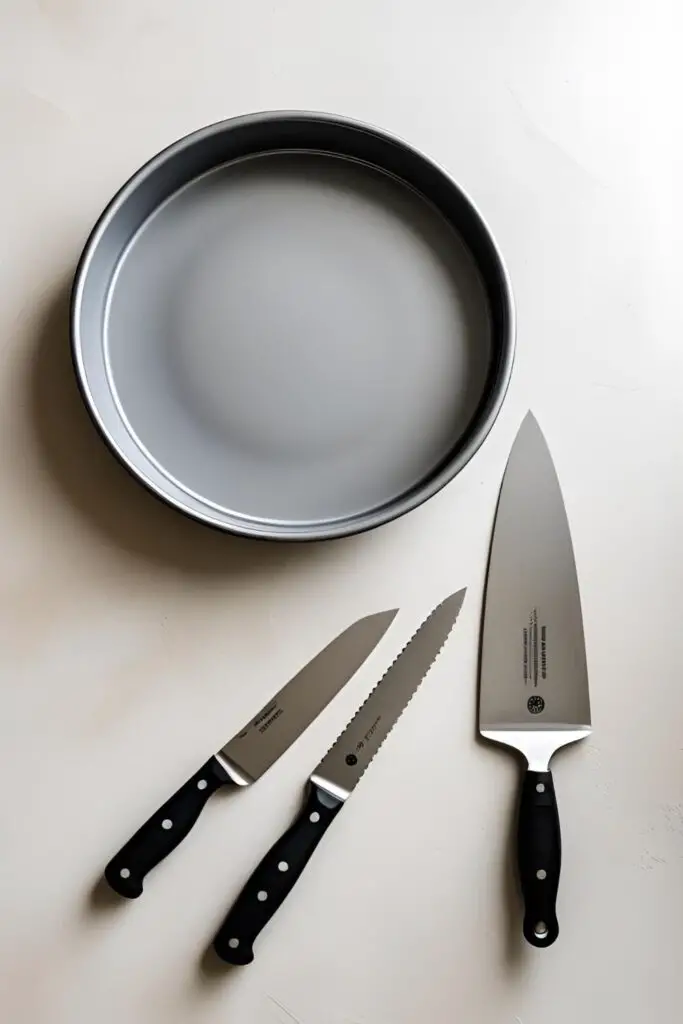
Tools & kitchen gadgets used
The real magic here isn’t in a special pan, but in a few key tools you probably already have.
- One 8-inch Round Cake Pan
- A Long, Sharp Serrated Knife (like a bread knife)
- A Cake Board or serving platter
- A Turntable (Cake Decorating Stand) (highly recommended for smooth frosting)
- A Bench Scraper (the secret to that clean, flat side)
- An Offset Spatula (both a large and a small one are helpful)
- Piping Bags and Tips (for decorative flair)
- A Wire Cooling Rack
Step-by-step instructions
The secret here is all in the assembly. Don’t be scared; it’s easier than it looks!
Step 1: Bake Your Cake Preheat your oven to 350°F (175°C). Grease and flour your 8-inch round cake pan and line the bottom with parchment paper. Prepare the cake batter as you normally would: cream the butter and sugar until light and fluffy, beat in the eggs and vanilla, then alternate adding the dry ingredients and the milk. Pour the batter into the pan, smooth the top, and bake for 30-35 minutes, or until a toothpick comes out clean.
Step 2: Cool It Down (Completely!) Let the cake cool in the pan for 15 minutes before inverting it onto a wire rack to cool completely. I mean it. Do not even think about touching it with a knife until it is 100% at room temperature. For an even easier time, you can wrap the cooled cake in plastic and chill it in the fridge for an hour.

Step 3: The Big Cut Time for a little bit of cake surgery. Don’t be scared. First, use your long serrated knife to level the top of the cake, creating a flat surface. Now, confidently and carefully, cut the entire cake cleanly in half, right down the middle. You now have two beautiful semi-circles.
Step 4: Build Your Tiny Tower Set one half-cake aside (this is your bonus cake!). Take the other half and place it on your work surface. Carefully cut this semi-circle in half horizontally, just like you’re slicing a bagel. You now have two thinner semi-circle layers.
Step 5: The Crumb Coat (The Most Important Step!) Place your bottom half-layer on your cake board, with the flat, cut side facing forward. Add a nice layer of frosting on top. Place the second half-layer on top of that. Now, using your offset spatula, apply a very thin layer of frosting all over the entire cake—the top, the rounded back, and especially the flat, crumbly “cut” side. Pop the whole thing in the fridge for 30 minutes to firm up. This traps all the crumbs and is the secret to a clean finish.
Step 6: The Final Frosting Now that your crumb coat is set, apply a final, beautiful, smooth coat of frosting to the top and the rounded side of the cake. Use your bench scraper, holding it vertically against the flat “cut” side, to scrape away excess frosting and create a super sharp, clean edge.
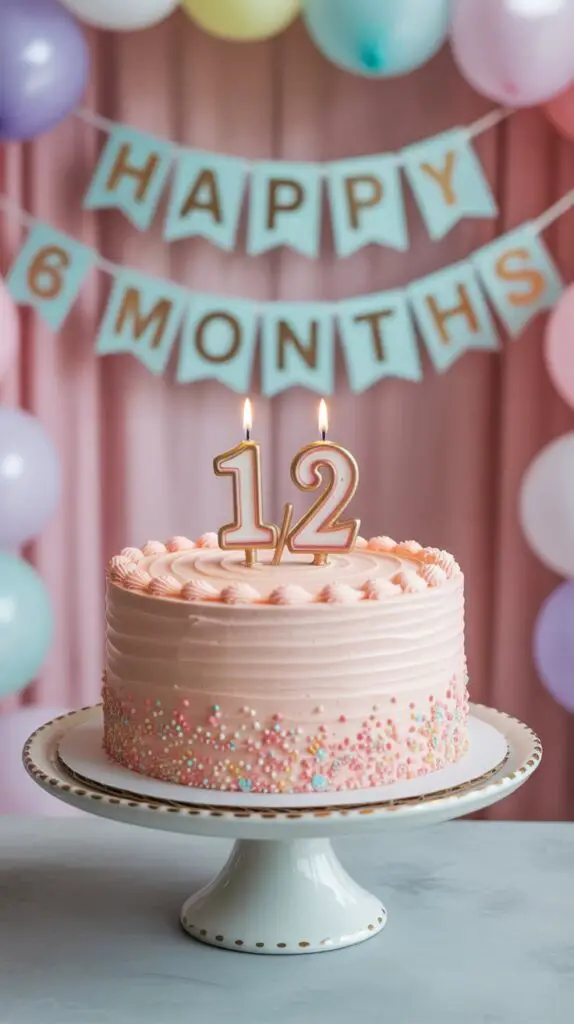
Step 7: Time to Decorate! This is the fun part! The flat “cut” side and the top are your canvas. You can pipe rosettes or a shell border along the top edge, add a cascade of sprinkles down the rounded back, or write a festive “½” on top for a half-birthday celebration.
Step 8: Admire Your Bonus Cake Don’t forget about that other half of the cake you set aside! You can frost it and eat it immediately (baker’s treat!), or wrap it well and freeze it for up to 3 months. Next time you need a half cake, you’re already halfway there!
Calories & Nutritional Info

This is for one slice of the finished half cake, assuming you cut it into about 6 nice slices.
- Serving Size: 1 slice
- Estimated Calories: Around 350-450 kcal, depending on how much frosting you use.
- Contains: Exactly half the guilt of eating a whole cake. (This is not scientifically proven.)
Common Mistakes to Avoid
Avoid these pitfalls to ensure your half cake is a whole success.
- Using a Flimsy, Delicate Cake: A light, airy angel food or chiffon cake will just collapse and fall apart when you try this. You need a sturdy cake like a butter cake, pound cake, or a dense chocolate cake that can handle being cut and stacked.
- Cutting a Warm or Room-Temp Cake: This will result in a crumbly, tragic mess. For the cleanest possible cut, your cake must be chilled or, at the very least, completely and totally cool.
- Skipping the Crumb Coat: If you try to frost the exposed, crumbly “cut” side without a crumb coat, you will get a horrifying mess of cake bits mixed into your beautiful buttercream. It will look like a disaster. The crumb coat is 100% non-negotiable.
- Trying to Fully “Frost” the Cut Side: The beauty of the half cake design is seeing the exposed layers on the flat side! You just want a very thin, almost translucent layer of frosting from the crumb coat to seal it, not a thick, opaque layer. Use a bench scraper to get that sharp, clean finish.
Variations & Customizations
This technique works with any sturdy cake. Let your imagination run wild!
- Rainbow Surprise Half Cake: Use your favorite white cake recipe. Divide the batter into 3-4 bowls and tint each with a different color of the rainbow. Layer the colored batters into the pan before baking. When you cut the cake in half, you’ll reveal a beautiful rainbow interior!
- “Two-Faced” Chocolate Drip Cake: Frost the half cake in a simple white or pastel color. Then, make a rich chocolate ganache and do a dramatic drip that only goes down the rounded side, leaving the clean, flat “cut” side untouched. The contrast is stunning.
- Black Forest Half Cake: Use a sturdy chocolate cake. Fill the layers with cherry pie filling and whipped cream frosting. Frost the outside with more whipped cream, top with chocolate shavings and fresh cherries. The cross-section will look incredible.
FAQ Section
All your half-baked questions, fully answered.
1. What is a half birthday cake? It’s a cake made to celebrate a six-month milestone, usually for a baby’s “half birthday.” The half cake design is the perfect, literal interpretation of this fun new tradition.
2. How do you cut a cake perfectly in half? Use a long, sharp serrated knife. For a super straight line, you can use a ruler to make small guide marks on either side before you start cutting. Go slow and use a gentle sawing motion.
3. What’s the best way to get a super smooth frosting finish? A crumb coat is the first step. For the final coat, use an offset spatula to apply the frosting, then use a bench scraper, held at a 45-degree angle while you spin the cake on a turntable, to smooth it out.
4. Can I make this with a box cake mix? Yes, but for best results, choose a sturdier type of mix, like a pound cake or a “moist deluxe” butter cake mix. A very light and airy mix might be too delicate.
5. How do I store a decorated half cake? Store it in a tall, airtight container in the refrigerator. Because one side is exposed, it can dry out a bit faster. It’s best enjoyed within 2-3 days. You can press a piece of plastic wrap against the cut side to help keep it fresh.
6. What are some other occasions to make a half cake? They’re perfect for celebrating a 6-month anniversary, a small dinner party, a book club meeting, or any time you want a celebratory dessert without committing to a full cake.
7. How do you get the ‘cut’ side to look so clean? The secret is threefold: 1) Use a chilled cake. 2) Apply a very thin crumb coat to seal in all the crumbs. 3) Use a clean bench scraper to shear off the excess frosting, leaving a sharp, professional-looking edge.
Final Thoughts
And there you have it. You’ve created a perfectly portioned, incredibly trendy, and ridiculously clever cake that’s guaranteed to impress. It’s proof that you don’t need a huge occasion (or a huge guest list) to justify baking something beautiful and celebratory.
You now have the power to celebrate all of life’s little “half-milestones.” So go on, enjoy your half-cake, and decide what you’re going to do with your wonderful bonus half!