Stunning Sage Green Cake Recipe (It’s Easier Than You Think!)
Is there a color that’s more calming, chic, and universally loved right now than sage green? It’s on our walls, in our closets, and now, it’s about to be on our plates. Forget loud, obnoxious colors. Today, we are entering our sophisticated baker era with a dessert that is the epitome of understated elegance: the sage green cake.
I can hear you now. “That looks like it belongs in a fancy magazine or at a celebrity wedding. I can’t make that.” To which I say: Oh, yes you can. This cake is your secret weapon. It’s the dessert you make when you want to look effortlessly cool and talented, even if you spent the morning trying to figure out if your sourdough starter is still alive.
This recipe is all about creating a vibe. It’s earthy, it’s modern, and it tastes as good as it looks. Ready to become the calm, cool, collected baker you were always meant to be? Let’s get our zen on.
Why This Recipe is Awesome
If the sheer beauty of it hasn’t sold you, let me break down why this cake is your new best friend.
- Effortlessly Chic: This cake doesn’t scream for attention; it confidently whispers. Its minimalist beauty makes it perfect for literally any occasion that calls for a touch of class—baby showers, bridal parties, birthdays, or just because you appreciate pretty things.
- A “Grown-Up” Flavor Profile: We’re pairing the aesthetic with a flavor that’s just as refined. A tender olive oil cake infused with bright lemon and a hint of earthy rosemary. It’s unexpected, sophisticated, and utterly delicious.
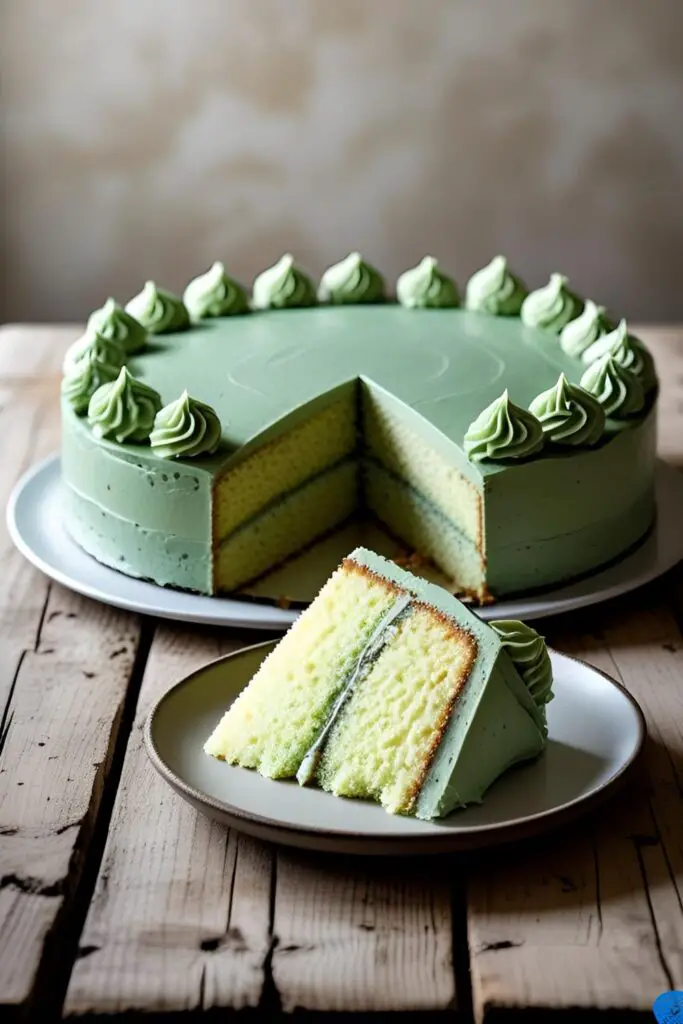
- The Color is Everything: I’m going to show you exactly how to mix that perfect, dusty, “I-summer-in-the-Tuscan-countryside” shade of sage green. It’s easier than you think, and the payoff is huge.
Ingredients

Let’s gather our materials. Precision is key, especially for our color palette.
For the Lemon Rosemary Olive Oil Cake:
- 1 ½ cups all-purpose flour
- 1 cup granulated sugar
- 1 ½ teaspoons baking powder
- ½ teaspoon salt
- ¾ cup whole milk, at room temperature
- ½ cup good quality extra-virgin olive oil
- 2 large eggs, at room temperature
- 1 tablespoon fresh rosemary, finely chopped
- Zest of 2 large lemons

For the Silky Smooth Buttercream:
- 4 large egg whites (about 120g)
- 1 ¼ cups granulated sugar (about 250g)
- 1 ½ cups (3 sticks) unsalted butter, cubed and softened
- 1 teaspoon vanilla extract
- Pinch of salt
For the Perfect Sage Green Color:
- Leaf Green food coloring gel
- Brown or Black food coloring gel
- Yellow food coloring gel (optional, for warmth)
For the Minimalist Decorations:
- A few sprigs of fresh eucalyptus or rosemary
- Optional: Edible gold leaf
Tools & Kitchen Gadgets Used
To achieve this level of chic, you’ll need the right equipment. This isn’t the time to eyeball things.
- Stand Mixer (highly, highly recommended for the buttercream)
- Digital Kitchen Scale (for accurate buttercream ratios)
- Two 8-inch Round Cake Pans
- Parchment Paper
- Saucepan and Heatproof Bowl (to create a double boiler)
- Instant-Read Thermometer
- Offset Spatula
- Bench Scraper (the secret to those smooth sides)
- Cake Turntable
- Toothpicks (for adding color)
Step-by-Step Instructions
Alright, let’s get into it. Take a deep breath. You’ve got this.
Step 1: Bake the Cake Preheat your oven to 350°F (175°C). Grease your cake pans and line the bottoms with parchment paper. In a large bowl, whisk together the flour, sugar, baking powder, and salt. In a separate bowl, whisk the milk, olive oil, and eggs until well combined. Add the finely chopped rosemary and lemon zest to the wet ingredients.

Step 2: Combine and Bake Pour the wet ingredients into the dry ingredients and whisk until just combined. A few small lumps are perfectly fine—do not overmix! Divide the batter evenly between your two prepared pans. Bake for 25-30 minutes, or until a toothpick inserted into the center comes out with moist crumbs attached. Let the cakes cool in the pans for 15 minutes before turning them out onto a wire rack to cool completely.
Step 3: Make the Silky Buttercream This is a Swiss Meringue Buttercream, and it’s less scary than it sounds. Wipe the bowl of your stand mixer and your whisk with vinegar to ensure they are grease-free. Add the egg whites and sugar to the bowl. Place the bowl over a saucepan of simmering water (a double boiler), making sure the bottom of the bowl doesn’t touch the water. Whisk constantly until the sugar has completely dissolved and the mixture reaches 160°F (71°C) on your thermometer.
Step 4: Whip it Good Transfer the bowl to your stand mixer fitted with the whisk attachment. Whisk on high speed for 10-15 minutes, until the meringue is stiff, glossy, and the outside of the bowl is completely cool to the touch. Switch to the paddle attachment, turn the mixer to low, and start adding your softened, cubed butter a few pieces at a time. Once all the butter is in, add the vanilla and salt, then crank the speed up to medium-high and beat until it’s thick and silky smooth. (Don’t panic if it looks curdled at some point! Just keep whipping, and it will come together. I promise.)
Step 5: Your Art Class Moment (The Color) Scoop about two-thirds of the white buttercream into a separate bowl. Now, for the color. Using a fresh toothpick for each color, add a tiny speck of leaf green and an even tinier speck of brown or black. Mix thoroughly. Assess the color. Too bright? Add another minuscule speck of brown. Too dark? Add a bit more of your reserved white buttercream. Want it warmer? Add a tiny touch of yellow. Build the color slowly until you have that perfect, dusty sage.
Step 6: Assemble and Decorate Level your cooled cake layers. Place one layer on your cake stand and top with a layer of the remaining white buttercream. Place the second cake layer on top. Crumb coat the entire cake with a thin layer of your sage green buttercream and chill for 30 minutes until firm.
Step 7: The Final Coat Apply a final, generous coat of the sage green buttercream. Use your bench scraper and cake turntable to get the sides as smooth as a tranquil pond. Or, if you’re not feeling the pressure of perfection, create a rustic textured look with the back of a spoon. Finally, artfully place a sprig or two of eucalyptus or rosemary on top. A tiny flake of gold leaf adds a touch of magic. Less is more!
Calories & Nutritional Info

It’s a cake. Let’s just embrace it for the glorious union of fat and sugar that it is.
- Serving Size: 1 slice (assuming cake is cut into 12 slices)
- Estimated Calories: Around 550-650 kcal per slice.
- Sophistication Points: A solid 10/10.
- Key Nutrients: Contains elegance, calm, and the satisfaction of a job well done. The olive oil has some healthy fats, so… it’s practically a salad, right?
Common Mistakes to Avoid
Read this before you start, and you’ll avoid the most common pitfalls.
- Going Full-On Grinch Green: The key to sage green is restraint. DO NOT squeeze green food coloring directly into the bowl. Use a toothpick to add a tiny amount at a time. You can always add more color, but you can’t easily take it away.
- Making Sweet Scrambled Eggs: When making the Swiss meringue, if your egg white and sugar mixture gets too hot or you don’t whisk constantly, you’ll cook the eggs. Use a double boiler and an instant-read thermometer. Don’t guess!
- Over-Decorating the Masterpiece: You’ve created this beautiful, minimalist canvas. Don’t ruin it by covering it with a mountain of sprinkles and piping. The beauty of a sage green cake lies in its simplicity. A single sprig of herbs or a touch of gold leaf is all it needs.
- A Soupy, Curdled Buttercream Mess: If your buttercream looks broken, don’t throw it out! 99% of the time, the temperature is the issue. Too warm? Chill the whole bowl in the fridge for 15 minutes and whip again. Too cold? Warm the sides of the bowl with a kitchen torch or warm towel and whip again. Just keep whipping!
Variations & Customizations
Feeling like riffing on this theme? I support that.
- Vanilla Bean & Lavender: For a more classic and calming flavor, make a simple vanilla bean cake and add a teaspoon of culinary lavender to the buttercream. The purple hue of the lavender buds will look stunning against the sage green.
- Matcha Magic: Instead of using food coloring, use high-quality culinary matcha powder to naturally color and flavor your buttercream. It provides a beautiful, earthy green color and a delicious, unique taste.
- The Rustic Textured Finish: Terrified of getting perfectly smooth sides? Don’t be! Embrace a rustic look. After your final coat of frosting, use the back of a small spoon or your offset spatula to create gentle swirls and textures around the cake. It’s chic and forgiving.
FAQ Section
Let’s clear up some of the mystery surrounding this elegant dessert.
1. How do you make the perfect sage green frosting color? The secret is to mix colors. Start with a white base. Add a small amount of leaf green food coloring gel, then neutralize and deepen it with an even smaller amount of brown or black. Build the color slowly with toothpicks until you reach the desired shade.
2. What flavors go well with a sage green cake? Earthy, herbal, and citrus flavors work beautifully. Think lemon, rosemary, lavender, thyme, pistachio, matcha, or a simple, high-quality vanilla bean.
3. Can I use American buttercream instead? You can, but it won’t be as smooth and has a much sweeter flavor profile. To get it smooth, you’ll need to beat it for a very long time. For the most sophisticated finish, Swiss Meringue is the way to go.
4. My Swiss meringue buttercream is runny/curdled. How do I fix it? This is the most common issue! If it’s runny, your butter was too soft, or the meringue was too warm. Chill the bowl for 15-20 minutes and re-whip. If it’s curdled or looks like cottage cheese, it’s too cold. Warm the sides of the mixing bowl gently (with a hairdryer or warm towel) for a few seconds and then whip it again. It will come together!
5. What are some good decorations for a minimalist cake? Less is more. Think fresh herbs (rosemary, thyme, eucalyptus), a single perfect flower (make sure it’s non-toxic!), a scattering of edible gold leaf, or a very simple textured finish on the frosting itself.
6. Is it safe to put real eucalyptus on a cake? Yes, but with a caveat. Eucalyptus isn’t meant to be eaten. Wrap the stems in floral tape or plastic wrap before inserting them into the cake, and make sure the leaves only rest on the surface. Remove it completely before serving.
7. How do you get super smooth sides on a cake? A cold, firm crumb-coated cake, a good turntable, and a bench scraper are the keys. Hold the scraper straight against the side of the cake and spin the turntable to smooth the frosting in one go. It takes practice!
Final Thoughts
Look at you! You’ve just created a cake that is the epitome of modern elegance. It’s a quiet showstopper, a conversation starter, and a testament to the idea that sometimes, the most beautiful things are the most simple.
So go ahead, pour yourself a cup of tea, cut a slice of your masterpiece, and enjoy the calm. You’ve officially mastered the art of the sage green cake, and your friends will be asking for your secrets for years to come.