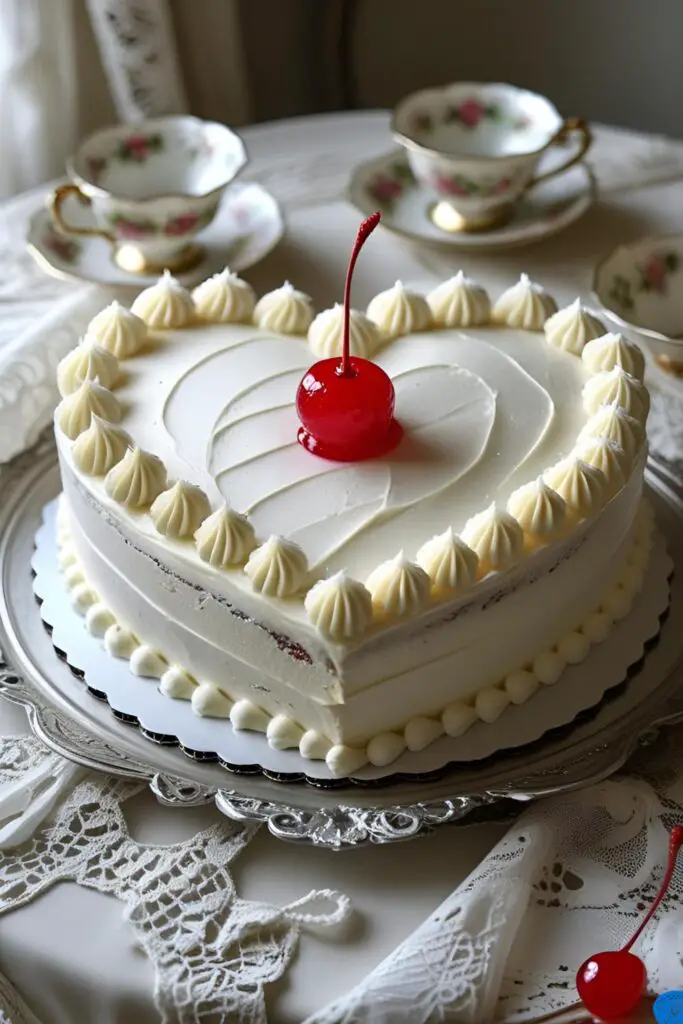
The Ultimate White Vintage Cake Recipe (For That Coquette Aesthetic)
Have you seen them? Those ridiculously dreamy, frilly cakes taking over your social media feeds? The ones that look like they belong at Marie Antoinette’s tea party, covered in elaborate buttercream swags and delicate pearls. This isn’t just a dessert; it’s an entire vibe. Welcome, my friend, to the era of the white vintage cake.
Before you close this tab thinking you need the steady hands of a surgeon and a royal pastry degree, just stop. What if I told you that creating one of these ethereal masterpieces is not only possible but actually fun? You just need a solid recipe, a little bit of patience, and a willingness to embrace your inner frosting artist.
Forget minimalist “naked” cakes. We’re going for maximum, unapologetic glamour. So, are you ready to pipe your way into a state of pure, frilly bliss? Let’s do this.
Why This Recipe is Awesome
Honestly, what’s not to love? This cake is the main character, and it knows it.
- It’s Pure Romance: This isn’t just a cake; it’s a statement piece. It’s perfect for bridal showers, milestone birthdays, or just a Tuesday when you feel like being extra. The white-on-white elegance is timeless and breathtaking.
- The Flavor is Divine: Underneath all that finery is a tender, velvety white cake with a delicate vanilla-almond flavor. It’s paired with a sweet, stable buttercream that’s perfect for both frosting and intricate piping.
- You’ll Feel Like a Pro: The piping techniques look incredibly complex, but they’re just combinations of simple motions. Once you get the hang of it, you’ll feel like a true cake decorating champion. I promise.
Ingredients
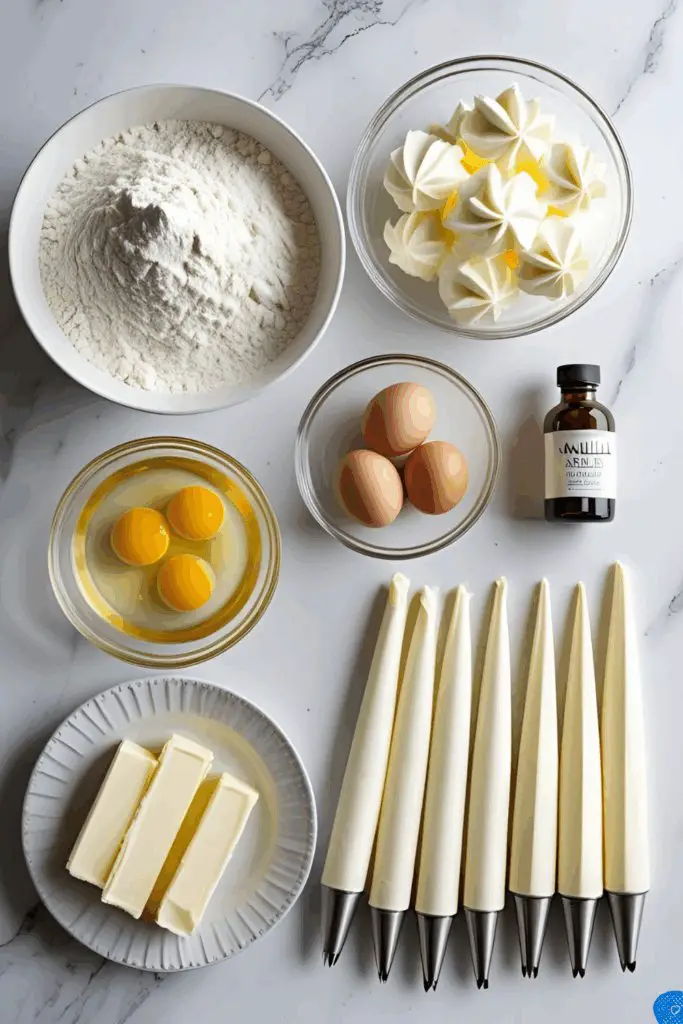
To build this elegant structure, you need the right materials. We’re aiming for pure white, so pay close attention to the details!

For the White Velvet “Canvas” Cake:
- 2 ½ cups cake flour, sifted
- 1 ½ cups granulated sugar
- 1 tablespoon baking powder
- ½ teaspoon salt
- ½ cup (1 stick) unsalted butter, softened but still cool
- 4 large egg whites, at room temperature
- 1 cup buttermilk, at room temperature
- 1 teaspoon clear vanilla extract (this is important!)
- ½ teaspoon almond extract
For the “Lace & Frills” Buttercream:
- 1 ½ cups (3 sticks) unsalted butter, softened (use the palest butter you can find) OR 1 ½ cups high-ratio shortening for the purest white.
- 6-7 cups powdered sugar, sifted
- ⅓ cup heavy cream or milk
- 1 ½ teaspoons clear vanilla extract
- ½ teaspoon almond extract
- Pinch of salt
For the “Jewelry” & Final Touches:
- White pearl sprinkles (edible dragées) in various sizes
- White nonpareils or sanding sugar
- Optional: Maraschino cherries without stems for a classic retro look
Tools & Kitchen Gadgets Used
This cake is all about the technique, which means tools are your best friend. Don’t skimp here!
- Stand Mixer (a hand mixer will work, but a stand mixer makes life easier)
- Two 8-inch Round Cake Pans
- Parchment Paper
- Cake Turntable (seriously, this is a game-changer for smooth sides)
- Offset Spatula (large and small)
- Bench Scraper
- Piping Bags (you’ll need several)
- A Variety of Piping Tips: This is the star of the show. I recommend a starter set that includes:
- Star Tips: Wilton #21 (small stars, borders), #32 (shell borders)
- Round Tips: Wilton #3 or #4 (dots, writing, delicate lines)
- Petal Tip: Wilton #104 (for swags and ruffles)
- Leaf Tip: Wilton #352 (for classic leaf shapes)
Step-by-Step Instructions
Alright, let’s create some magic. Put on some classical music and channel your inner artist.
Step 1: Bake the White Velvet Cake Preheat your oven to 350°F (175°C). Grease and flour your cake pans, then line the bottoms with parchment paper. In your stand mixer bowl, whisk together the sifted cake flour, sugar, baking powder, and salt. Add the cool, softened butter and mix on low speed until the mixture looks like damp sand.

Step 2: Combine and Bake In a separate liquid measuring cup, whisk the egg whites, buttermilk, and extracts. With the mixer on low, pour half of the wet mixture into the dry ingredients and mix until just combined. Scrape down the bowl, then add the remaining wet mixture and beat on medium speed for about 30 seconds until the batter is smooth. Pour evenly into your pans and bake for 25-30 minutes, or until a toothpick comes out clean. Let cool in the pans for 10 minutes, then invert onto a wire rack to cool completely.
Step 3: Whip the Buttercream Beat the butter (or shortening) in your mixer on high speed for 5 minutes until it’s very pale and fluffy. Sift in 4 cups of powdered sugar and mix on low until combined. Add the cream and extracts, then gradually add the remaining 2-3 cups of powdered sugar until you reach a stiff-medium consistency. It should hold its shape perfectly when you lift the beater.
Step 4: Assemble and Crumb Coat Level your cool cake layers. Place one layer on your turntable, apply a layer of buttercream, then top with the second layer. Apply a thin coat of buttercream all over the cake to trap crumbs. Chill in the fridge for 30-45 minutes until it’s firm to the touch.
Step 5: The Perfect Canvas Apply a final, generous coat of white buttercream. Use your offset spatula and bench scraper to get the sides and top as perfectly smooth as you can. This smooth base makes the ornate piping pop. Chill the cake again for at least 30 minutes.
Step 6: The Piping Party! Now for the fun part. Fill your piping bags with your desired tips. Don’t be afraid to practice on a piece of parchment paper first!
- Bottom Border: Start with a simple shell border around the base of the cake using a star tip like #32.
- Top Border: Repeat the shell border around the top edge of the cake.
- Side Swags: This is the signature look! Use a petal tip (#104), hold it with the wide end against the cake, and pipe in a gentle “U” shape from one point to another. Repeat around the cake, connecting the swags.
- Over-Piping: This is what creates that lavish, layered look. Go back over your initial piping with more details. Pipe small rosettes or stars where your swags connect. Add another, more delicate border on top of your first one. Go wild!
Step 7: Add the Bling While the frosting is still fresh, carefully place your white pearl sprinkles using tweezers for precision. Add them to the center of rosettes or along the draped swags. A light dusting of sanding sugar can add a beautiful, subtle sparkle.
Calories & Nutritional Info

Let’s just call this an “occasional treat” and move on, shall we?
- Serving Size: 1 slice (assuming cake is cut into 12 generous slices)
- Estimated Calories: Somewhere in the 600-700 kcal range. It’s mostly butter and sugar. And it’s glorious.
- Elegance Level: Off the charts.
- Nutritional Profile: Excellent source of joy and satisfaction.
Common Mistakes to Avoid
Avoid a cake catastrophe with these key tips.
- Using Standard Yellow Butter & Vanilla: Your “white” cake will be ivory at best. For a true, stark white, you must use clear vanilla extract. Using a high-ratio shortening instead of butter in the frosting will give you the purest white color, though butter provides better flavor. The choice is yours, artist!
- Using Runny Frosting: This is the number one enemy of intricate piping. Your buttercream must be stiff enough to hold its shape. If your swags are drooping sadly, your frosting is too soft. Beat in more sifted powdered sugar until it stiffens up.
- Piping on a Warm Cake: Do not, I repeat, DO NOT attempt to pipe on a cake that is not thoroughly chilled. A cold, firm cake is a stable canvas. A room-temperature cake will cause your beautiful piping to slide right off. Chill, chill, and chill again.
- Having No Game Plan: Don’t just start piping randomly. Sketch out a simple design on paper first. Decide where you want your swags, shells, and pearls to go. A little planning prevents a lot of scraping off and starting over.
Variations & Customizations
Want to put your own signature on this classic?
- Delicate Pastel Dream: This is the quintessential “Coquette Cake.” Keep the cake and base frosting white, but divide your remaining buttercream and tint it with the tiniest drop of pastel pink, baby blue, or mint green food gel for the piping details.
- Victorian Chocolate Goth: For a dramatic twist, make a rich, dark chocolate cake and use a black cocoa buttercream for piping. The same frilly, ornate techniques create a stunning gothic masterpiece.
- A Touch of Floral: Instead of almond extract, infuse your cake and buttercream with a teaspoon of food-grade rosewater. The subtle floral note is incredibly elegant and pairs beautifully with the vintage aesthetic.
FAQ Section
Let’s demystify this beautiful beast of a cake.
1. What exactly is a vintage cake? It refers to a style of cake decorating, popular from the 1950s-80s, characterized by over-the-top, ornate piping. This includes swags, ruffles, shells, and intricate borders, often in a single color or pastel palette. It’s also known as the Lambeth style.
2. What frosting is best for vintage piping? A crusting American buttercream (like this recipe) is great for beginners because it’s stable and holds its shape well. Professional bakers often use Swiss or Italian meringue buttercream for a silkier texture, but it can be less forgiving.
3. How do you get buttercream pure white? First, use shortening or the palest butter you can find. Second, use clear vanilla extract. Third, if it still has a yellow tinge, add a microscopic speck of violet food coloring. The violet color-corrects the yellow, making it appear brighter white.
4. What are the essential piping tips for a Lambeth cake? You’ll want a small-to-medium star tip (like Wilton #21 or #32), a petal tip (#104), and a small round tip (#3). This combination will allow you to create shells, swags, and dots, which are the core of the look.
5. Can I make this cake ahead of time? Yes! You can bake the cake layers up to two days ahead and wrap them well at room temperature. The buttercream can be made three days ahead and stored in the fridge. The fully decorated cake is best served within 24 hours but will hold in the fridge for 2-3 days.
6. How do you pipe the swags on the side of the cake? Use a petal tip (#104) with the wide end touching the cake. Start at your first point, apply pressure, and move the tip down and then up to your endpoint in a “U” shape. Release pressure at the end. It takes a little practice!
7. Is the vintage cake style hard for beginners? IMO, it’s more about patience than difficulty. The individual techniques (like piping a star or a shell) are easy. The challenge is in the repetition and planning. Practice on parchment paper, and you’ll be shocked at how quickly you pick it up!
Final Thoughts
You did it. You created a cake that is the very definition of elegance. It’s a timeless, romantic, and utterly delicious work of art. It’s proof that with a little guidance, you can bring the most beautiful, intricate desserts to life in your own kitchen.
Now go find some good lighting, take about a hundred photos, and then gather your favorite people to enjoy a slice of your masterpiece. You’ve earned it.