How to Make an Epic Jungle Safari Cake (It’s Easier Than You Think!)
Your little explorer has issued a decree. Their upcoming birthday party requires a cake that captures the wild, untamed spirit of the jungle. They don’t want a boring sheet cake. They want adventure. They want excitement. They want a jungle safari cake, complete with majestic beasts and edible dirt. You smile, nod, and immediately start hyperventilating, picturing a 12-hour fondant sculpting session that ends in tears and a sad-looking hippo.
Take a deep breath. Put down the phone to the expensive bakery. What if I told you that you could create a stunning, centerpiece-worthy safari cake using clever shortcuts and simple techniques? A cake that will make your kid’s eyes go wide and have the other parents whispering, “How did they do that?”
We’re about to embark on a culinary expedition where the results are epic, and the process is surprisingly low-stress. Grab your apron; it’s time to venture into the wild.
Why This Recipe is Your Survival Guide
This isn’t just a cake; it’s a strategy for winning at birthday parties without losing your mind.
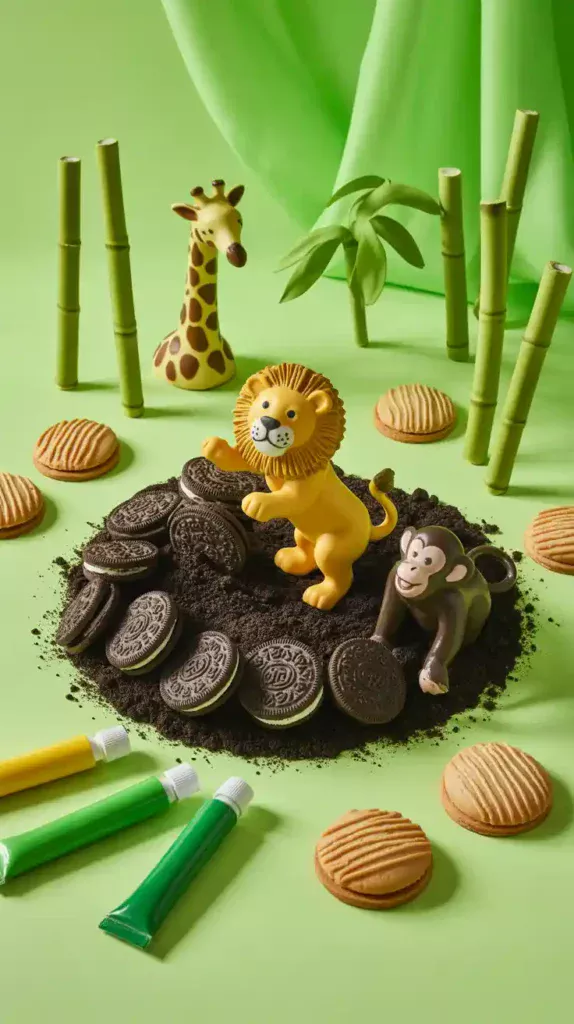
First, it’s all about maximum impact with minimum fuss. The genius of this cake is that we let store-bought items do the heavy lifting. We’re talking crushed cookies for realistic “dirt,” pirouette cookies for “bamboo,” and adorable toy animals as the stars of the show. No fondant sculpting, no complex piping skills required.
Second, the flavor is a guaranteed crowd-pleaser. Beneath our wild exterior is a rich, moist, impossibly delicious chocolate cake that both kids and adults will actually want to eat. It’s the perfect “mud” for our jungle scene and a flavor that never fails to get rave reviews.

Finally, it’s endlessly customizable. Is your kid obsessed with lions? Make them the king of the cake. Do they love giraffes? Let one peek out from behind some bamboo. This recipe is a blueprint for you to create a personalized masterpiece that features all your little one’s favorite animals.
The Forager’s List: Ingredients
To build our edible ecosystem, we need to gather a few key supplies.
For the Chocolate “Mud” Cake:
- 2 cups (250g) all-purpose flour
- 2 cups (400g) granulated sugar
- 43 cup (75g) unsweetened cocoa powder
- 2 teaspoons baking soda
- 1 teaspoon baking powder
- 1 teaspoon salt
- 1 cup (240ml) buttermilk, at room temperature
- 21 cup (120ml) vegetable oil
- 2 large eggs, at room temperature
- 1 cup (240ml) hot strong brewed coffee (or hot water)
For the Jungle Vine Buttercream:
- 2 cups (452g) unsalted butter, softened
- 6−7 cups (720-840g) powdered sugar, sifted
- 1/4 cup (60ml) heavy cream or milk
- 2 teaspoons pure vanilla extract
- A pinch of salt
- Green, Leaf Green, and Brown Gel Food Coloring: Gels are a must for deep, vibrant colors!
For the Safari Decorations:
- Food-Safe Jungle Animal Figurines: Lions, tigers, giraffes, zebras, monkeys—go wild!
- About 1 cup Oreo cookies: For making delicious, realistic “dirt.”
- About 10-12 Pirouette or other rolled wafer cookies: To create a cool bamboo effect.
- Optional: Clean, non-toxic artificial tropical leaves for decorating around the base of the cake stand.
The Explorer’s Kit: Tools & Gadgets
The right equipment makes any expedition smoother.
- Stand Mixer or Electric Hand Mixer: A true lifesaver for making fluffy buttercream.
- Mixing Bowls, Whisk, and Silicone Spatula: The essentials for any baking quest.
- Two 8-inch Round Cake Pans: For a classic, sturdy layer cake.
- Parchment Paper & Wire Cooling Rack: To ensure your cakes don’t get stuck in the mud.
- Offset Spatula & Bench Scraper: Your best tools for a clean, frosted finish.
- Cake Turntable: Makes frosting a round cake feel like a dream.
- Piping Bag with a Grass Tip and a Leaf Tip (Optional): Highly recommended for adding easy, impressive textures.
- Food Processor or a Ziplock Bag & Rolling Pin: For pulverizing your Oreos into fine “dirt.”
Step-by-Step: Your Map to the Jungle
Follow this guide, and you’ll navigate the baking jungle like a pro.
H3: Part 1: Baking the Chocolate Cake Layers
- Prep Your Base Camp: Preheat your oven to 350°F (175°C). Grease your two 8-inch cake pans and line the bottoms with parchment paper.
- Mix the Dry Ingredients: In a large bowl, whisk together the flour, sugar, cocoa powder, baking soda, baking powder, and salt.
- Combine the Wet Ingredients: In a separate bowl, mix the buttermilk, oil, and eggs. Pour the wet mixture into the dry ingredients and mix on low speed until just combined.
- Add the Coffee: Carefully pour in the hot coffee (it makes the chocolate taste chocolatier!) and stir until the batter is thin and smooth.
- Bake and Cool: Pour the batter evenly between your two pans and bake for 30-35 minutes, or until a toothpick comes out clean. Let the cakes cool in the pans for 15 minutes before turning them out onto a wire rack to cool completely. A warm cake is a fragile cake.
H3: Part 2: Whipping Up the Buttercream
- Make the Frosting: In your stand mixer, beat the softened butter until creamy. Gradually add the sifted powdered sugar, alternating with the heavy cream, until it’s all incorporated. Add the vanilla and salt, then whip on high for 3-5 minutes until light and fluffy.
- Color Your World: Scoop out about a cup of the buttercream and set it aside. To the main bowl, add a mix of green and leaf green gel food coloring until you achieve a vibrant, jungle green. You can tint the small bowl of remaining frosting a light brown for accents, or just leave it white.
H3: Part 3: Assembling Your Terrain
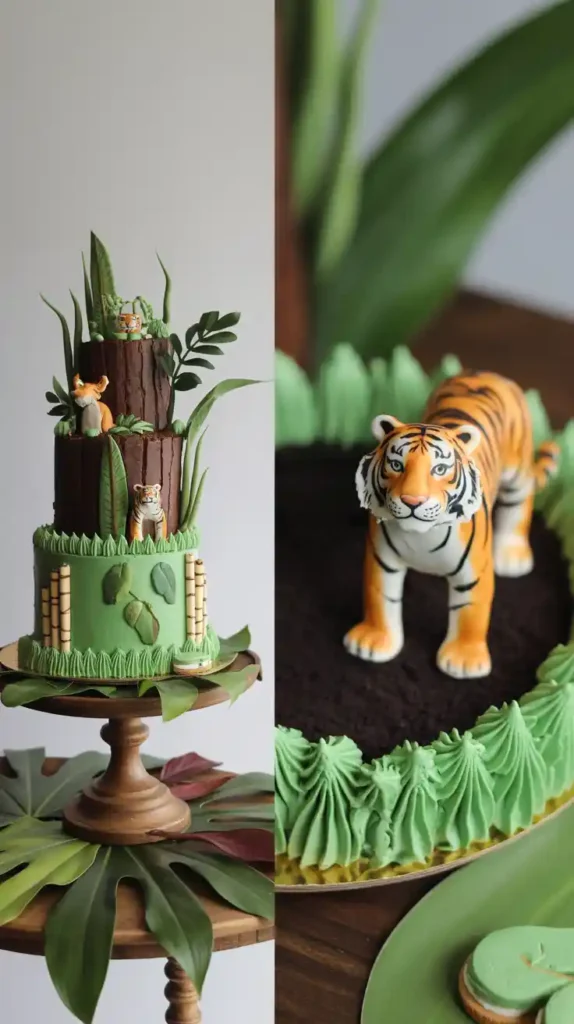
- Stack and Crumb Coat: Level your cooled cakes if needed. Place one layer on your cake stand or turntable and top with a layer of green buttercream. Add the second cake layer on top. Apply a very thin layer of buttercream all over the cake to trap crumbs, then chill for 30 minutes.
- The Final Coat: Cover the chilled cake in a final, generous coat of your green buttercream. You don’t need it to be perfectly smooth—a few swoops and textures with your offset spatula will make it look more natural and wild.
H3: Part 4: Decorating the Wilderness
- Make Some Dirt: Crush your Oreo cookies (filling and all) in a food processor or a ziplock bag until they resemble fine dirt. Create a few “dirt patches” by gently pressing the crumbs onto the top and base of your cake.
- Plant Some Bamboo: Cut your pirouette cookies to various lengths. Gently press them into the frosting in small clusters to look like bamboo stalks.
- Add Some Greenery (Optional): If you have a piping bag with a grass or leaf tip, this is your time to shine! Pipe small patches of grass around the dirt patches and the base of the bamboo. Pipe a few leaves on the bamboo stalks. This adds incredible texture!
- Release the Animals! This is the final, glorious step. Carefully place your clean, food-safe animal figurines onto the cake. Have a giraffe peeking over the top, a tiger lurking in the grass, and a monkey climbing the bamboo. Arrange them until your safari scene is complete.
Nutritional Info (Expedition Rations)
A breakdown of your delicious jungle fuel.
- Serving Size: 1 slice (assuming 12 slices)
- Estimated Calories: Around 600 kcal of pure party power.
- Key Nutrients: Fun, imagination, and a healthy dose of sugar.
- Note: This cake is designed to fuel epic birthday adventures. The memories created will burn off all the calories. That’s how it works, right?
Common Mistakes to Avoid (Don’t Get Lost on the Trail)
- The Mudslide: Attempting to frost a cake that is even slightly warm. Your buttercream will melt, your layers will slide, and you will have a sad, green puddle. The cake must be completely cool.
- A Pale, Sad Jungle: Using liquid food coloring. It will never give you the rich, vibrant green you want and can make your frosting runny. You must use concentrated gel food coloring.
- Contaminated Cake: Just grabbing your kid’s favorite toy from the bottom of the toy box. Make sure your animal figurines are food-safe. If not, wash them extremely well and place them on a small piece of parchment paper or a dollop of frosting to create a barrier with the cake.
- A Messy Landscape: Don’t try to frost over the dirt patches. Apply your full green coat of frosting first, then add the dirt, bamboo, and other decorations on top.
- An Overcrowded Zoo: It can be tempting to put every single animal on the cake. Resist the urge. A few thoughtfully placed figurines will look more artful and less chaotic. Less is more.
Variations & Customizations (Explore New Territories)
Ready for a different kind of adventure?
- Banana Jungle Cake: What do monkeys love? Bananas! Swap the chocolate cake for your favorite banana cake recipe and pair it with a brown sugar or cream cheese frosting for a truly on-theme flavor explosion.
- Surprise Volcano Eruption: On top of the cake, place an ice cream cone upside down and cover it in chocolate frosting to look like a volcano. Before serving, fill the cone with red and orange sprinkles or popping candy that will “erupt” when you cut into it.
- Two-Tiered Expedition: For a larger party, make a double batch of the recipe. Bake one batch in two 8-inch pans and the other in two 6-inch pans. Stack the 6-inch cake on top of the 8-inch cake (with proper dowel support!) for an impressive, tiered jungle masterpiece.
Frequently Asked Questions (Your Safari Field Guide)
What’s the best cake flavor for a jungle theme?

Chocolate is a fantastic choice as it looks like “mud.” Banana, coconut, or even a spice cake with cinnamon and nutmeg also fit the warm, tropical theme beautifully.
How do you make frosting look like grass or leaves?
The easiest way is to use special piping tips! A “grass tip” (like a Wilton #233) has multiple small holes that create a grassy texture when you pipe. A “leaf tip” (like a Wilton #352) has a V-shaped opening that creates perfect little leaves with a simple squeeze.
Are toy animal figurines really safe for a cake?
It’s best to buy figurines specifically sold as “cake toppers” as they are made from food-safe plastic. If you use regular toys, wash them thoroughly with hot, soapy water and create a barrier between the toy’s feet and the cake itself.
Can I make this jungle safari cake ahead of time?
Yes! You can bake the cake layers up to two days in advance and store them, well-wrapped, at room temperature. You can fully assemble and decorate the cake a day before the party. Just store it in the refrigerator.
How do I make the “dirt” for the cake?
Simply place Oreo cookies (the whole cookie, filling and all!) in a food processor and pulse until you have fine crumbs. No food processor? No problem. Put them in a ziplock bag and smash them with a rolling pin or a can.
Can I use fondant for this cake?
You certainly can if you’re a fan of fondant! You could cover the cake in green fondant and make simple fondant leaves. However, this recipe is designed to be super accessible using just buttercream.
How do I store the finished cake?

Because of the buttercream, it’s best to store it in the refrigerator. Let it sit at room temperature for about 30-60 minutes before serving to allow the frosting to soften up.
Final Thoughts
You did it. You ventured into the wild world of themed cakes and emerged a champion. You’ve created a delicious, awe-inspiring centerpiece that is going to make your little explorer’s day truly unforgettable.
Now, stand back, admire your handiwork, and get ready for the chorus of “oohs” and “aahs.” You have officially proven that you can conquer any baking challenge thrown your way. Happy adventuring!