The Ultimate Choco Truffle Cake (And Why It’s Not as Hard as It Looks)
Let’s talk about that moment. You’re staring through the glass of a fancy bakery case, eyes locked on a cake so dark, so glossy, so intensely chocolatey it looks like it was forged in the heart of a cocoa-fueled volcano. That, my friend, is the choco truffle cake. And you probably think, “Wow, I could never make that. I’d need a culinary degree and the patience of a saint.”
I’m here to tell you that’s a lie. A delicious, chocolate-scented lie.
Today, we’re demystifying this icon of indulgence. We’re going to make a choco truffle cake so decadent, so rich, and so ridiculously impressive that your friends will be convinced you’ve been secretly attending pastry school at night. But here’s the secret: it’s basically just two main components—a super moist chocolate cake and a simple, two-ingredient wonder called ganache. Ready to feel like a rockstar?
Why This Recipe Is Basically Perfect
So, what makes this the king of all chocolate cakes? First, the flavor. This isn’t your average, run-of-the-mill chocolate cake. It’s an intense, profound chocolate experience. The cake itself is deeply flavored and impossibly moist, while the truffle ganache is like the smoothest, silkiest, most luxurious chocolate truffle you’ve ever eaten, melted down into a frosting.
Second, it’s a showstopper. The beauty of this cake is its elegant simplicity. That glossy, dark ganache doesn’t need a lot of fussy decoration. It’s naturally gorgeous. You can slather it on with a spatula, and it will still look like a million bucks.
Finally, it’s deceptively easy. If you can whisk ingredients in a bowl and melt chocolate, you can make this cake. I promise. We’re breaking it down step-by-step so you can create a bakery-worthy masterpiece in your own kitchen.
The All-Important Ingredients List
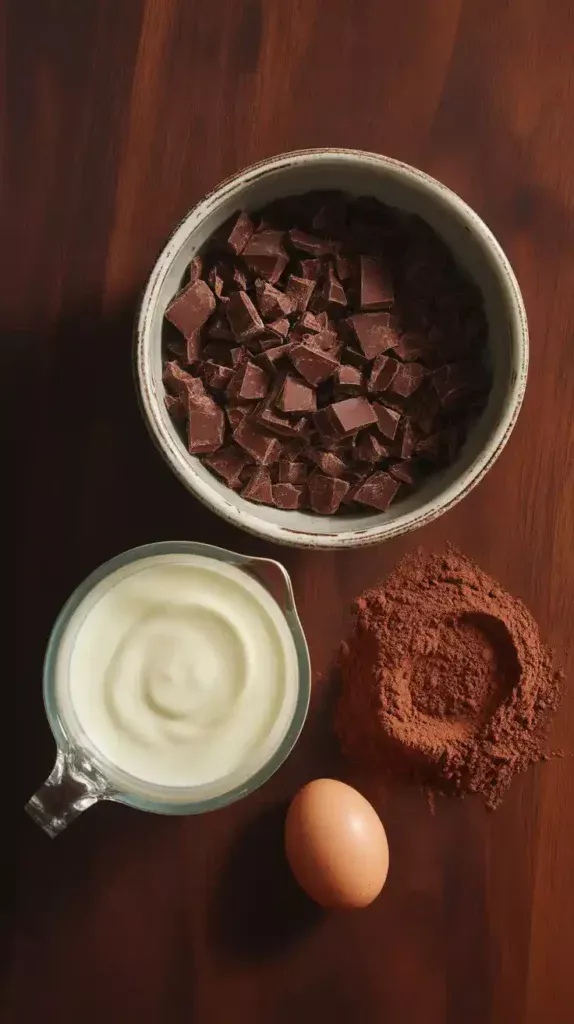

A cake this good is all about the quality of the ingredients. Don’t skimp on the chocolate!
For the Impossibly Moist Chocolate Cake:
- 1 ¾ cups all-purpose flour
- 2 cups granulated sugar
- ¾ cup good-quality unsweetened cocoa powder (Dutch-process is great here)
- 2 teaspoons baking soda
- 1 teaspoon baking powder
- 1 teaspoon salt
- 2 large eggs, at room temperature
- 1 cup buttermilk, at room temperature
- ½ cup vegetable oil (or other neutral oil)
- 2 teaspoons pure vanilla extract
- 1 cup freshly brewed hot coffee or boiling water
For the Silky Chocolate Truffle Ganache:
- 16 ounces (about 2 ¾ cups) high-quality semi-sweet or dark chocolate (60-70% cacao), finely chopped
- 2 cups heavy whipping cream
- 1 tablespoon unsalted butter, softened (optional, for shine)
The Tools of the Truffle Trade
You don’t need a professional kitchen, but these tools will make your life a whole lot easier. This is the stuff that makes you feel like a pro.
- Stand Mixer or Hand Mixer: While you can do it by hand, a mixer is your best friend for a lump-free cake batter.
- Two 8-inch or 9-inch Round Cake Pans: The foundation of your layer cake empire.
- Parchment Paper: Your insurance policy against cake-sticking-to-the-pan syndrome.
- Wire Cooling Racks: Non-negotiable for cooling your cakes properly.
- Saucepan: A small, heavy-bottomed one for heating the cream for your ganache.
- Heatproof Bowl: For melting your chocolate into liquid gold.
- Whisk: A good balloon whisk for bringing the ganache together.
- Offset Spatula: The ultimate tool for spreading fillings and frostings like a pro.
- Cake Turntable: Seriously, this gadget makes frosting a cake from “a chore” to “deeply satisfying.”
Step-by-Step Guide to Chocolate Nirvana
Let’s break this down. It’s just cake and frosting. You’ve got this.
Part 1: Bake the Chocolate Cake Layers
- Prep for Success: Preheat your oven to 350°F (175°C). Grease your cake pans well, line the bottoms with parchment paper, and then grease the parchment paper too. When it comes to chocolate cake, you can’t be too careful.
- Whisk the Dry Stuff: In a large bowl, sift or whisk together the flour, sugar, cocoa powder, baking soda, baking powder, and salt. Breaking up those cocoa clumps is key.
- Combine the Wet Stuff: In a separate, smaller bowl, whisk the eggs, buttermilk, oil, and vanilla extract until combined.
- Marry the Two: Pour the wet ingredients into the dry ingredients and mix on low speed (or with a whisk) until just combined. Don’t go crazy here; stop as soon as the flour streaks disappear.
- The Secret Weapon: Carefully pour the hot coffee into the batter and mix on low speed one last time until it’s all one consistency. The batter will be very thin and liquidy. This is correct! This is what makes the cake so moist.
- Bake and Wait: Pour the batter evenly into your prepared pans. Bake for 30-35 minutes, or until a toothpick inserted into the center comes out with a few moist crumbs attached, but no wet batter.
- Cool It Completely: Let the cakes cool in the pans for about 10 minutes before flipping them out onto wire racks to cool completely. I’m not kidding. If you even think about putting ganache on a warm cake, it will melt into a sad chocolate puddle. Go do something else for at least an hour.

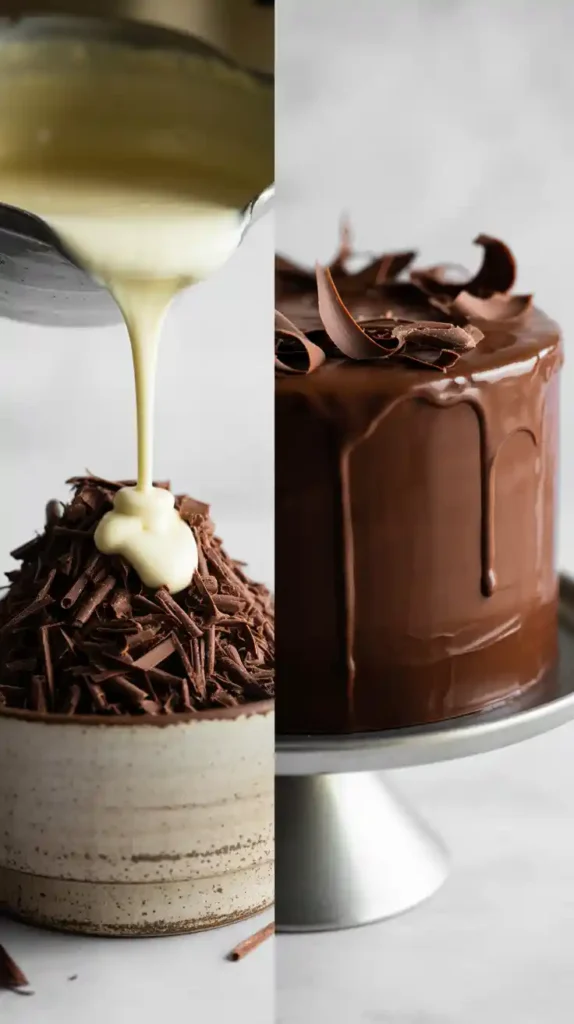
Part 2: Create the Luscious Truffle Ganache
- Chop the Chocolate: Finely chopping the chocolate is the most important step for a smooth ganache. A serrated knife works wonders. Place the chopped chocolate in a medium heatproof bowl.
- Heat the Cream: Pour the heavy cream into a small saucepan and heat it over medium heat until it just begins to simmer around the edges. Do not let it boil!
- The Magic Moment: Pour the hot cream directly over the chopped chocolate. Do not stir! Just let it sit for a full 5 minutes. This allows the heat from the cream to gently melt the chocolate from the inside out.
- Whisk to Perfection: After 5 minutes, start whisking from the center of the bowl in small circles, gradually working your way out. The mixture will look split and weird at first, but keep whisking! Magically, it will come together into a smooth, glossy, beautiful ganache. Whisk in the optional softened butter now if you’re using it.
- Let It Set: Now you need patience. The ganache needs to cool and thicken to a spreadable, peanut-butter-like consistency. This can take 1-2 hours at room temperature. You can speed this up in the fridge, but stir it every 15 minutes so it cools evenly.
Part 3: Assemble Your Masterpiece
- First Layer: Place one cooled cake layer on your serving plate or turntable. Scoop about a cup of the thickened ganache on top and spread it evenly.
- Second Layer: Gently place the second cake layer on top. Now, use your offset spatula to cover the entire cake—top and sides—with the remaining ganache.
- Make it Pretty (or Don’t): You can smooth the ganache perfectly with a bench scraper for a sleek, modern look. Or, just make pretty swirls with the back of a spoon for a more rustic vibe. The beauty of ganache is that it looks incredible either way.
Calories & Nutritional Info (Brace Yourself)
This is a monument to indulgence. Let’s not pretend it’s health food.
- Estimated Calories per Slice (1/12th): Around 600-750 calories. It’s worth every single one.
- Main Component: Pure, unadulterated happiness.
- Serving Size: A small slice is rich enough to satisfy even the most intense chocolate craving.
- TBH: If you’re counting calories today, maybe just bookmark this recipe for a cheat day. 🙂
Common Mistakes to Avoid (Read This Before You Start!)
- Using Cheap Chocolate Chips: Most chocolate chips contain stabilizers to help them keep their shape. This is the enemy of smooth ganache. Use good quality baking chocolate bars and chop them yourself.
- Overheating the Cream/Chocolate: If you boil the cream or try to melt the chocolate over direct heat, you risk seizing it, turning it into a grainy, oily mess. Be gentle.
- Frosting a Warm Cake: I will mention this in every cake recipe until the end of time. A warm cake + frosting = disaster.
- Not Letting the Ganache Thicken: If you try to frost the cake while the ganache is still warm and liquidy, it will just run off the sides. Patience is a virtue, especially in baking.
Variations & Customizations
Once you’ve mastered the classic, why not play around?
- The Mocha Truffle: Dissolve 2 teaspoons of instant espresso powder in the hot coffee before adding it to the cake batter. The coffee will intensify the chocolate flavor to an unbelievable degree.
- The Orange Truffle: Add the zest of one orange to the heavy cream as you heat it for the ganache. Strain the cream before pouring it over the chocolate. Chocolate and orange are a match made in heaven.
- The Eggless Wonder: For an eggless version, you can replace the two eggs in the cake with ½ cup of plain yogurt or ½ cup of unsweetened applesauce. The texture will be slightly denser but still incredibly delicious.
FAQ Section: Your Truffle Troubles, Solved
H3: What is the difference between a regular chocolate cake and a choco truffle cake? The main difference is the frosting! A regular chocolate cake might use buttercream, but a true truffle cake is defined by its use of rich chocolate ganache for the filling and coating, which mimics the filling of a chocolate truffle.
H3: How do I get a super shiny ganache? Three things: use high-quality chocolate, don’t overheat anything, and whisk in that optional tablespoon of softened butter or a teaspoon of light corn syrup at the end. That little bit of extra fat or sugar adds a beautiful, professional-looking sheen.

H3: Why did my ganache split or look oily? This usually happens if the cream was too hot or if you stirred it too vigorously before the chocolate had a chance to melt. If it splits, you can sometimes save it by whisking in a tablespoon of warm milk or cream, a little at a time, until it comes back together.
H3: How should I store my choco truffle cake? Because of the heavy cream in the ganache, you should store the cake in an airtight container in the refrigerator for up to 4-5 days.
H3: My refrigerated truffle cake is hard. Did I do something wrong? Nope! The ganache will firm up considerably in the cold. For the best taste and texture, let the cake sit at room temperature for at least 30-60 minutes before serving. This allows the ganache to soften back to its silky, fudgy state.
H3: Can I make this cake ahead of time? Yes! The cake layers can be baked, cooled, and frozen (wrapped tightly in plastic wrap and foil) for up to a month. The ganache can be made a few days ahead and kept in the fridge; just let it soften at room temp or gently warm it over a double boiler to get it to a spreadable consistency again.
H3: Can I use milk chocolate or white chocolate for the ganache? You can, but you’ll need to change the ratios. Milk and white chocolates are softer and contain more sugar/milk solids. A good starting point is a 2.5:1 or 3:1 ratio of chocolate to cream by weight.
Final Thoughts
You did it. You stared into the chocolatey abyss and created something truly spectacular. This choco truffle cake isn’t just a dessert; it’s a testament to the power of good chocolate and a little bit of patience. You’ll never look at that bakery case the same way again, because now you know the secret: you’re the pastry chef.
Go ahead, cut yourself a slice. You’ve more than earned it.