The Only Red Velvet Birthday Cake Recipe You’ll Ever Need
Let’s talk about the most dramatic, the most mysterious, and the most misunderstood cake in the entire dessert universe. Is it a vanilla cake that got a questionable makeover? Is it a weak-willed chocolate cake? What is the deal with red velvet? If you’ve ever found yourself pondering this delicious enigma, then you’re in the right place. We are about to demystify the legend and teach you how to make a true, authentic, and mind-blowingly delicious red velvet birthday cake.
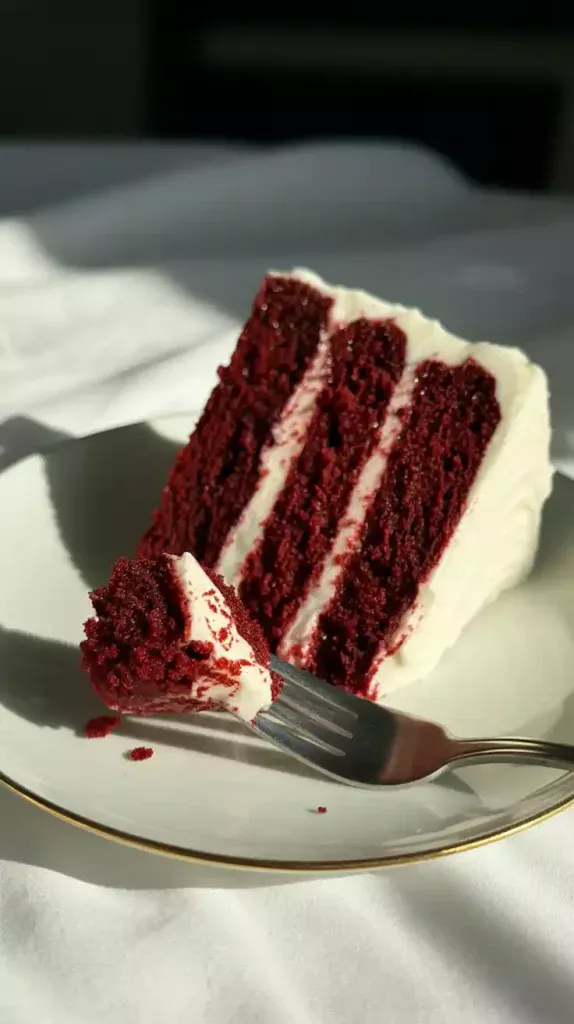
Forget those dry, bland, vaguely-red imposters from the grocery store. We are making the real deal. A cake with a soft, tight, and impossibly tender crumb that truly feels like velvet. A cake with a subtle, complex flavor that’s a perfect dance between tangy buttermilk and a whisper of chocolate. And of course, the grand finale: a thick, luscious, and unapologetically tangy cream cheese frosting.
Why This Recipe is an Absolute Legend
So, why is this the one and only red velvet recipe you need in your life?
- The Texture is Actually Velvet: This isn’t just a clever name. The chemical reaction between the buttermilk, vinegar, and baking soda in this recipe creates an incredibly soft, fine, and tender crumb. It’s a texture that is genuinely unique and utterly luxurious.
- It Has a Perfect, Complex Flavor: A real red velvet cake is not just a red vanilla cake. It has a slight tang from the buttermilk and a very subtle chocolate note from the cocoa powder. Paired with the tangy, rich cream cheese frosting, it’s a perfectly balanced and incredibly sophisticated flavor experience.
- It’s a Timeless Showstopper: There is nothing more visually stunning than cutting into a cake and revealing that deep, dramatic, vibrant red crumb against the stark white frosting. It’s a classic for a reason, and it’s the perfect centerpiece for any birthday or celebration.
The Ingredient List: The Anatomy of a Classic
To achieve that signature flavor and texture, a few key ingredients are non-negotiable.
For the Velvety Red Cake:
- All-Purpose Flour: 2 ½ cups.
- Unsweetened Cocoa Powder: 2 tablespoons. Just enough for a hint of flavor.
- Baking Soda: 1 teaspoon.
- Salt: 1 teaspoon.
- Granulated Sugar: 1 ½ cups.
- Vegetable Oil: 1 ½ cups. Oil is the secret to a super moist crumb.
- Large Eggs: 2, at room temperature.
- Buttermilk: 1 cup, at room temperature. This is essential for the tang and texture.
- White Vinegar: 1 tablespoon. Also essential!
- Vanilla Extract: 2 teaspoons.
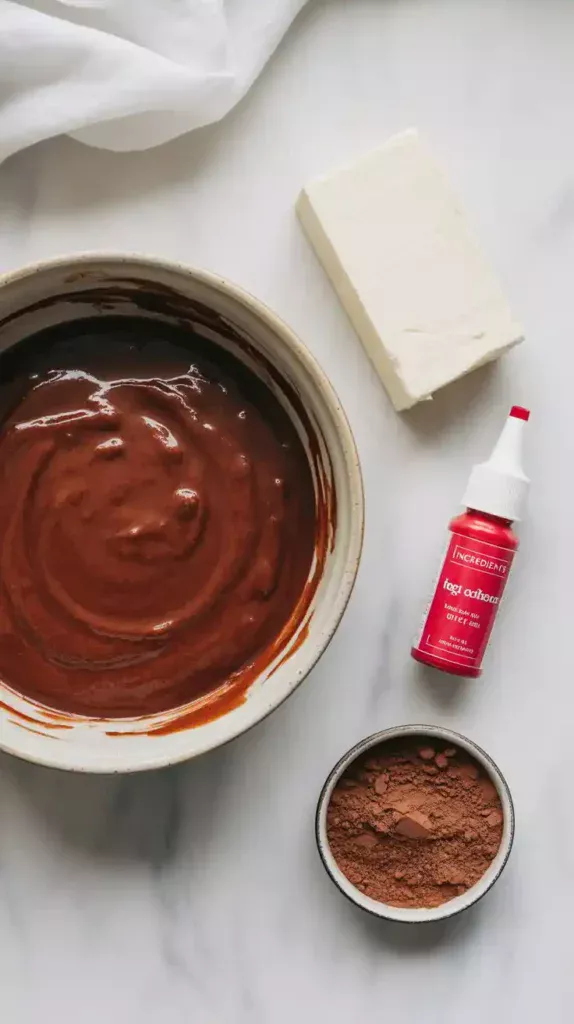
- Red Gel Food Coloring: 1 to 2 tablespoons. Gel coloring is a must for a vibrant red without a weird aftertaste.
For the Tangy Cream Cheese Frosting:
- Cream Cheese: 16 ounces (2 blocks), cold, straight from the fridge.
- Unsalted Butter: 1 cup (2 sticks), softened to room temperature.
- Powdered Sugar: 4 cups, sifted.
- Vanilla Extract: 1 ½ teaspoons.
- A Pinch of Salt.
Tools & Kitchen Gadgets: Your Velvet-Making Kit
You don’t need anything too fancy for this classic, just the basics.
- Three 8-inch or 9-inch Round Cake Pans.
- A Stand Mixer or a reliable Hand Mixer.
- A Flour Sifter or a Fine-Mesh Sieve.
- A Cake Turntable: For making the frosting process a dream.
- An Offset Spatula and a Bench Scraper.
- A Large Piping Bag and a Star Tip (optional): For a decorative border.
Step-by-Step Instructions: The Path to Velvety Perfection
Ready to bake a legend? Let’s do this.
Step 1: The Prep

Preheat your oven to 350°F (175°C). Grease and flour your three round cake pans. In a large bowl, sift together the flour, cocoa powder, baking soda, and salt.
Step 2: The Red Magic
In the bowl of your stand mixer, beat the sugar, oil, eggs, and vanilla until well combined. Now for the dramatic part: add your red gel food coloring and mix until you have a vibrant, alarmingly red mixture. In a separate small bowl, whisk together your room temperature buttermilk and the white vinegar.
Step 3: The Combination
On low speed, alternate adding your sifted dry ingredients and your buttermilk mixture to the red mixture. Do this in three additions of dry and two additions of wet, beginning and ending with the dry. Mix only until just combined. Do not overmix!
Step 4: The Bake
Divide the glorious, vibrant red batter evenly among your three prepared pans. Bake for 25-30 minutes, or until a wooden skewer inserted into the center comes out with a few moist crumbs attached. Let the cakes cool completely on a wire rack.
Step 5: The Perfect Frosting (The Secret)
This is the secret to a perfect, pipeable cream cheese frosting. In your stand mixer, beat the softened butter on its own for a few minutes until it’s perfectly smooth and creamy.
On low speed, gradually add the sifted powdered sugar. Add the vanilla and salt. Once it’s all combined, increase the speed to medium-high and beat for 2-3 minutes. Now, add your COLD, cubed cream cheese all at once and beat on medium-high for just 60-90 seconds, until it is completely smooth and combined. Do not overmix once the cream cheese is in!
Step 6: The Assembly

Level your cooled cake layers. A great trick is to reserve the cake tops you slice off to make decorative crumbs later.
Stack your layers on your cake stand with a generous layer of that glorious cream cheese frosting between each layer. Apply a thin crumb coat all over and chill for 30 minutes. Once firm, apply a final, beautiful coat of frosting. For a classic look, crumble up your reserved cake tops and press the red velvet crumbs around the base or on top of the cake.
Calories & Nutritional Info (A Slice of Luxury)
This is a rich, luxurious, and celebratory cake. Let’s treat it as such.
- Serving Size: One decadent slice.
- Calories: A birthday-appropriate amount.
- Good For: Celebrating, indulging, and impressing everyone you know.
Common Mistakes to Avoid (Velvet Nightmares)
- A Runny, Weeping Frosting: This is the most common cream cheese frosting problem. It is almost always caused by using softened cream cheese or over-mixing it. The secret is to use cold cream cheese and to mix it into the butter-sugar base at the very end, just until it’s combined. If it does get too soft, the fridge is your best friend.
- A Dry, Sad Cake: Red velvet should be incredibly moist. The biggest culprit of a dry cake is overbaking. Start checking your cake layers at the 25-minute mark. The second you see moist crumbs on your toothpick, they are done.
- A Brownish, Not-So-Red Cake: To get that signature, vibrant red, you must use a high-quality gel food coloring. The little liquid dropper bottles from the grocery store will not give you the color you want and can add a weird, bitter taste.
- Forgetting the Vinegar: Don’t skip it! The vinegar is not just for flavor. Its acidity reacts with the buttermilk and baking soda to create a chemical reaction that helps give the cake its fine, tender, “velvety” crumb.
Variations & Customizations
The classic is a classic for a reason, but here are a few fun ways to mix it up.
1. The White Chocolate Red Velvet
A truly decadent twist. Add 1 cup of high-quality white chocolate chips to your cake batter. For the frosting, you can add 4 ounces of melted and cooled white chocolate to the cream cheese frosting to make it even richer.
2. The Red Velvet “Oreo” Dream
For a stunning visual and a fun, crunchy texture. Crush about 1 cup of Oreo cookies (the whole cookie, filling and all) and sprinkle the crumbs over the cream cheese filling between each cake layer.
3. The Red Velvet Cupcakes

This recipe is perfect for cupcakes. Just line a muffin tin with paper liners and fill them about two-thirds of the way full. Bake for 18-22 minutes. This recipe will make about 24 perfect cupcakes, ready for a swirl of cream cheese frosting.
FAQ: Your Most Pressing Red Velvet Questions
So, what flavor is red velvet actually supposed to be?
It’s not just a red cake! A true red velvet has a unique flavor profile all its own. It’s primarily a buttermilk cake with a very mild, tangy chocolate note from the small amount of cocoa powder. The “velvet” refers to its incredibly soft, fine, and smooth texture.
Do I have to use that much red food coloring?
For that classic, vibrant red, yes. Historically, the red color came from a chemical reaction between non-Dutched cocoa and an acid, which produced a reddish-brown hue. Modern recipes use food coloring to amplify that. You can use beet powder for a more natural color, but it will be a more muted, magenta-like shade.
Can I use a different frosting besides cream cheese?
You can, but you’d be breaking a sacred, time-honored rule of the dessert world. The tangy, slightly salty cream cheese frosting is the perfect counterbalance to the mild sweetness of the cake. It’s the classic pairing for a reason.
Final Thoughts
You’ve done it. You have now mastered a true legend of the cake world. You have created a stunning, delicious, and perfectly textured red velvet cake that will make every other version you’ve ever had seem like a pale imitation.
So go on. Cut that first, dramatic slice. Admire the beautiful contrast of the deep red cake and the pristine white frosting. And savor that perfect, velvety, tangy, and slightly mysterious bite. You’ll never go back to the box mix again.