The “Come On Barbie, Let’s Go Party” Cake Tutorial
Hi Barbie! Are you ready to ditch the mundane, the boring, the beige, and enter a world of pure, unapologetic, plastic-and-fantastic PINK? Of course you are. Whether you’re planning a birthday, a movie night, or just a regular Tuesday that needs a serious injection of fabulousness, you don’t just need a cake. You need a monument to glamour. You need the ultimate barbie theme cake.
Forget subtlety. We’re about to create a tall, dazzling, pink ombré masterpiece that is dripping with sparkle and main character energy. This is the cake that looks like it just rolled up in its own pink Corvette. And the best part? It’s surprisingly easy to make. Let’s go party!
Why This Cake is Everything
So, why is this the one and only Barbie cake recipe your Dreamhouse will ever need?
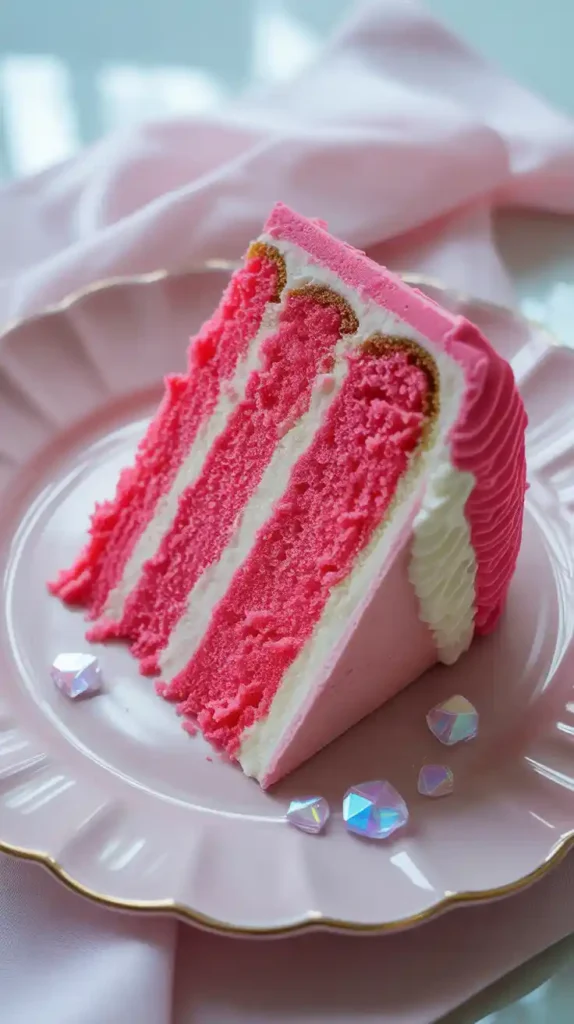
- It’s a Visual Masterpiece: This cake is designed to be seen. The seamless pink ombré gradient is a professional-looking technique that’s shockingly simple to achieve. Covered in glitter, it’s a show-stopping centerpiece that is guaranteed to be the star of any party (and your Instagram feed).
- It’s Fun on the Inside, Too: The fun doesn’t stop at the frosting. We’re making a delicious and moist “Pink Velvet” cake, so when you cut into it, you’re greeted with a beautiful, vibrant pink crumb. It’s a full commitment to the aesthetic.
- It’s a Confidence Booster: You will feel like a professional cake decorator after you pull off that perfect ombré swirl. This cake looks like it costs a fortune from a fancy bakery, but you can proudly say, “Oh this? I just whipped it up.”
The Ingredient List: It’s Giving… Pink
To build our fabulous creation, we need the pinkest, most delicious ingredients we can find.
For the Fabulous Pink Velvet Cake:
- All-Purpose Flour: 2 ¾ cups.
- Granulated Sugar: 1 ¾ cups.
- Baking Powder: 2 teaspoons.
- Salt: 1 teaspoon.
- Unsalted Butter: 1 cup (2 sticks), softened.
- Vegetable Oil: ½ cup.
- Large Eggs: 4, at room temperature.
- Vanilla Extract: 1 tablespoon.
- Buttermilk: 1 cup, at room temperature.
- Sour Cream: ½ cup, at room temperature.
- Pink Gel Food Coloring: A good quality “Hot Pink” or “Electric Pink” is a must.
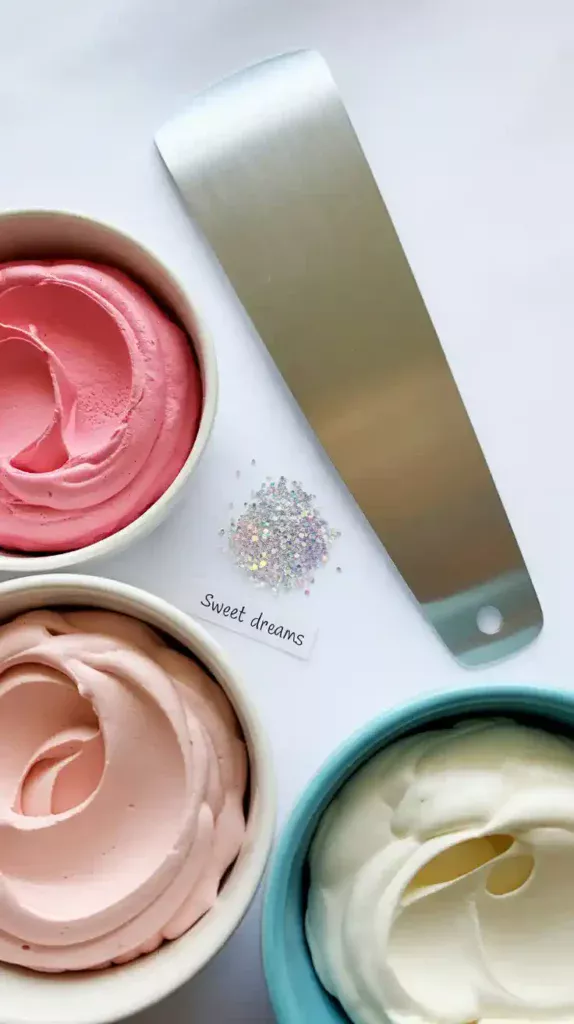
For the Dreamhouse Buttercream & Sparkle:
- Unsalted Butter: 3 cups (6 sticks), softened.
- Powdered Sugar: 8 cups (a whole 2lb bag), sifted.
- Heavy Cream or Milk: 5-7 tablespoons.
- Clear Vanilla Extract: 1 tablespoon (to keep the white part of your frosting bright).
- A Pinch of Salt.
- Pink Gel Food Coloring: In a few different shades/intensities.
- Edible Glitter: Lots of it. Pink, holographic, whatever your heart desires.
Tools & Kitchen Gadgets: Barbie’s Dream Kit
Every masterpiece requires the right tools. Here’s what you’ll need in your Mojo Dojo Casa House… er, kitchen.
- Three or four 8-inch Round Cake Pans: For a tall, dramatic cake.
- A Stand Mixer: For whipping up that perfect, fluffy buttercream.
- A Cake Turntable: This is essential for the ombré effect.
- A tall Bench Scraper: The other essential tool for a smooth ombré.
- An Offset Spatula.
- Optional but Awesome:
- A “Barbie” silhouette or “Come on Barbie” cake topper.
- Fun pink sprinkles.
Step-by-Step Instructions: The Ultimate Cake Makeover
Alright, Barbie, let’s get you ready for the party.
Step 1: Bake the Pink Foundation
- Prep: Preheat your oven to 350°F (175°C). Grease and flour your cake pans.
- Mix: In your stand mixer, cream the butter and sugar until very light and fluffy. Add the oil, then the eggs one at a time, followed by the vanilla. In a separate bowl, whisk the dry ingredients.
- Combine: On low speed, alternate adding the dry ingredients and the buttermilk, then fold in the sour cream. Finally, mix in your pink gel food coloring until you have a vibrant, unapologetically pink batter.
- Bake: Divide the batter between your pans and bake for 25-30 minutes, or until a toothpick comes out clean. Let the layers cool completely.
Step 2: Whip the Perfect Pink Palette
- Make your buttercream by beating the softened butter, then gradually adding the sifted powdered sugar, vanilla, salt, and cream until light and fluffy.
- Divide your finished buttercream into three bowls. Leave one bowl white. Tint the second bowl a light pastel pink. Tint the third bowl a vibrant hot pink.
Step 3: Build Your Dreamhouse

Level your cooled pink cake layers. Stack them on your cake board with a layer of the light pink or white buttercream between each layer. Apply a thin crumb coat all over and chill for 30 minutes.
Step 4: The Ombré Makeover
This is the fun part!
- On your chilled, crumb-coated cake, apply the frosting in bands. Use an offset spatula to apply the hot pink frosting around the bottom third of the cake.
- Apply the light pink frosting around the middle third.
- Apply the white frosting around the top third and on the top of the cake. Don’t worry about it being neat!
- Now, take your tall bench scraper. Hold it straight up against the side of the cake, making light contact. With your other hand, spin the cake turntable in one smooth, continuous motion. The colors will magically blend into a beautiful, seamless gradient. Scrape off the excess frosting from your scraper and repeat until you’re happy with the smoothness.
Step 5: Add the Sparkle!
This step is not optional. A Barbie cake must sparkle. Place your cake on a large baking sheet to catch the fallout. Take your edible glitter and go to town. You can gently toss it at the sides of the cake or use a clean, dry (and soft) paintbrush to gently apply it.
Step 6: The Finishing Touch
Add your cake topper. You can also pipe a simple shell border around the bottom with any leftover frosting. You are now officially ready for your blowout party.
Calories & Nutritional Info (Classified by Barbie HQ)
This cake is a celebration of fun, glamour, and the color pink. Let’s not bog it down with numbers.
- Main Ingredient: Fabulousness.
- Nutritional Value: Boosts confidence and sparks joy.
- Servings: Enough for you and all your besties.
Common Mistakes to Avoid (Dreamhouse Disasters)
- Underwhelming Pink: Those little liquid food coloring droppers from the grocery store are not going to cut it. You need a high-quality “hot pink” or “electric pink” gel food coloring to achieve that vibrant, signature Barbie shade.
- A Patchy, Sad Ombré: The key to a smooth gradient is applying thick, generous bands of each color before you start scraping. If the bands are too thin, you’ll get a patchy, uneven look.
- A Glitter Apocalypse: Edible glitter is a joy, but it will try to redecorate your entire kitchen. Applying the glitter while the cake is on a rimmed baking sheet will contain the mess and let you collect and reuse any fallout.
- A Leaning Tower of Fabulous: If you’re making a tall cake (3-4 layers), leveling your cake layers is non-negotiable. A flat, stable foundation is key.
Variations & Customizations (Choose Your Barbie)
Every Barbie is different. Your cake can be, too!
1. The Classic Barbie Doll Cake

This is the ultimate throwback. Bake one of your cake layers in a dome-shaped, oven-safe bowl. Stack it on top of another round layer to create a large “ballgown” shape. Frost it, and then insert a (clean, plastic-wrapped) Barbie doll into the top. Pipe on a beautiful bodice and decorate her “dress.”
2. The “Malibu Barbie” Tropical Vibe
Make a coconut or pineapple-flavored cake. For your ombré, use shades of pink, orange, and turquoise. Garnish with a few edible hibiscus flowers, a pink flamingo cake topper, and maybe some crushed Graham crackers around the base for “sand.”
3. The “Weird Barbie” Masterpiece
A tribute to the realest one. Make your cake perfectly. Frost it beautifully. Then, have fun “messing it up” in a loving way. Add some mismatched, brightly colored sprinkles, pipe on a slightly crooked message, and maybe draw some marker-like scribbles with an edible ink pen. It’s a cake with a great personality.
FAQ: Your Most Fabulous Questions, Answered
How do I get that perfect, vibrant “Barbie Pink”?
The secret is hot pink or electric pink gel food coloring. Brands like Americolor and Chefmaster make fantastic, super-concentrated colors. Start with a little and add more until you reach the desired level of fabulousness.
Is edible glitter really safe to eat?
Yes, as long as you buy glitter that is specifically labeled “edible.” This means it’s made from food-grade ingredients like sugar, cornstarch, and approved color additives. Do not use “non-toxic” craft glitter, which is not meant for human consumption.
What’s the easiest way to get a smooth ombré effect?
The bench scraper and turntable method is by far the most foolproof. The key is to work with a chilled, crumb-coated cake and to spin the turntable in one smooth, confident motion.
Can I make this cake ahead of time?

Absolutely! You can bake the cake layers up to two days in advance and keep them well-wrapped. You can assemble and frost the entire cake the day before your party. Just keep it in the fridge and add the glitter right before serving for maximum sparkle.
What flavor is a “Barbie cake” traditionally?
There’s no official flavor, but anything fun, pink, and delicious fits the bill! Strawberry, raspberry, funfetti, or a pink-tinted vanilla (like our Pink Velvet) are all perfect choices.
How do I get my buttercream so smooth?
Start with a chilled, crumb-coated cake. Apply a generous final coat of frosting—more than you think you need. Then, use a metal bench scraper, heated slightly under hot water and wiped dry, to take one final, smooth pass.
Final Thoughts
You did it. You’ve created a cake that is more than a dessert; it’s a statement. It’s a tribute to fun, fashion, and the power of pink. It’s a cake that’s ready for its close-up, its blowout party, and its giant slice.
So go on, put on your favorite party dress, turn up the music, and present your masterpiece. You’re not just serving cake; you’re serving a whole vibe. Go party, Barbie.