The “Some Bunny Loves You” Guide to the Classic Easter Bunny Cake
Let’s take a trip down memory lane. Remember those holiday desserts from your childhood? The ones that weren’t flawlessly airbrushed or covered in hyper-realistic fondant, but were made with a clever trick, a whole lot of love, and an absolutely unapologetic amount of shredded coconut? Well, it’s time to bring back a legend. We are about to create the most charming, nostalgic, and surprisingly easy centerpiece for your holiday table: the classic easter bunny cake.
This isn’t just a cake; it’s a work of geometric genius. It’s a magic trick that transforms two simple round cakes into an adorable bunny head, complete with floppy ears and a jaunty bowtie. Forget specialty pans and complicated sculpting. All you need is a knife, a little imagination, and a willingness to get coconut absolutely everywhere.
Why This Cake is an Easter Icon
So, why has this particular bunny cake hopped its way through generations of family celebrations?
- It’s a Clever, No-Fuss Masterpiece: The “wow” factor of this cake is its brilliant construction. You don’t need a bunny-shaped pan. You just need two round cakes and a knife. The moment you arrange the pieces is a true “a-ha!” moment of creative genius.
- It’s a Fun Family Project: This is the perfect cake to make with kids. They can help with the frosting, the coconut “fur,” and creating the bunny’s jelly bean face. It’s a memory-making machine.
- The “Coconut Fur” is a Forgiving Friend: Worried about your frosting skills? Don’t be! The generous coating of fluffy, shredded coconut covers a multitude of sins. Lumps, bumps, and uneven spots all disappear under a beautiful blanket of snowy “fur.”
The Ingredient List: Hoppy Building Blocks
To construct our floppy-eared friend, we need a delicious cake base and all the fixings for its fluffy coat.
For the “Hoppy” Carrot Cake:
- All-Purpose Flour: 2 cups.
- Granulated Sugar: 2 cups.
- Cinnamon: 2 teaspoons.
- Baking Soda: 2 teaspoons.
- Salt: ½ teaspoon.
- Vegetable Oil: 1 ½ cups.
- Large Eggs: 4.
- Shredded Carrots: 3 cups, finely grated.
- Crushed Pineapple: 1 can (8 ounces), drained well. This is the secret to a super moist cake!
- The “Bunny-in-a-Hurry” Shortcut: A box of spice cake or carrot cake mix is a fantastic and perfectly acceptable time-saver.
For the Fluffy Coconut “Fur” & Face:
- Cream Cheese: 16 ounces (2 blocks), softened.
- Unsalted Butter: 1 cup (2 sticks), softened.
- Powdered Sugar: 4 cups, sifted.
- Vanilla Extract: 2 teaspoons.
- Sweetened Shredded Coconut: One large bag (about 14 ounces). You’ll need a lot!
- For the Face:
- Jelly beans (pink and black are great)
- Black licorice laces
- Pink construction paper or cardstock (optional, for the ears)
Tools & Kitchen Gadgets: Your Bunny-Building Kit
You don’t need a fancy workshop for this project, just a few key items.
- Two 8-inch or 9-inch Round Cake Pans.
- A Large Rectangular Cake Board: You need a big surface to assemble your bunny. A cookie sheet covered in aluminum foil also works perfectly.
- A Stand Mixer or Hand Mixer.
- A Sharp Serrated Knife.
- An Offset Spatula.
Step-by-Step Instructions: The Magical Assembly
Ready to see a bunny appear out of two circles? It’s magic!
Step 1: Bake Your Circles
- Preheat your oven to 350°F (175°C). Grease and flour your two round cake pans.
- Prepare your carrot cake batter from scratch or a box mix.
- Divide the batter evenly between the two pans and bake for 30-40 minutes, or until a toothpick inserted into the center comes out clean.
- Let the cakes cool in the pans for 15 minutes before turning them out onto a wire rack to cool completely. This is non-negotiable. A warm cake will crumble.
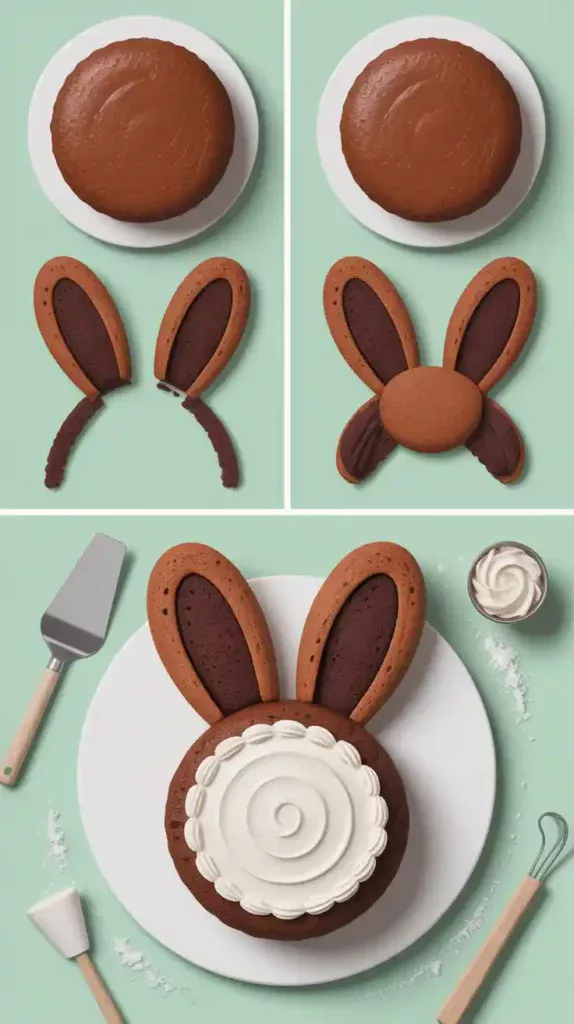
Step 2: The Geometric Magic (The Cut)

This is the brilliant part.
- Leave one of the round cakes whole. This will be the bunny’s head.
- Take the second round cake. Place it on a cutting board. Imagine a line down the center. Now, cut two curved, ear-like shapes from the outside edges, leaving a bowtie shape in the middle. (See diagram/visualize: you’re basically cutting two shallow crescent moons off the sides). You should now have two long, curved “ear” pieces and one central “bowtie” piece.
Step 3: The Bunny Assembly
- On your large cake board, place the whole round cake in the center. This is the face.
- Place the two long “ear” pieces at the top of the head, with the curved edges facing outwards.
- Place the “bowtie” piece at the bottom of the head.
- Stand back and marvel. You just made a bunny!
Step 4: The Fluffy Frosting Coat
- Whip up your cream cheese frosting by beating the cream cheese and butter until smooth. Gradually add the powdered sugar and vanilla and beat until light and fluffy.
- Use a generous amount of frosting as “glue” to secure the ears and bowtie to the head.
- Now, frost the entire assembled cake. Don’t worry about getting it perfectly smooth.
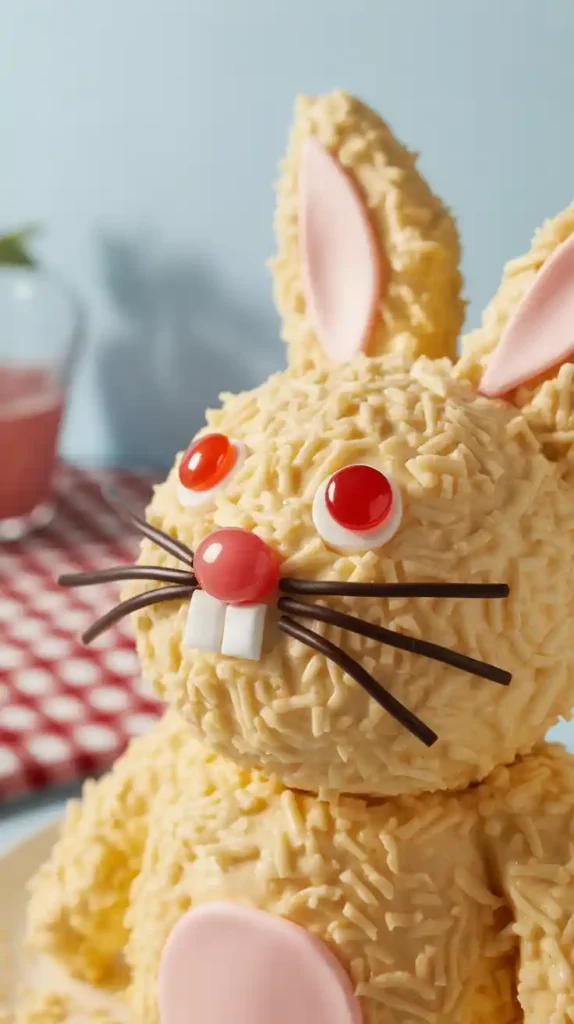
Step 5: Make It Furry
This is the fun (and messy) part. Spread your shredded coconut on a large plate or baking sheet. Gently press the shredded coconut all over the frosted cake until your entire bunny is covered in a fluffy white “fur.”
Step 6: Create the Face
- Use two jelly beans for the eyes and one for the nose.
- Cut your licorice laces into smaller pieces and press them into the face for the whiskers.
- For an extra touch, cut two smaller, pink ear shapes out of construction paper and gently lay them inside the cake ears.
Calories & Nutritional Info (For Everybunny)
It’s a holiday. This cake is made of carrots (healthy!), pineapple (healthy!), and joy (very healthy!).
- Serving Size: One happy slice.
- Calories: Let’s just agree that Easter calories don’t count until Monday.
- Main Nutrient: Nostalgia.
Common Mistakes to Avoid (Bunny Blunders)
- Cutting a Warm Cake: This is the fastest way to turn your beautiful bunny into a pile of sad, carrot-flecked crumbs. The cake must be completely cool, or even slightly chilled, before you attempt to cut and move the pieces.
- Running Out of Real Estate: This bunny takes up more space than you think. Do a quick, dry layout of your pieces on your board before you start frosting to make sure everything fits.
- The Coconut Blizzard: Applying the coconut fur is a delightfully messy process. I recommend doing it over a large, rimmed baking sheet to contain the inevitable coconut explosion that will occur on your counter.
- Droopy Ears and a Runaway Bowtie: Don’t be shy with the frosting “glue.” Use a generous dollop of cream cheese frosting to secure the ear and bowtie pieces to the head. It’s the delicious mortar that holds your creation together.
Variations & Customizations (Everybunny is Unique)
Want to put your own spin on this classic? Hop to it!
1. The Chocolate Easter Bunny
A chocoholic’s dream. Use your favorite chocolate cake recipe and a rich chocolate buttercream. Instead of white coconut, use chocolate sprinkles (jimmies) or toasted, shredded coconut for the “fur.”
2. The Cottontail Cupcake Patch
Don’t want to make a whole cake? This is super cute and easy. Frost cupcakes with white frosting. Dip the tops in a bowl of shredded coconut. Use mini marshmallows to create a tail, and pink jelly beans for a nose and ears.
3. The Modern Minimalist Bunny

If the full-on coconut explosion isn’t your vibe, you can create a more modern look. Frost the cake smoothly with white buttercream. Use pink and black frosting in piping bags with small round tips to pipe on a simple, cute, minimalist bunny face.
FAQ: Your Hoppiest Questions, Answered
Do I have to use coconut on the cake?
Nope! If you or your guests are not fans of coconut, you can create the “furry” look by patting on a thick layer of white sprinkles (jimmies) or by using a star piping tip to cover the entire cake in little frosting stars.
Can I make this cake ahead of time?
Absolutely! You can bake the cake layers a day or two in advance and keep them well-wrapped. Because of the cream cheese frosting, it’s best to assemble and frost the cake the day of or the day before your celebration. Keep the finished cake refrigerated.
My cake pieces broke when I tried to move them. Is it ruined?
Not at all! Frosting is the ultimate edible superglue. Use a generous amount to “spackle” any cracks or reattach any broken pieces. Once it’s all covered in coconut, no one will ever know your secret.
What if I don’t have licorice for the whiskers?
No problem! You can use thin pretzel sticks, pieces of uncooked spaghetti, or carefully pipe on thin lines with black or chocolate frosting.
What’s the best way to cut the ear and bowtie shape?
Don’t overthink it! Just make two gentle, curved cuts. Imagine you’re cutting a slim crescent moon shape off each side of the round cake. The piece left in the middle will naturally look like a bowtie.
What size board do I need to assemble this on?

You need a surprisingly large surface. A standard 12×18 inch rectangular cake board or a half-sheet baking pan is a safe bet and will give you plenty of room.
Is carrot cake the only option?
Not at all! A classic coconut cake, a simple vanilla cake, or even a strawberry cake are all fantastic and festive choices for the base.
Final Thoughts
You’ve done it. You’ve taken two simple circles and, with a bit of kitchen magic, transformed them into the most charming dessert on the Easter table. You’ve created a centerpiece that is packed with nostalgia, personality, and a whole lot of delicious coconut.
So go on, place that adorable bunny in the center of your celebration and get ready for the oohs and aahs. You’re about to make this Easter an extra hoppy one.