The Easiest Butterfly Birthday Cake (It’s a Cake Decorating Magic Trick)
Do you remember those magical birthday cakes from your childhood? The ones that weren’t covered in hyper-realistic fondant sculptures but were still pure, unadulterated works of art? I’m talking about train cakes made of loaf pans and doll cakes with giant buttercream skirts. Today, we’re bringing back that clever, creative energy with the undisputed queen of nostalgic party cakes. Get ready to learn how to make the classic butterfly birthday cake.
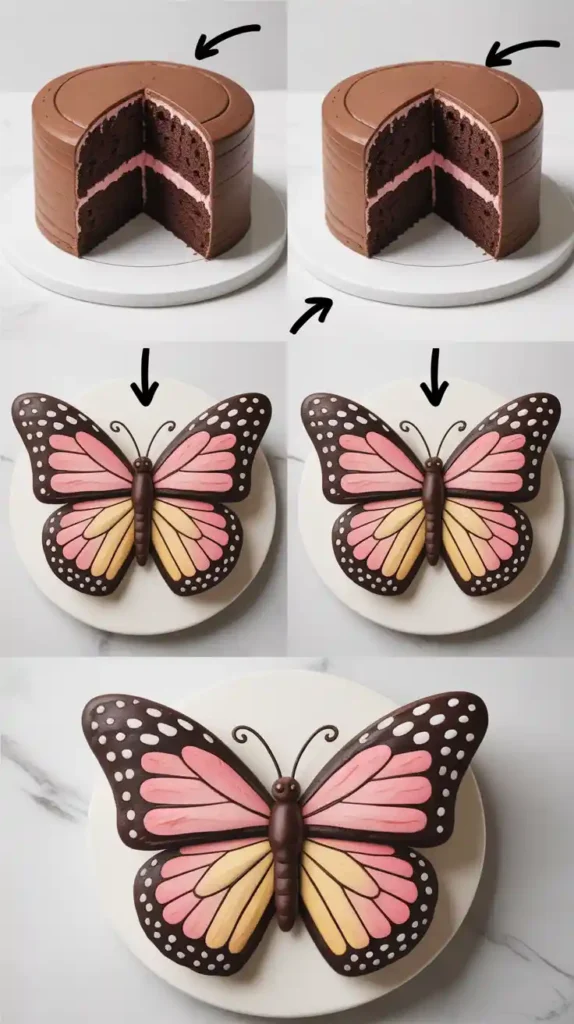
Here’s the secret: this stunning, intricate-looking cake is made from one single round cake and one simple cut. No special pans, no carving skills, no sorcery required. It’s a brilliant decorating hack that will make you look like a cake genius, and it’s so fun to make, you’ll be looking for any excuse to celebrate.
Why This Recipe Will Make Your Heart Flutter
Still not convinced you can pull this off? Let me tell you why this cake is your new secret weapon.
- It’s an Ingenious Hack: The “wow” factor of this cake comes from its clever construction. The moment you flip those two cake halves to form the wings is a genuine “a-ha!” moment. It’s maximum impact for minimal effort.
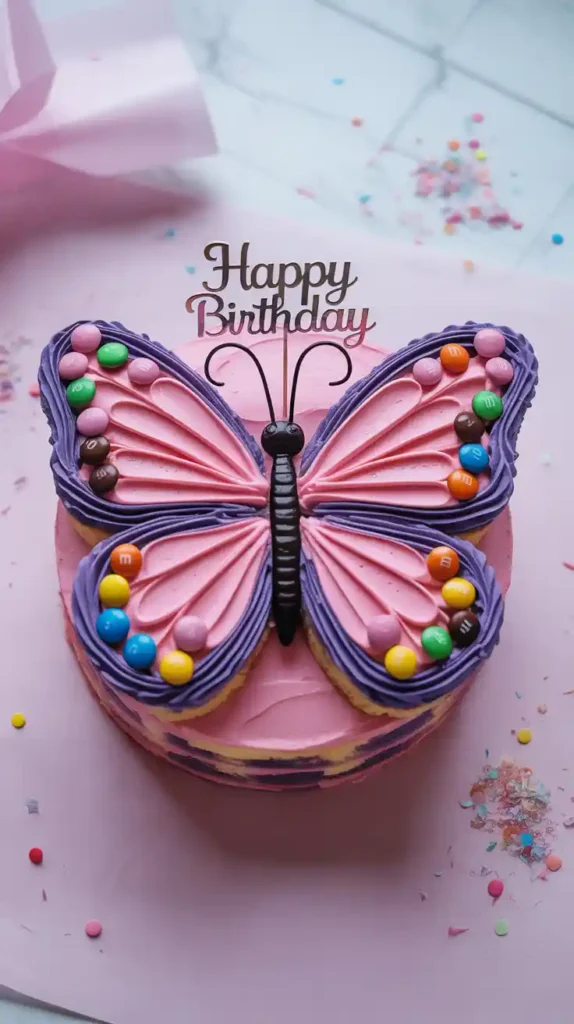
- Endlessly Customizable: This cake is a blank canvas for your creativity. Go for pastel pinks and purples for a whimsical fairy vibe, or bright rainbow colors for a fun kid’s party. The decorating possibilities are literally endless.
- No Special Equipment Needed: Do you have a round cake pan? A knife? You’re basically 90% of the way there. This is a show-stopping cake that doesn’t require a trip to a specialty baking store.
The Ingredient Lineup
To create our beautiful butterfly, we need a solid cake base and a vibrant palette of frosting and decorations.
For the Perfect Canvas Cake (Vanilla or Chocolate):
- All-Purpose Flour: 2 ½ cups.
- Granulated Sugar: 2 cups.
- Unsweetened Cocoa Powder: ¾ cup (if making chocolate cake; omit for vanilla).
- Baking Soda: 1 ½ teaspoons.
- Baking Powder: 1 ½ teaspoons.
- Salt: 1 teaspoon.
- Large Eggs: 2, at room temperature.
- Milk or Buttermilk: 1 cup, room temperature.
- Vegetable Oil: ½ cup.
- Vanilla Extract: 2 teaspoons.
- Hot Coffee or Hot Water: 1 cup (for chocolate cake) OR an extra ½ cup of milk (for vanilla).
- Shortcut: You can absolutely use 1 box of your favorite cake mix instead! No judgment here.
For the Colorful Frosting & Decorations:
- Unsalted Butter: 1 ½ cups (3 sticks), softened.
- Powdered Sugar: 5-6 cups, sifted.
- Vanilla Extract: 1 ½ teaspoons.
- Milk or Heavy Cream: 3-5 tablespoons.
- Salt: A pinch.
- Gel Food Colorings: An assortment of your favorite colors.
- Decorations: Sprinkles, M&Ms, Skittles, gumdrops, silver balls—go wild!
- The Body & Antennae: A Twinkie, a small banana, or just a thick line of frosting for the body. Two long pieces of black licorice lace for the antennae.
Tools & Kitchen Gadgets: Your Transformation Kit
You likely have everything you need for this metamorphosis already.
- One 9-inch Round Cake Pan: The key to the whole operation.
- A Large Rectangular Cake Board or a Cookie Sheet: You need a large, flat surface to assemble your butterfly.
- Stand Mixer or Hand Mixer: For whipping up the cake and frosting.
- Offset Spatula: For smooth frosting application.
- Piping Bags and Tips: Optional, but very helpful for creating detailed patterns on the wings.
- A Sharp Serrated Knife: For making that one magic cut.
Step-by-Step Instructions: The Metamorphosis
Ready to see the magic happen? Let’s do this.
Step 1: Bake Your Circle

Prepare your cake batter (from scratch or a box mix) and pour it into a well-greased and floured 9-inch round cake pan. Bake according to the directions. Once a toothpick inserted into the center comes out clean, let the cake cool in the pan for 15 minutes before turning it out onto a wire rack to cool completely. I mean it. A warm cake will crumble when you cut it.
Step 2: The Magic Cut
Once your cake is completely cool, place it on a cutting board. Using your sharp serrated knife, make one single cut straight down the center of the cake. You should now have two perfect half-circles.
Step 3: The Wing Flip (The “A-ha!” Moment)
This is where the magic happens. Take your two half-circle pieces and place them on your large cake board or cookie sheet. Arrange them so that the two straight, cut edges are on the outside, and the two curved edges are touching in the middle. Stand back and admire your work. You just made butterfly wings!
Step 4: Build the Body and Frost
You’ll see a V-shaped gap between the two “wings.” This is where you’ll create the body. You can use a Twinkie, a small banana, or simply pipe a thick line of frosting to fill this gap. Now, apply a thin crumb coat of frosting over the entire cake (wings and body) and chill it in the fridge for 20-30 minutes to lock in the crumbs. After chilling, apply a final, smooth coat of your base color frosting.
Step 5: Let Your Creativity Fly!
This is the best part. Use your different colored frostings, piping bags, candies, and sprinkles to decorate the wings. Remember that butterfly wings are symmetrical, so try to mirror the design on both sides. Use M&Ms for polka dots, create colorful stripes, or pipe intricate patterns. Finally, stick the two pieces of licorice lace into the top of the “body” to create the antennae.
Calories & Nutritional Info (The Party Pooper Section)
It’s a birthday cake! The main nutritional benefit is happiness. But if you must know, here’s an estimate per slice.
- Calories: Approximately 450-550 kcal (depending heavily on your candy choices!)
- Sugar: A glorious, birthday-appropriate amount.
- Joy Index: 11/10

Disclaimer: Birthday calories are a myth. This is a scientific fact.
Common Mistakes to Avoid (Butterfly Blunders)
- Cutting a Warm Cake: This is the #1 way to ruin the magic trick. A warm cake is a fragile cake. Let it cool completely before you even think about picking up that knife.
- A Wimpy Body: Don’t be shy with the frosting or candy you use for the body. A nice, thick body helps define the shape and holds the two wing pieces together securely.
- Asymmetrical Wings: The beauty of a butterfly is its symmetry. Try your best to mirror your patterns on both wings. It doesn’t have to be perfect, but a little effort goes a long way.
- The Crumbly Catastrophe: If you skip the crumb coat, you’ll get little cake crumbs mixed into your final layer of frosting. That quick chill in the fridge makes a huge difference.
Variations & Customizations
Let your imagination take flight with these fun ideas.
1. The Majestic Monarch
Use orange, yellow, and black frosting to replicate the iconic pattern of a Monarch butterfly. Use a small round piping tip to pipe black lines and white dots along the edges of the wings for a more realistic and stunning effect.
2. The Rainbow Butterfly
This one is a guaranteed kid-pleaser. Divide your frosting into 5-6 bowls and tint each one a different color of the rainbow. Pipe thick stripes of color from the body to the edge of the wings to create a vibrant rainbow pattern.
3. The Mini Butterfly Cupcakes
Don’t want to make a whole cake? Bake cupcakes instead! To decorate, take one extra cupcake, slice it in half, and arrange the two halves on top of a frosted cupcake to look like little wings. Use sprinkles for the body and two pieces of a pretzel stick for the antennae.
FAQ: Your Butterfly-Related Questions
Do I need a butterfly-shaped cake pan for this?
Nope! That’s the beauty of this hack. You create the butterfly shape from one simple round cake pan. No special equipment needed.
My cake broke when I moved it! Can I fix it?

Yes! Buttercream is like delicious cement. Use a generous amount of frosting to “glue” any broken pieces back together. Once you apply the crumb coat and chill it, it will be very stable. No one will ever know.
What are the best candies for decorating the wings?
So many options! M&Ms, Skittles, Smarties, and Reese’s Pieces are great for making polka dots. Gumdrops and jelly beans add fun texture. Sprinkles of all shapes and sizes are always a great choice.
Can I make this cake ahead of time?
Absolutely. You can bake the cake layer a day in advance. Let it cool completely, then wrap it tightly in plastic wrap and store it at room temperature. You can frost and decorate it the day of the party.
What if I don’t have licorice for the antennae?
No problem! You can use two thin pretzel sticks, two pieces of dried spaghetti, or even two Pocky sticks. Get creative!
How do I store the finished cake?
Because of the buttercream frosting, you should store the cake in a cake carrier or lightly covered in the refrigerator. Let it sit out for about 30 minutes before serving to allow the frosting to soften up.
Can I use a square cake pan instead of a round one?
Unfortunately, no. The magic of this particular design relies on the curved and straight edges created by cutting a round cake in half.
Final Thoughts
You did it! You took a simple circle and, with one clever cut, transformed it into a beautiful, whimsical butterfly. You are now officially a cake magician. This is the kind of fun, creative baking that makes memories.
So go on, get your sprinkles ready and let your inner artist fly. Create a butterfly that’s as unique and colorful as you are. And get ready for everyone at the party to ask, “Wow, how did you do that?”