The Only Guide You Need on How to Cook Brussel Sprouts in an Air Fryer
Let’s be honest with each other. For years, brussel sprouts have been the villain of the vegetable world. They were the mushy, grey, vaguely stinky things from your childhood nightmares that you were forced to eat. But I am here today as an ambassador of the modern brussel sprout to tell you that everything you thought you knew was a lie. This is your guide on how to cook brussel sprouts in air fryer, and it’s a redemption story for the ages.
We’re about to take this misunderstood vegetable and turn it into something genuinely crave-worthy. We’re talking crispy, chip-like outer leaves, a tender and sweet interior, and a nutty, caramelized flavor you won’t believe came from a sprout. Your air fryer is about to become your new best friend, and these brussel sprouts will be its greatest triumph.
Why This Recipe Will Make You a Believer
So, why should you trust me and give these little green cabbages another chance? The magic is in the method.
- Texture Transformation: The air fryer is a master of texture. The intense, circulating heat crisps up the outer leaves until they are almost like potato chips while perfectly roasting the inside to a tender, sweet finish. No mush, ever.
- It’s Unbelievably Fast and Easy: Forget roasting for 40 minutes in the oven. These are ready in about 15 minutes flat. The prep is minimal, and the cleanup is a breeze. It’s the perfect healthy side dish for a busy weeknight.
- It Will Convert the Haters: I’m not kidding. I have personally converted lifelong, sworn enemies of brussel sprouts with this exact recipe. Serve a bowl of these at a dinner party, and watch people’s minds explode.
The Simple Ingredient Lineup
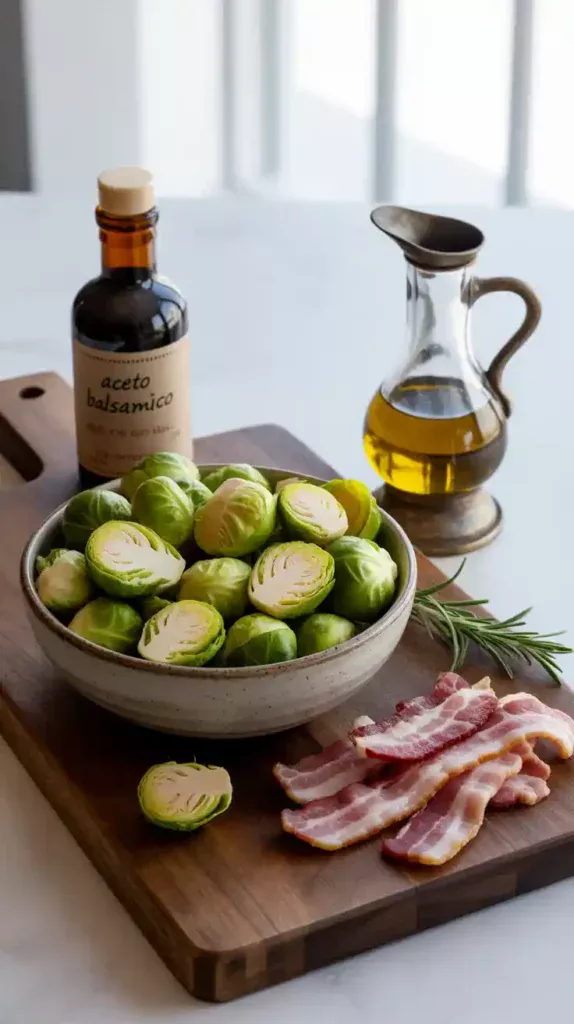
You don’t need much to unlock the incredible flavor of these sprouts.
- Fresh Brussel Sprouts: 1 pound. Look for ones that are bright green and firm.
- Olive Oil: 1-2 tablespoons. This is crucial for crisping!
- Garlic Powder: ½ teaspoon.
- Salt & Black Pepper: To taste.
- Optional but Highly Recommended Finisher: A drizzle of balsamic glaze after cooking.
Tools & Kitchen Gadgets
You don’t need a fully-stocked professional kitchen for this. Just a few key items.
- An Air Fryer: The hero of our story.
- A Large Bowl: For tossing and seasoning.
- A Chef’s Knife & Cutting Board: For prepping the sprouts.
- Tongs: For shaking the basket and serving.
Step-by-Step Instructions: The Sprout Redemption Arc

Follow these simple steps, and I promise you’ll be rewarded with the best brussel sprouts of your life.
Step 1: The Prep
First, wash your brussel sprouts. Trim off the tough, woody stem at the bottom, and pull off any yellowed or sad-looking outer leaves. Then, slice each sprout in half from top to bottom. If you have some particularly large sprouts, you can quarter them. The goal is to have pieces that are roughly the same size for even cooking.
Pro Tip: Don’t throw away the leaves that fall off during prep! Toss them in with the rest; they’ll turn into the crispiest, most delicious little chips. They’re the best part, IMO.
Step 2: The Seasoning
Throw your prepped sprouts into a large bowl. Drizzle them with the olive oil and sprinkle on the garlic powder, salt, and pepper. Use your hands or a spatula to toss everything together until every sprout and loose leaf is evenly coated in a light sheen of oil and spices.
Step 3: The Air Fry
Preheat your air fryer to 380°F (195°C). Once it’s hot, add the seasoned brussel sprouts to the basket in a single layer. A little overlap is okay, but don’t mound them up. We need that hot air to hit every surface.
Step 4: The All-Important Shake
Cook for a total of 12-15 minutes. At the halfway point (around 6-7 minutes), pull out the basket and give it a vigorous shake. This is crucial for flipping the sprouts and ensuring they get crispy and browned on all sides.
Step 5: The Glorious Finish

Your sprouts are done when they are tender on the inside and the outer leaves are dark, caramelized, and crispy. Use your tongs to transfer them to a serving bowl. Now, for the final touch: drizzle with a bit of balsamic glaze and toss to coat. The sweet and tangy glaze with the roasty, savory sprouts is a match made in heaven.
Calories & Nutritional Info (The Healthy Part)
These taste like an indulgent snack, but they’re packed with good stuff. Here’s a rough estimate for a generous side-dish portion (about ¼ of the recipe).
- Calories: Approximately 120-150 kcal.
- Fiber: ~4g (Excellent source!)
- Vitamins: Packed with Vitamin K and Vitamin C.
- Fat: ~7g (Almost all of it from the healthy olive oil).
Common Mistakes to Avoid (Sprout Sabotage)
- Overcrowding the Basket: This is the cardinal sin of air frying. If you pile the sprouts in, they will steam and become mushy. Cook in a single layer, even if it means working in two batches. It’s worth it.
- Skimping on the Oil: The oil is not just for flavor; it’s the conductor of crispiness. You need to coat every sprout to get that perfect texture. Don’t be shy.
- Not Shaking the Basket: If you don’t shake them, the sprouts on the bottom will get super dark while the ones on top remain pale. Shake it like you mean it.
- Cutting them into different sizes: If you have tiny pieces and huge pieces, the tiny ones will burn before the huge ones are tender. Try to keep them relatively uniform.
Variations & Customizations
The basic recipe is a 10/10, but here are a few ways to level it up even further.
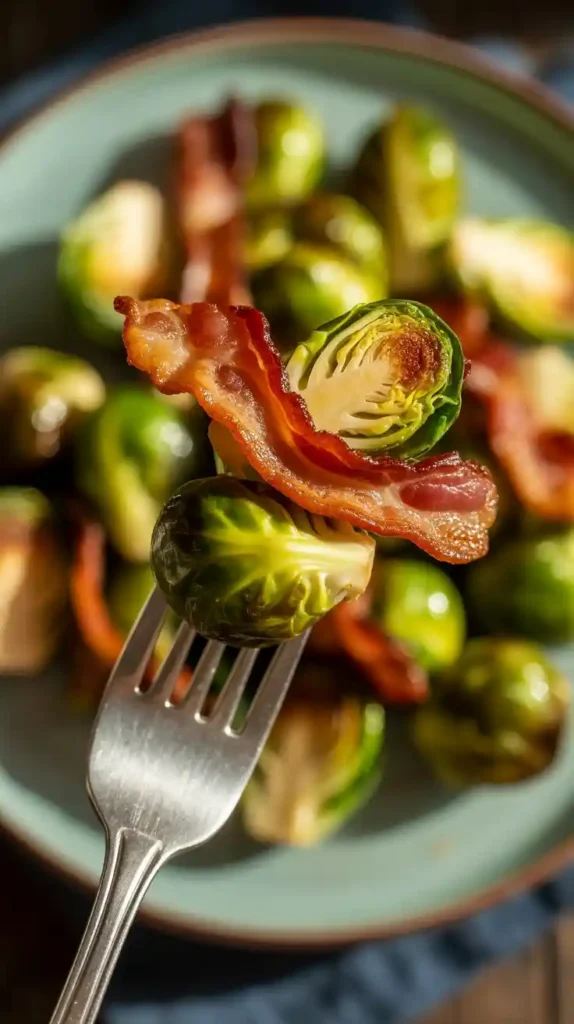
1. The Holy Trinity: Balsamic, Bacon, and Sprouts
This is the ultimate upgrade. Chop up 2-3 strips of bacon and add them to the air fryer basket with your seasoned sprouts. The bacon will render its fat all over the sprouts as it cooks, and you’ll be left with crispy bacon bits and insanely flavorful sprouts. Drizzle with balsamic glaze at the end.
2. Sweet & Spicy Hot Honey Sprouts
This one is for the flavor adventurers. Before cooking, toss the sprouts in a mixture of olive oil, salt, pepper, and a tablespoon of sriracha or your favorite hot sauce. After they come out of the air fryer, drizzle them with a tablespoon of hot honey.
3. Cheesy Parmesan Goodness
During the last 3 minutes of cooking, pull out the basket and sprinkle the sprouts generously with grated Parmesan cheese. Return the basket to the air fryer. The cheese will melt and get crispy, creating a salty, savory crust that is absolutely irresistible.
FAQ: Your Sprout-Related Questions, Answered
Can I use frozen brussel sprouts?

You can, but the texture won’t be quite the same. They tend to be softer and less crispy. Air fry them from frozen at 380°F (195°C) for about 18-20 minutes, shaking a couple of times.
Do I really need to cut them in half?
Yes, I highly recommend it. Cutting them in half creates a flat surface that can get beautifully caramelized and browned. It also helps them cook faster and more evenly.
How do I get them EXTRA crispy?
First, don’t overcrowd the basket. Second, make sure they’re well-coated in oil. Third, for the last 2-3 minutes of cooking, you can crank the heat up to 400°F (200°C) to get a final blast of crisping power.
My brussel sprouts taste bitter. Why?
This can happen if they’re overcooked. The air fryer method is so fast that it’s less likely, but still possible. Bitterness can also just be a trait of the sprouts themselves; sometimes you get a more bitter batch. The sweetness from the balsamic glaze helps to balance that out.
What should I serve these with?
They are the perfect side dish for literally anything! Serve them with roasted chicken, steak, salmon, or pork chops. They’re also amazing just on their own as a healthy snack.
How do I store and reheat leftovers?
Store them in an airtight container in the refrigerator for up to 3 days. To reheat and bring back the crispiness, pop them back in the air fryer at 375°F (190°C) for 3-5 minutes. They’ll be almost as good as new.
My loose leaves burned. What did I do wrong?
The loose leaves cook much faster than the sprout halves. This is normal! They should be dark and super crispy. If they are turning black and tasting acrid, your temperature might be a bit too high for your specific air fryer, or you cooked them a minute or two too long.
Final Thoughts
Congratulations! You have officially learned the secret to making the most delicious brussel sprouts on the planet. You have taken a vegetable with a terrible reputation and turned it into a crispy, caramelized, rockstar side dish. Your veggie game will never be the same.
Now go, spread the good word. Convert your sprout-hating friends and family members. Be the hero who finally shows them what a brussel sprout is supposed to taste like. You’ve got this.