Gorgeous Purple Cake Designs for a Birthday (That You Can Actually Make)
Let’s talk about the color purple. It’s not just a color; it’s a whole mood. It’s royal, it’s magical, it’s a little bit mysterious, and it’s the undisputed queen of looking fabulous on a cake. If you’re looking to create show-stopping purple cake designs birthday celebrations will never forget, you’ve come to the right place. Forget boring beige cakes. We’re diving headfirst into the world of lavender, violet, and plum to create a dessert that’s as stunning as it is delicious.
You might be thinking, “But I’m not an artist! I can’t make those perfect cakes I see on Pinterest.” To that I say: nonsense! I’m going to show you how to create three different, absolutely gorgeous purple cake designs, ranging from “wow, that was easy” to “look at me, I’m basically a cake wizard.” We’re going to bake a perfect canvas cake and then turn it into a work of art.
Why This is Your New Favorite Project
So, why should you block out an afternoon to become a purple-fingered cake artist? Let me count the ways.
- It’s a Three-in-One Masterclass: I’m not just giving you one recipe. I’m giving you a flawless base cake recipe AND three separate, step-by-step design tutorials. You can pick the one that matches your vibe and skill level.
- Endless Creativity: Purple isn’t just one color. We’ll play with soft lavenders, vibrant violets, and moody deep purples. You can mix and match to create something that is uniquely yours.
- The Ultimate Showstopper: A beautifully decorated purple cake is the definition of elegance. It’s perfect for milestone birthdays, sophisticated parties, or any time you want to make someone feel like royalty. Prepare for gasps of admiration.
The Ingredient List
First, we need a delicious cake to be our canvas, and a whole lot of buttercream to be our paint.
For the Lemon-Vanilla Canvas Cake:
- All-Purpose Flour: 3 cups.
- Baking Powder: 2 teaspoons.
- Salt: ½ teaspoon.
- Unsalted Butter: 1 ½ cups (3 sticks), softened to room temperature. Crucial for texture!
- Granulated Sugar: 2 cups.
- Large Eggs: 4, at room temperature.
- Vanilla Extract: 1 tablespoon.
- Lemon Zest: From 2 large lemons. This adds a bright freshness that is divine.
- Buttermilk: 1 ¼ cups, at room temperature. The secret to a tender crumb.
For the Royal Purple Buttercream & Decorations:
- Unsalted Butter: 3 cups (6 sticks), softened.
- Powdered Sugar: 8-9 cups, sifted. Don’t skip the sifting!
- Vanilla Extract: 1 tablespoon.
- Heavy Cream or Milk: 5-7 tablespoons.
- Salt: A generous pinch.
- Purple Gel Food Coloring: This is essential. Get a good quality violet or purple gel color.
- Optional Gel Colors: Pink and blue gel colors can help you mix custom shades of purple.
- Decorations: Sprinkles, edible glitter, silver leaf, or fresh flowers (make sure they’re food-safe!).
Tools & Kitchen Gadgets: Your Art Kit
To create these designs, you’ll need a few key pieces of equipment. Having the right tools makes all the difference.
- Stand Mixer: For whipping up fluffy cake batter and silky buttercream.
- Three 8-inch Round Cake Pans: For a nice, tall cake.
- Cake Turntable: I consider this essential for getting smooth sides.
- Offset Spatula (Large & Small): For applying and smoothing frosting.
- Bench Scraper: The secret weapon for super smooth sides and the ombré effect.
- Piping Bags & Tips: For the flower design, you’ll want a large star tip (like a Wilton 1M) and maybe a small round tip.
- Several Small Bowls: For mixing your different shades of purple frosting.
- Wire Cooling Rack: To cool those perfect cake layers.
Step-by-Step Instructions: Let’s Paint with Buttercream

We’ll tackle this in phases: baking our canvas, mixing our colors, and then choosing a design adventure.
Part 1: Bake the Perfect Canvas
- Prep Your Station: Preheat your oven to 350°F (175°C). Grease and flour your three 8-inch pans and line the bottoms with parchment.
- Mix the Dry: In a medium bowl, whisk together the flour, baking powder, and salt.
- Cream the Wet: In your stand mixer, beat the softened butter and sugar for 5 minutes until very pale and fluffy. Beat in the eggs one at a time, then mix in the vanilla extract and lemon zest.
- Combine It All: On low speed, add the flour mixture in three parts, alternating with the buttermilk in two parts (begin and end with flour). Mix just until combined. A few streaks of flour are fine.
- Bake: Divide the batter evenly among the three pans. Bake for 25-30 minutes, or until a toothpick comes out clean. Let cool in the pans for 15 minutes, then turn out onto a wire rack to cool completely.
Part 2: Mix Your Purple Palette
- Make the Buttercream: Beat the softened butter until creamy. Slowly add the sifted powdered sugar, vanilla, and salt. Add the cream to reach a stiff but smooth consistency. Beat on high for 3-5 minutes until light and fluffy.
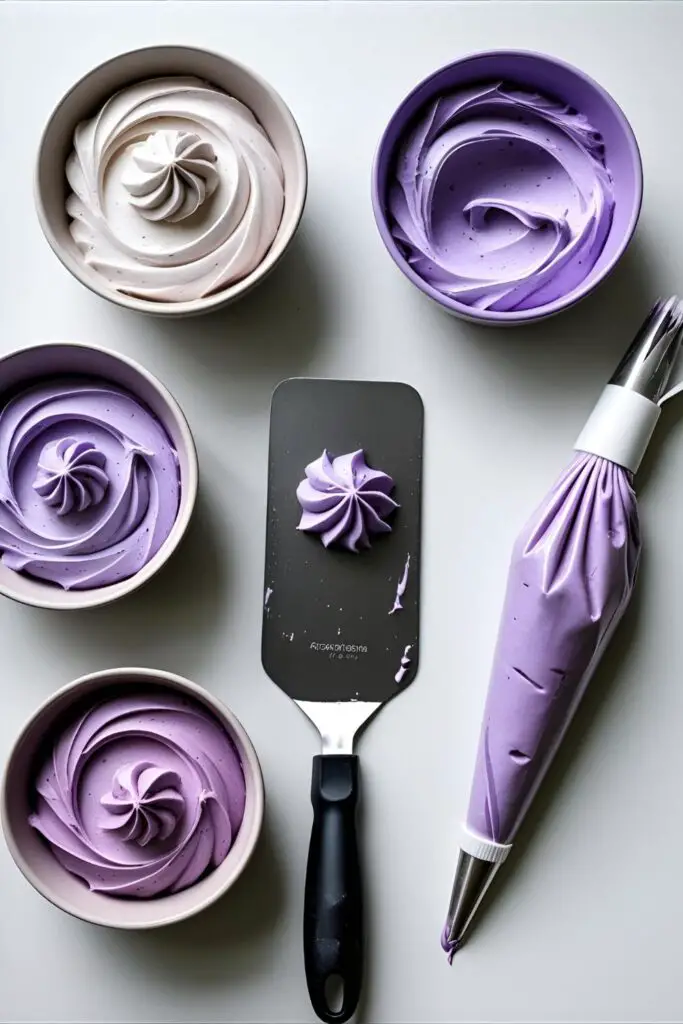
- Divide and Color: Set aside about half of your white buttercream. Divide the other half among 3-4 small bowls.
- Create Your Shades: Using a clean toothpick for each dip, add gel food coloring to your bowls. Start with a tiny amount for a light lavender. Add more for a medium violet. For a deep plum, use a good amount of purple gel and maybe a minuscule drop of black or blue gel. Mix well to see the true color.
Part 3: Choose Your Design Adventure!
Here are three designs, from easiest to most ambitious. All start after you have leveled, filled, and applied a smooth base coat of white buttercream to your chilled cake.
Design 1: The Ombré Dream (Surprisingly Easy)
- Take your three shades of purple frosting. Using a small offset spatula, apply bands of color around the bottom of the cake, starting with the darkest shade at the base, medium in the middle, and lightest on top. Don’t worry about it being neat.
- Now, take your bench scraper. Hold it straight up against the side of the cake. With your other hand, spin the cake turntable in one smooth, continuous motion. The colors will blend together into a gorgeous, seamless gradient. Clean the bench scraper and repeat until you’re happy.
Design 2: The Watercolor Wonder (Artsy & Forgiving)
- Start with your chilled, white-frosted cake. Take small dabs of your different purple frostings on a small offset spatula.
- Gently smear and swipe the colored frosting patches randomly onto the white cake. Think of it like finger painting, but with a spatula. Overlap the colors slightly.
- Take your clean bench scraper and gently smooth the cake in one or two turns. This will soften and blend the edges of your patches, creating a stunning watercolor effect. The key is not to over-blend!
Design 3: The Lavender Blossom Cascade (The Showstopper)
- Fill a piping bag fitted with a large star tip (like a Wilton 1M) with your light or medium purple frosting.
- Starting at the top edge of the cake, pipe a rosette by starting in the center and swirling outwards.
- Create a “cascade” by piping more rosettes, shells, and simple stars in a winding “S” shape down the side of the cake. Alternate between your different shades of purple for a more dynamic look. Fill in any gaps with small piped stars. It’s okay if it’s not perfect; a natural, organic look is beautiful.
Calories & Nutritional Info (The Delicious Details)

You’re creating art, and art nourishes the soul. But if you need to know what it does for the body… here’s an estimate per slice (assuming 14 slices).
- Calories: Roughly 650-700 kcal
- Carbohydrates: ~90g
- Sugar: ~70g (It’s a birthday cake, not a protein bar.)
- Fat: ~35g
TBH, a cake this beautiful should be calorie-free by law. A campaign for another day, perhaps.
Common Mistakes to Avoid (Purple Problems)
- Muddy Colors: This happens when you overmix your colors on the cake itself, especially with the watercolor design. Less is more. A few gentle swipes with the bench scraper is all you need.
- Using Liquid Food Coloring: I will say it again for the people in the back: Use GEL food coloring only. Liquid coloring will ruin your buttercream consistency, making it runny and impossible to work with.
- Getting a “Bruised” Purple: If you’re trying to get a deep purple and it just looks grey or dull, add a tiny touch of pink or fuchsia gel color. This will brighten it up and counteract the grey tones.
- Forgetting to Chill: A cold, firm cake is your best friend when decorating. It prevents the frosting from sliding around and keeps your colors from bleeding. Chill your cake after the crumb coat and after the base coat.
Variations & Customizations
Once you’ve mastered the color, you can play with flavor and advanced designs!
1. The Ube or Blackberry Cake
Go all-in on the purple theme! Use an ube (purple yam) cake recipe for a naturally vibrant purple crumb and a unique, delicious flavor. Or, add a blackberry or blackcurrant jam filling between the layers for a tart, fruity surprise that matches the color scheme.
2. The Glamorous Geode Cake

This is a super trendy and stunning design. You carve a small section out of the side of your frosted cake and fill it with crushed purple rock candy to look like a crystal geode. Use a bit of edible gold paint on the edges for extra glam.
3. The Magical Galaxy Cake
For a darker, more mystical vibe, create a galaxy effect. Use black buttercream as your base, then smear on patches of deep blue, violet, and pink. Splatter it with white food coloring (using a clean brush) to create “stars.”
FAQ: Your Pressing Purple Questions
How do I get a really deep, dark purple frosting?
Start with a high-quality violet gel color. Add a lot of it. Then, add a tiny drop of black gel color to deepen it. The real secret? Let it sit. The color will deepen significantly after about 30-60 minutes.
What flavors pair well with a purple-themed cake?
Lemon, vanilla, and lavender are classic choices. Blackberry, blueberry, and white chocolate are also fantastic pairings that complement the aesthetic beautifully.
How do I stop my colors from looking streaky when I mix them?
Make sure you mix your gel color into the buttercream thoroughly in a separate bowl before you apply it to the cake. Use a spatula to scrape the bottom and sides of the bowl to ensure there are no white streaks left.
Can I use natural food coloring?
You can, but be prepared for more muted, earthy tones. Butterfly pea powder creates a lovely blue that can be turned purple with a little lemon juice. Blueberry or blackberry powders also work, but they won’t be as vibrant as gel colors.
How do I make my buttercream white before I color it?

If your butter gives your frosting a yellow tint, you can add a minuscule toothpick-dot of purple gel coloring. The purple will counteract the yellow tones and make the buttercream appear bright white. It’s color theory magic!
Where’s the best place to find unique purple sprinkles?
Baking supply stores and online retailers (like Etsy or specialty sprinkle shops) are your best bet. They have incredible custom mixes with different shapes, sizes, and shades of purple, plus edible glitter and silver leaf.
My buttercream started to look greasy after I added the color. What happened?
This usually means the frosting got too warm or was over-mixed. Pop the whole bowl in the refrigerator for 20-30 minutes, then give it a gentle but quick stir with a spatula. It should come back together.
Final Thoughts
You are now officially a cake artist. You’ve conquered color theory, mastered the bench scraper, and created a purple masterpiece fit for a king or queen. Whether you made a dreamy ombré, an artsy watercolor, or a cascade of beautiful blossoms, you made something special.
So go ahead, present your stunning creation. Take a thousand photos. And when everyone asks which fancy bakery you bought it from, just give them a cool, mysterious smile. Your secret is safe with me. 🙂