The Ultimate Lion King Cake: A Recipe That Means No Worries!
Alright, let’s talk about the pressure of making a themed birthday cake. You see the flawless creations on Pinterest and think, “Who are these sorcerers?” Well, today, you become one of them. We’re about to tackle a show-stopping, jaw-dropping, absolutely unforgettable Lion King cake that will have your guests roaring with approval. And the best part? It’s way easier than it looks. It’s time to tell your baking anxieties “Hakuna Matata,” because this recipe is your problem-free philosophy.
Forget spending a fortune on a bakery cake that tastes like sweetened cardboard. We’re making a cake that not only looks like the majestic African savanna at sunrise but also tastes incredible. Ready to take your rightful place on Pride Rock… I mean, in the kitchen?
Why This Cake Rules the Pride Lands
So, why this specific recipe? Because it’s designed for maximum “wow” factor with minimum panic. This isn’t just a cake; it’s an event.
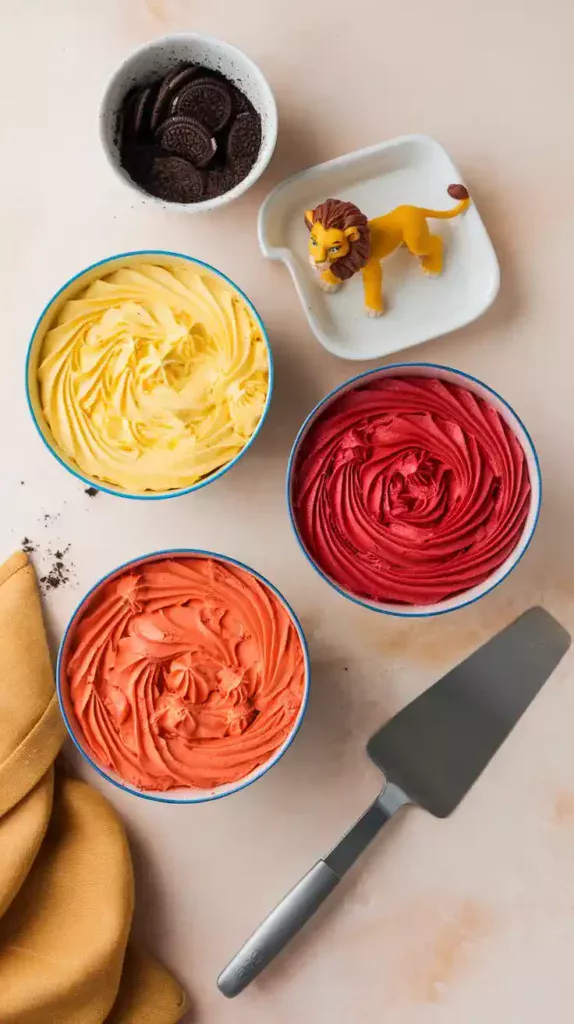
- A True Showstopper: The vibrant, blended sunset frosting is a visual masterpiece. It looks like you spent days perfecting it, but TBH, our little secret is that it’s a simple technique anyone can master. It’s the perfect centerpiece for a Lion King birthday party.
- Deliciously Crowd-Pleasing: Underneath that gorgeous exterior is a rich, moist, and sturdy vanilla bean cake that’s an absolute crowd-pleaser. It’s delicious on its own and pairs perfectly with the sweet buttercream.
- Totally Achievable: Are you a professional cake decorator? Me neither. This tutorial breaks down every step, from baking the layers to creating that iconic sunset. You’ll feel like a total pro, even if you’ve never picked up a piping bag in your life.
The Royal Ingredients List
To create our masterpiece, we need ingredients worthy of a king. We’ll break it down into the cake itself and the glorious frosting.
For the Sturdy Vanilla Bean Cake (Makes two 8-inch layers):
- 2 ½ cups all-purpose flour
- 2 ½ teaspoons baking powder
- ½ teaspoon salt
- ¾ cup unsalted butter, softened to room temperature
- 1 ¾ cups granulated sugar
- 3 large eggs, room temperature
- 1 tablespoon high-quality vanilla extract (or the seeds from one vanilla bean)
- 1 ¼ cups whole milk, room temperature
For the Savannah Sunset Buttercream & Decorations:
- 1 ½ cups unsalted butter, softened
- 4-5 cups powdered sugar, sifted
- ¼ cup heavy cream or whole milk
- 2 teaspoons vanilla extract
- Pinch of salt
- Gel food coloring: Yellow, Orange, and Red are essential.
- Optional: A touch of black or dark brown for the silhouette.
- For decoration:
- About 1 cup of crushed chocolate sandwich cookies (like Oreos) for the “dirt” at the base.
- Lion King figurines (Simba, Timon, Pumbaa) or a printed paper silhouette of Simba being held up on Pride Rock.
Your Essential Kitchen Gadgets
Having the right tools will make you feel like Rafiki with his staff—wise and ready for anything.
- Stand Mixer or Hand Mixer: Seriously, don’t try to cream butter and sugar by hand unless you want a serious arm workout.
- Round Cake Pans: Two 8-inch round cake pans are perfect for this.
- Parchment Paper: The non-negotiable secret to getting your cakes out of the pan in one piece.
- Mixing Bowls: A few of these will keep your workflow organized.
- Cake Turntable (Lazy Susan): This is a game-changer for getting smooth, even frosting. I can’t recommend it enough.
- Offset Spatula: For applying frosting like a pro.
- Bench Scraper: The secret weapon for creating those sharp, clean sides and blending the sunset colors.
- Piping Bags & Tips: Optional, but useful for creating a dam or decorative swirls on top.
Step-by-Step Guide to a Majestic Cake

Follow these steps, and you’ll be on the throne in no time. Be prepared!
Part 1: Bake the Cake Layers
- Prepare for Greatness: Preheat your oven to 350°F (175°C). Grease your two 8-inch cake pans, line the bottoms with parchment paper, and then grease the parchment paper. Yes, it’s a process, but it’s worth it.
- Combine Dry Ingredients: In a medium bowl, whisk together the flour, baking powder, and salt. Set it aside. This ensures you don’t get a random salty or flat bite.
- Cream Butter & Sugar: In the bowl of your stand mixer, beat the softened butter and sugar together on medium-high speed for about 3-5 minutes until it’s light, pale, and fluffy. This step whips air into the batter, which is key for a light cake.
- Add Eggs & Vanilla: Add the eggs one at a time, beating well after each addition. Scrape down the sides of the bowl to make sure everything is incorporated. Mix in the vanilla extract.
- Alternate Wet & Dry: With the mixer on low, add about a third of your dry ingredients, followed by half of the milk. Repeat this process, ending with the last of the dry ingredients. Mix only until the flour streaks disappear. Do not overmix!
- Bake It: Divide the batter evenly between your prepared pans. Bake for 30-35 minutes, or until a toothpick inserted into the center comes out clean.
- Cool It Down: Let the cakes cool in the pans for 15 minutes before inverting them onto a wire rack. Peel off the parchment paper and let them cool completely. Do not even think about frosting a warm cake.
Part 2: The Art of the Sunset Frosting
- Whip the Buttercream: In your mixer, beat the softened butter on medium speed until it’s smooth and creamy. Turn the mixer to low and gradually add the sifted powdered sugar.
- Get it Smooth: Once the sugar is mostly incorporated, add the vanilla, salt, and heavy cream. Turn the mixer up to medium-high and beat for another 3-5 minutes until the buttercream is incredibly light and fluffy.
- Divide and Color: Divide the buttercream into four bowls. Leave one bowl white (about 1 cup). Then, color the other three bowls: one vibrant yellow, one bright orange, and one powerful red. Remember, a little gel color goes a long way.
- Assemble and Crumb Coat: Place one cake layer on your turntable. Apply a thin layer of white buttercream on top. Place the second cake layer on top. Now, use the remaining white buttercream to apply a very thin “crumb coat” all over the cake. This traps any loose crumbs. Chill the cake in the fridge for 30 minutes. This step is non-negotiable for a clean finish.
- Create the Sunset: Now for the fun part! Using your offset spatula, apply bands of your colored frosting around the chilled cake. Start with yellow at the top third, then orange in the middle, and red at the bottom. Don’t worry about making it perfect.
- The Magic Blend: Take your bench scraper, hold it vertically against the side of the cake, and slowly spin the turntable. The scraper will smooth the frosting and beautifully blend the colors together, creating that sunset effect. Clean the scraper after each pass.
- Final Touches: Gently press the crushed chocolate cookies around the base of the cake to create the savanna floor. Place your Simba figurine on top, or carefully prop up a paper silhouette. You did it!
Calories & Nutritional Info (A Guideline, Not Gospel)

Look, this is a celebration cake. It’s made of butter, sugar, and joy. But for those who are curious, here’s an estimate per slice (assuming 14 slices).
- Calories: Roughly 500-600 kcal per slice.
- Fat: High. It’s a butter-based cake with buttercream. This is where the flavor lives.
- Sugar: Very high. Again, it’s cake.
- Pride Factor: Off the charts.
- Recommendation: Enjoy a slice with no worries, then maybe balance it out later.
Common Mistakes to Avoid on Your Journey
Even Simba made mistakes. Here’s how to avoid your own “elephant graveyard” moments.
- The Leaning Tower of Pride Rock: This happens when your cake layers aren’t level. Before frosting, use a long serrated knife to carefully trim the domes off the top of your cooled cakes so they are perfectly flat.
- The Muddy Sunset: Don’t over-blend! The goal is a gentle transition of colors, not a single brownish-orange blob. Spin the turntable slowly and clean your bench scraper between passes to keep the colors distinct yet blended.
- Frosting a Warm Cake: I’ve said it before, and I’ll say it again. If you frost a warm cake, the buttercream will melt into a greasy, heartbreaking puddle. Patience is a virtue.
- Skipping the Crumb Coat: Feeling impatient and want to skip the crumb coat and chilling? Don’t. You’ll end up with cake crumbs all through your beautiful sunset frosting, and you will be sad.
Variations Fit for a King (or Queen!)
Want to customize your creation? Here are a few fun ideas.
- “Slimy, Yet Satisfying” Surprise: Go for a chocolate cake base. Before assembling, use a round cookie cutter to core out the center of both layers. Fill the cavity with green-tinted vanilla pudding and a pile of gummy worms before frosting the outside. It’s a gross-out hit with kids!
- Zazu’s Tropical Twist: Use a coconut or orange-flavored cake recipe for the base. Add shredded coconut to the buttercream and decorate the top with fresh pineapple flowers for a more tropical jungle vibe.
- The Lion Guard Sheet Cake: Overwhelmed by layers? Make a single-layer 9×13 inch sheet cake. It’s much easier to frost with the sunset effect, and you can create a whole savanna scene on top with more figurines and crushed cookies. Perfect for feeding a large pride.
Frequently Asked Questions from the Kingdom
Here are answers to the questions you’re probably yelling at your screen right now.
1. What flavor is a Lion King cake, traditionally? There’s no “official” flavor, so you have creative freedom! The theme is visual. A classic vanilla or yellow cake works perfectly as a canvas for the sunset colors, but chocolate, spice, or even red velvet would be delicious.

2. How do you make a Lion King birthday cake at home? You follow this recipe! The key elements are a layered cake, a sunset buttercream effect (yellow, orange, red), and themed toppers like a Simba figurine or a printed silhouette of the iconic Pride Rock scene.
3. Can I make this cake ahead of time? Yes! You can bake the cake layers up to two days in advance. Let them cool completely, wrap them tightly in plastic wrap, and store them at room temperature. You can even frost the cake a day in advance and keep it in the fridge.
4. How do I actually make the sunset buttercream effect? It’s all about the tools. Apply bands of colored frosting, then use a bench scraper held flat against the cake while you spin it on a turntable. The scraper smooths and blends the colors seamlessly.
5. Where can I find good Lion King cake toppers? Toy stores are your best friend! A small, plastic Simba or the whole gang works perfectly. You can also find countless options, including edible images and custom toppers, on Amazon or Etsy.
6. Do I have to use fondant? Heck no! IMO, buttercream tastes way better and this design is specifically made to avoid fondant altogether. This recipe proves you don’t need to be a fondant sculptor to make a stunning themed cake.
7. What is a crumb coat and why is it so important? A crumb coat is a thin layer of frosting you apply to the cake before the final decorative layer. You then chill the cake to firm it up. This simple step traps all the loose cake crumbs so they don’t get dragged into your beautiful, final layer of frosting, ensuring a clean, professional finish.
Final Thoughts: The Circle of Cake is Complete

You did it! You faced the challenge, and you created a cake worthy of royalty. This Lion King cake isn’t just dessert; it’s a memory, a centerpiece, and proof that you are a baking rockstar. Now, go present your creation and watch as everyone gasps in awe. The roar of the crowd will be your reward.
Now, go on, take a bow. You’ve earned it.