The Ultimate Inside Out Cake: Breaking All the Rules in the Most Delicious Way
Let’s talk about cake rules. You know, the unwritten laws of baking that say the frosting goes on the outside, the filling stays on the inside, and the pretty parts are meant to hide the humble cake layers. It’s all very… orderly. But what if we decided to break those rules? What if we took a cake and flipped the script completely? My friend, let me introduce you to the glorious, rebellious, and stunningly beautiful world of the inside out cake.
This isn’t just a dessert; it’s a statement. It’s a modern, deconstructed masterpiece that wears its delicious fillings and beautiful layers on the outside for everyone to see. Forget hiding your hard work—we’re putting it on display.
If you’re ready to have some fun, challenge tradition, and create a cake that is a guaranteed conversation starter, then you’re in the right place. We’re about to make an inside out cake that will change the way you think about dessert.
Why This Recipe Is a Stroke of Genius
So, why should you embrace this topsy-turvy take on a classic? What makes the inside out cake so special?
First, it is uniquely beautiful. This isn’t your average birthday cake. The deconstructed, minimalist aesthetic is incredibly chic and modern. It’s the kind of cake you’d see in a high-end bakery or on a fancy restaurant’s dessert menu. It’s edible art, plain and simple.

Second, it showcases every delicious element. Why hide your perfect sponge layers and luscious pastry cream? An inside out cake celebrates every component. Your guests can see the fluffy cake, the creamy filling, and the glossy ganache all at once. It’s a feast for the eyes before it’s a feast for the mouth.
Finally, it’s surprisingly forgiving. Are you tired of trying to get perfectly smooth, flawless sides on a cake? Good news! With this style, the exposed layers are the whole point. You get to focus on the fun, decorative piping instead of stressing about a perfect blanket of frosting. An inside out cake is all about intentional imperfection.
The Delicious Deconstruction (Ingredients)
To turn a cake inside out, we first need a classic to deconstruct. We’re making an Inside Out Boston Cream Pie, a beloved favorite flipped on its head.
For the Classic Sponge Cake Layers:
- 1 1/2 cups all-purpose flour
- 1 1/2 teaspoons baking powder
- 1/4 teaspoon salt
- 4 large eggs, separated, at room temperature
- 1 cup granulated sugar, divided
- 1/2 cup whole milk, at room temperature
- 1/4 cup vegetable oil
- 1 teaspoon vanilla extract
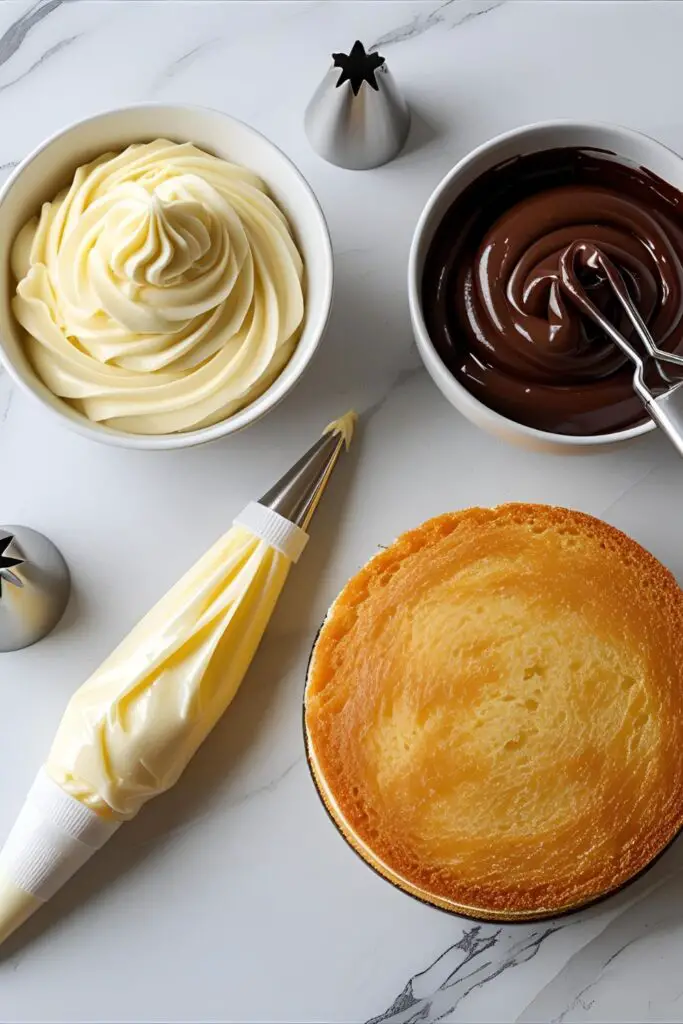
For the Vanilla Pastry Cream (The Star!):
- 2 cups whole milk
- 1/2 cup granulated sugar
- 1/4 cup cornstarch
- A pinch of salt
- 4 large egg yolks
- 2 tablespoons unsalted butter
- 1 teaspoon vanilla extract
For the Glossy Chocolate Ganache:
- 4 oz semi-sweet chocolate, finely chopped
- 1/2 cup heavy cream
The Artist’s Studio (Tools & Gadgets)

To create this edible sculpture, you’ll need a few key tools.
- A Stand Mixer: For whipping egg whites into a beautiful meringue for the cake. A KitchenAid Stand Mixer makes this effortless.
- Round Cake Pans: Two 8-inch round cake pans for your lovely sponge layers.
- A Medium Saucepan and Whisk: The essential duo for making a perfect, lump-free pastry cream.
- Piping Bags and Tips: This is crucial for the “outside” part of our inside out cake. A large round or star tip (like a Wilton 1A or 1M) is perfect for decorative piping.
- A Cake Turntable: Incredibly helpful for getting even, clean piping and a perfect ganache drip.
Step-by-Step: Turning Your Cake Inside Out
Ready to break the rules? Let’s get started on this fun and delicious project.
Part 1: The Foundation (The Sponge Cake)
Step 1: Prep and Mix Preheat your oven to 350°F (175°C). Grease and flour your cake pans. In a small bowl, whisk together the flour, baking powder, and salt.
Step 2: The Egg Whites In the clean bowl of your stand mixer, beat the 4 egg whites on high speed until soft peaks form. Gradually add 1/2 cup of the sugar and continue to beat until you have a stiff, glossy meringue. Transfer the meringue to another bowl.
Step 3: The Egg Yolks In the now-empty mixer bowl, beat the 4 egg yolks with the remaining 1/2 cup of sugar until pale and thick. Beat in the milk, oil, and vanilla. On low speed, mix in the dry ingredients until just combined.
Step 4: Fold and Bake Gently fold about one-third of the meringue into the yolk mixture to lighten it. Then, gently fold in the remaining meringue until no white streaks remain. Divide the batter between the pans and bake for 20-25 minutes. Cool completely.
Part 2: The Star Player (The Pastry Cream)

Step 5: The Cream Base In a medium saucepan, heat the milk until it’s just simmering. While it heats, whisk the sugar, cornstarch, and salt in a medium bowl. Whisk in the egg yolks until the mixture is a smooth, pale yellow paste.
Step 6: Temper the Eggs This is a key step! Slowly pour about half of the hot milk into the egg yolk mixture while whisking constantly. This gently warms the eggs so they don’t scramble. Pour the tempered egg mixture back into the saucepan with the rest of the milk.
Step 7: Thicken the Cream Cook the mixture over medium heat, whisking constantly, until it becomes very thick and bubbly. Once it boils, cook for one more minute. Remove from the heat and whisk in the butter and vanilla.
Step 8: Chill, Chill, Chill! Pour the pastry cream through a sieve into a clean bowl. Press a piece of plastic wrap directly onto the surface of the cream (this prevents a skin from forming). Chill in the fridge for at least 4 hours, or until completely cold and set.
Part 3: The Grand Finale (Assembling Your Inside Out Cake)
Step 9: The Ganache Place your chopped chocolate in a heatproof bowl. Heat the heavy cream until simmering, then pour it over the chocolate. Let it sit for 5 minutes, then stir until smooth. Let it cool slightly until it’s thick enough to drip.
Step 10: The Assembly Level your cooled sponge cake layers. Place one layer on your serving plate. Instead of spreading filling, go right ahead and place the second layer on top.
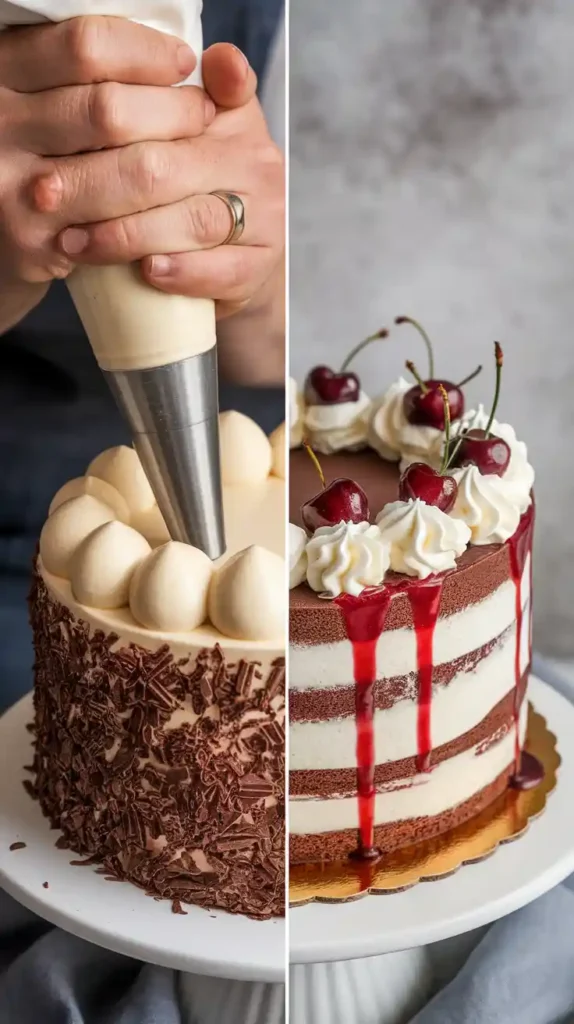
Step 11: The “Outside” Decoration Transfer your chilled, thick pastry cream to a piping bag fitted with a large tip. Pipe decorative dollops, stars, or a border around the top edge of the cake, leaving the center empty. You can also pipe a decorative border between the layers. This is the moment your dessert officially becomes an inside out cake.
Step 12: The Drip Carefully spoon or drizzle the cooled chocolate ganache over the piped pastry cream and let it drip down the exposed sides of the cake. And there you have it—a true inside out cake masterpiece.
Calories & Nutritional Info
An official analysis of this delicious rebellion.
- Serving Size: One artistically deconstructed slice.
- Rule-Breaking Quotient: 100%
- Calories: Who can say? When you turn a cake inside out, the calories probably get confused and fall out. (Okay, fine, it’s around 550 per slice. Enjoy your beautiful creation.)
- Pairs Well With: A feeling of creative superiority.
Common Mistakes to Avoid (Don’t Let Your Project Unravel)
Let’s sidestep the common issues when creating an inside out cake.
- The Runny Pastry Cream: Your piped decorations are slumping into a sad puddle. Your pastry cream was not cooked long enough. You need to cook it until it’s very thick—thicker than you think!
- The Scrambled Egg Surprise: Your pastry cream is lumpy. You didn’t temper the eggs properly and they scrambled. Pour the hot milk in very slowly while whisking constantly.
- The Dry, Exposed Layers: The sides of your cake look dry. Brush the cake layers with a simple syrup (equal parts sugar and water, boiled and cooled) before assembling to keep them moist.
- The Misunderstood Concept: You frosted the whole cake. The entire point of an inside out cake is the beautiful, exposed layers. Fight the urge to cover them up!
Variations & Customizations
Once you master the concept of the inside out cake, the possibilities are endless.
- Inside Out Black Forest Cake: Use rich chocolate cake layers. Pipe whipped cream decoratively on the outside and top with a beautiful cherry compote that drips down the sides.
- Inside Out Strawberry Shortcake: Use angel food cake or vanilla sponge layers. Pipe stabilized whipped cream on the top and between the layers and garnish with a cascade of fresh, sliced strawberries.
- Inside Out Tiramisu Cake: Use coffee-soaked ladyfinger layers or a coffee-infused sponge. Pipe a mascarpone cream on the outside and finish with a dusting of cocoa powder and chocolate shavings. This is a truly sophisticated inside out cake.
Frequently Asked Questions (Your Deconstructed Guide)
You have questions about this unconventional dessert? I have answers.
1. What is an inside out cake? An inside out cake is a modern, deconstructed style of layer cake where the fillings (like pastry cream, whipped cream, or mousse) are used as decorative elements on the outside, and the cake layers are left exposed.
2. How do you keep the exposed cake layers from getting dry? The secret is to brush each layer with a simple syrup before assembling. This locks in moisture and can even add extra flavor.
3. What is the best kind of cake to use for this style? A sturdy but light cake like a sponge, chiffon, or a classic butter cake works best. You want layers that will hold their shape and have a beautiful, even crumb to show off.
4. What is pastry cream and is it difficult to make? Pastry cream is a rich, creamy custard thickened with starch. It’s not difficult, but it requires your full attention. The keys are to temper the eggs correctly and to whisk constantly to prevent scorching.
5. Can I make an inside out cake in advance? It’s best assembled on the day of serving for optimal freshness, as the layers are exposed. You can bake the cake layers and make the pastry cream a day or two in advance and then assemble a few hours before the party.
6. How is this different from a “naked cake”? A naked cake typically has a thin layer of filling between the layers and a very light “scrape” of frosting on the outside. An inside out cake takes it a step further by using the filling component as the primary, abundant decoration on the top and exterior.
7. What are some other flavor combinations for an inside out cake? The sky’s the limit! Think lemon cake with raspberry mousse piped on top, or a spice cake with a piped cream cheese frosting and a caramel drip. Any classic cake can become an inside out cake.
Final Thoughts
Congratulations, you rule-breaker! You’ve successfully deconstructed a classic and created something new, exciting, and absolutely stunning. You’ve learned that sometimes, the most beautiful results come from flipping tradition on its head and showing off what’s on the inside.
So the next time you bake a cake, ask yourself: does the frosting really need to cover everything? Maybe, just maybe, it’s time to let your layers shine. You’re not just a baker anymore; you’re a delicious rebel.