The Ultimate Wafer Paper Cake: Your Guide to Edible Art
Have you ever been scrolling through your feed and stopped dead in your tracks at a cake? Not just a pretty cake, but a cake that looks like a modern art installation. It has delicate, gravity-defying sails, ethereal textures, and a certain je ne sais quoi that makes you think it must have been crafted by an architect with a pastry degree. You think, “Well, that’s it. That’s the pinnacle. I’ll just stick to my sprinkles.” What if I told you the secret to that impossibly chic look is basically… edible paper? Welcome, my friend, to the wonderful world of the wafer paper cake.
Get ready to have your mind blown. Wafer paper is the home baker’s secret weapon for creating high-end, contemporary cake designs without needing years of fondant-sculpting experience. It’s lightweight, versatile, and the key to making a cake that truly stands out.
Today, we’re demystifying this magical material. We’re going to walk you through how to create a stunning, minimalist wafer paper cake that will make you look like a seasoned cake artist. Let’s make something amazing.
Why This Technique Is a Game-Changer
So, why are we suddenly obsessed with edible paper? Why should you add “wafer paper skills” to your baking resume?

First, it delivers maximum drama with minimal effort. A single, well-placed wafer paper “sail” can transform a simple, smooth cake into a masterpiece. It’s the fastest way to add texture, height, and an architectural element that looks like it took hours of painstaking work. The return on investment for a wafer paper cake is huge.
Second, it’s incredibly forgiving. Unlike heavy fondant that can tear or get elephant skin, wafer paper is feather-light. It’s perfect for covering imperfections, and its abstract nature means there are no mistakes, only “artistic choices.” A slight tear or an unexpected bend? It’s part of the design now!
Finally, it’s a canvas for your creativity. You can cut it, paint it, print on it, mold it, and shape it. Once you understand the basics of handling it, you can create endless wafer paper cake designs, from delicate flowers to bold, geometric wraps.
The Artist’s Supplies (Ingredients)
A great wafer paper cake starts with a great canvas and the right artistic medium.
For the Perfect Cake Canvas:
- 1 box of your favorite white or vanilla cake mix: Let’s keep it simple! The focus is on the decoration.
- Ingredients as called for on the box: Usually eggs, oil, and water.
For the Silky Smooth Buttercream:
- 1 cup unsalted butter, softened
- 4 cups powdered sugar, sifted
- 3-4 tablespoons milk or heavy cream
- 1 teaspoon clear vanilla extract

For the Wafer Paper Art:
- Wafer Paper Sheets (AD Grade): This is the star. I recommend a grade of 0.27mm or thicker for structural pieces like sails.
- Clear, high-proof alcohol (like vodka) or clear vanilla extract: This is used to condition the paper without dissolving it.
- Edible Luster Dust or Color Dust: In your color of choice (metallics look amazing!).
- A little bit of shortening or piping gel: To attach the wafer paper to the cake.
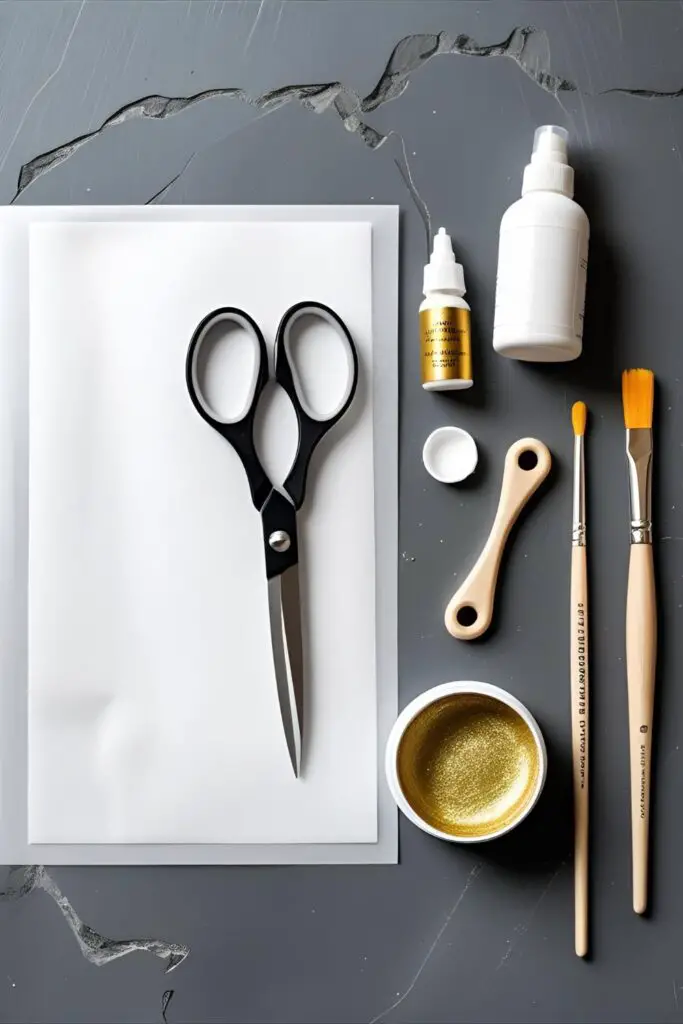
The Essential Studio Tools (Tools & Gadgets)
To create your edible sculpture, you’ll need a few specific tools.
- Wafer Paper: You can find edible wafer paper sheets online or at specialty baking stores.
- A Clean, New Spray Bottle: For applying a super-fine mist of liquid. This is crucial for conditioning the paper evenly.
- Sharp Scissors & a Craft Knife: For cutting clean, precise shapes from the wafer paper.
- Silicone Mat or Parchment Paper: A non-stick surface to work on is a must.
- Soft, Food-Safe Paintbrushes: For applying the luster dust and “painting” the wafer paper.
- Cake Turntable & Bench Scraper: The dynamic duo for achieving that perfectly smooth buttercream base that every good wafer paper cake needs.
Step-by-Step: Crafting Your Wafer Paper Cake
Ready to create something truly unique? Let’s walk through the process step by step.
Part 1: Preparing Your Canvas
Step 1: Bake and Cool Your Cake Prepare your cake mix according to the box directions and bake in two 8-inch round pans. Let the layers cool completely. This is not a drill. A warm cake will melt everything into a sad puddle.
Step 2: Make the Buttercream and Frost the Cake In a stand mixer, beat the softened butter until creamy. Gradually add the sifted powdered sugar and vanilla. Slowly add the milk or cream until you reach a smooth, spreadable consistency.
Step 3: Get a Flawless Finish Level your cooled cakes and stack them with a thin layer of frosting in between. Apply a thin “crumb coat” of frosting and chill the cake for 30 minutes. After chilling, apply a final, generous coat of buttercream. Use a bench scraper and a turntable to get the sides as smooth as humanly possible. Chill the cake again until the frosting is firm to the touch. A firm, cold cake is the perfect canvas for a wafer paper cake.
Part 2: Creating the Wafer Paper Art

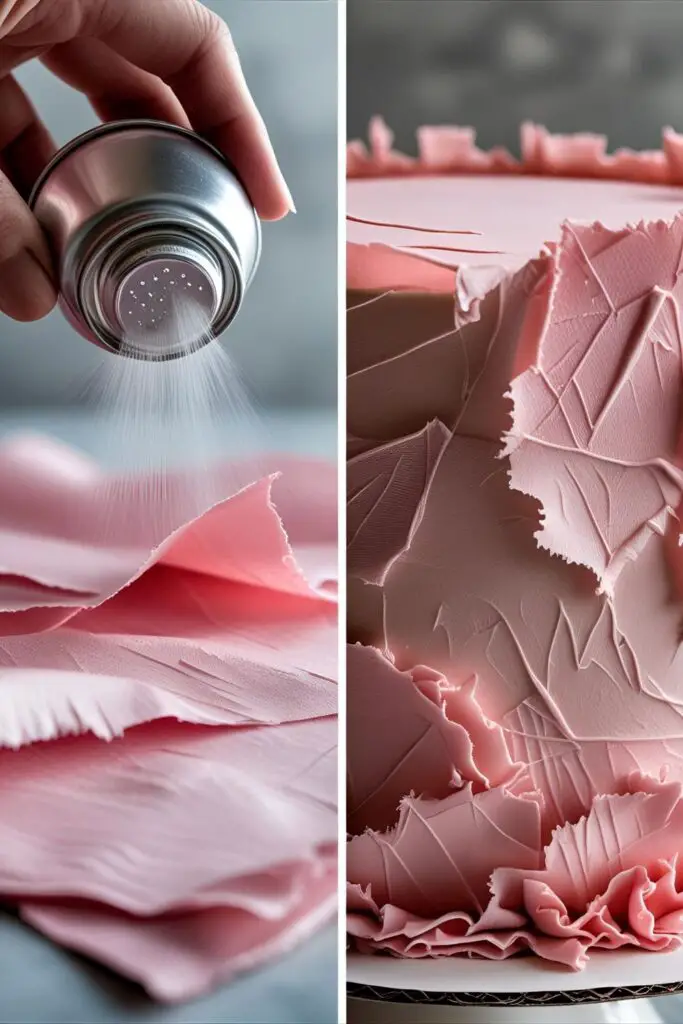
Step 4: Color Your Wafer Paper There are two easy ways to do this:
- Dry Dusting: Use a soft, fluffy brush to apply dry luster dust directly to the wafer paper sheet for a soft, shimmery look.
- Painting: Mix your luster dust with a few drops of clear vodka or extract to create an edible paint. Paint it onto the wafer paper for a more opaque, metallic finish. Let it dry completely.
Step 5: Cut Your Shapes Using sharp scissors or a craft knife, cut your colored wafer paper into your desired shapes. For a sail, a large, organic, semi-circular shape works well. For a wrap, cut a long rectangle that’s taller than your cake.
Step 6: Condition and Shape the Wafer Paper Fill your clean spray bottle with water. Set it to the finest mist possible. Hold the bottle about a foot away from your cut wafer paper shape and give it one, quick, light mist. Wait 30 seconds. The paper should become soft and pliable, like fabric. Do not overspray!
Step 7: Create the Sail Once the paper is pliable, gently drape it over a crumpled piece of parchment paper, a can, or any other object to give it a wavy, sculptural shape. Let it sit and air dry completely (this can take 1-3 hours). It will harden into its new, beautiful shape.
Part 3: The Final Assembly
Step 8: Attach Your Art Once your wafer paper sail is completely dry and hard, you can attach it to your chilled cake. Apply a few small dabs of shortening, piping gel, or fresh buttercream to the edge of the wafer paper that will make contact with the cake. Gently press it into the firm, cold frosting. And that’s it! You’ve created a wafer paper cake!
Calories & Nutritional Info
An official analysis of this work of art.
- Wafer Paper (per sheet): Calories: ~10. Taste: A hint of potato and your own creative genius.
- The Cake Underneath (per slice): Calories: A celebratory number. Let’s not tarnish this moment with specifics.
- Artistic Value: 100% of your recommended daily allowance.
- Primary Benefit: Induces gasps of admiration and makes you look incredibly cool.
Common Mistakes to Avoid (Don’t Let Your Art Wilt)
Let’s avoid a trip to the modern art disaster museum.
- The Dissolving Tragedy: You sprayed the wafer paper with too much water. Wafer paper is essentially potato starch, and it will disintegrate into a goopy mess if it gets too wet. A very, very light mist is all you need.
- The Brittle Shatter: You tried to bend or shape dry wafer paper. It will snap and crack. You must condition it with a light mist of water first to make it pliable.
- The Color Bleed: You attached a brightly colored piece of wafer paper to a soft, wet buttercream cake. The moisture from the frosting can cause the color on the wafer paper to bleed. Attach your pieces to a well-chilled cake with firm frosting.
- The Fire Hazard: You placed your beautiful wafer paper cake too close to the birthday candles. It is paper. It is flammable. Please exercise caution and keep open flames away from the wafer paper elements.
Variations & Customizations
Once you master the basics, you can create so many incredible wafer paper cake designs.
- The Edible Image Print: If you have access to an edible ink printer, you can print any pattern, photo, or design directly onto wafer paper sheets and wrap them around your cake for a completely custom look.
- Delicate Wafer Paper Flowers: This is a more advanced technique, but you can cut out individual petal shapes, condition them, and shape them into beautiful, delicate flowers that are impossibly lightweight.
- The “Torn Edge” Texture: Instead of cutting the wafer paper, you can carefully tear it to create a soft, deckled, organic edge. This looks stunning when layered around the base or top of a cake for a cloud-like effect. It’s a very popular style for a modern wafer paper cake.
Frequently Asked Questions (Wafer Paper 101)
You’ve got questions about this mysterious material? I’ve got answers.
1. What is wafer paper and what does it taste like? Wafer paper is an edible paper usually made from potato starch, water, and oil. It’s flavorless and dissolves in your mouth, so it doesn’t really impact the taste of the cake.
2. What’s the difference between wafer paper and icing sheets? Wafer paper is starch-based, semi-translucent, and has no flavor. Icing sheets (or frosting sheets) are made of sugar, are opaque white, have a sweet taste, and are more flexible. For the sculptural, lightweight designs, wafer paper is superior.
3. How do you get wafer paper to bend without breaking? You must “condition” it by applying a very fine mist of water or a water/alcohol mixture. This makes it temporarily pliable so you can shape it before it dries hard again.
4. How do you attach wafer paper to a cake? For small, flat pieces, just pressing them onto fresh buttercream works. For larger, structural pieces on a chilled cake, a few dabs of shortening, piping gel, or fresh buttercream act as a glue.
5. Can you put wafer paper in the fridge? It’s generally not recommended for long periods. The humidity in a refrigerator can make wafer paper wilt and soften over time. It’s best to add your wafer paper elements as close to serving time as possible.
6. How long does a finished wafer paper cake last? The cake itself is good for a few days, but the wafer paper elements are at their best on day one. After that, they may start to soften or wilt depending on the humidity.
7. Can you write or paint on wafer paper? Yes! You can write on it with edible markers. You can also paint on it by mixing edible color dust with a clear, high-proof alcohol (like vodka) to create an edible watercolor or paint.
Final Thoughts
Congratulations, you are now a modern cake artist. You’ve stepped beyond the world of sprinkles and rosettes and into the realm of edible sculpture. The wafer paper cake is your ticket to creating desserts that are sophisticated, unique, and guaranteed to be the talk of any party.
So go on, get a little experimental. Cut, shape, paint, and play. The world of wafer paper is vast and exciting, and you’ve just created your very first masterpiece.