25+ Magical Princess Cake Ideas (And How to Make Them)
The request arrives, often whispered with the gravity of a royal decree: “I want a princess cake for my birthday.” Your heart swells with love… and then promptly plummets into a pit of panic. Visions of leaning towers of fondant, terrifyingly off-model Disney characters, and a general glitter explosion dance in your head. What’s a loyal subject to do?
Fear not, noble baker! Put down the phone to the expensive bakery and step away from the pre-made cake aisle. I’m here to arm you with enchanting, impressive, and surprisingly achievable princess cake ideas that don’t require a fairy godmother to pull off. You are about to become the hero of the party, and all you need is a little butter, sugar, and a dash of confidence.
Why This Recipe Is a Royal Success
So, why are we tackling this seemingly monumental task? Because it’s so much more than just a cake.
First, it’s a showstopper that’s secretly easy. Seriously. We’re focusing on techniques that deliver that “wow” factor without requiring a degree in sculpture. With a few key tools and tricks, you can create a cake that looks like it came straight from a storybook. We have plenty of princess cake ideas that fit any skill level.
Second, it’s endlessly customizable. The base recipe is a simple, delicious vanilla cake—a perfect canvas. From there, you can adapt the colors and designs to match any princess in the kingdom, from Cinderella to Elsa to Tiana. It’s not just a princess cake; it can be their princess cake.

Finally, you get to be the magic-maker. There is no greater feeling than seeing the look on a child’s face when you bring out a cake you made just for them. You’re not just baking; you’re creating a core memory. And IMO, that’s worth a little bit of flour on your shirt.
The Royal Pantry (Ingredients)
You won’t need to quest for any dragon tears or phoenix feathers. These ingredients are all readily available at your local market.
For the Royal Vanilla Cake:
- 2 1/2 cups all-purpose flour
- 2 cups granulated sugar
- 1 tablespoon baking powder
- 1/2 teaspoon salt
- 1 cup unsalted butter, softened and cut into cubes
- 4 large eggs, at room temperature
- 1 cup whole milk, at room temperature
- 2 teaspoons pure vanilla extract
For the Enchanted Buttercream:
- 2 cups unsalted butter, softened
- 6-7 cups powdered sugar, sifted
- 1/2 cup heavy cream or whole milk
- 2 teaspoons clear vanilla extract (clear extract keeps the frosting perfectly white for coloring!)
- A pinch of salt
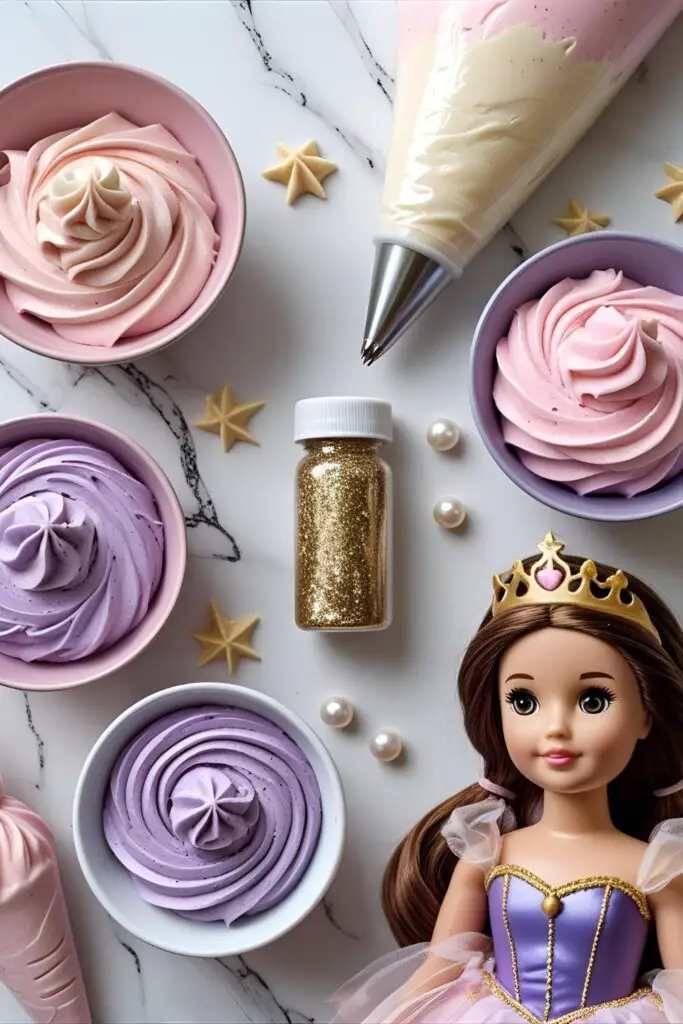
- Gel food coloring: Pinks, purples, blues, yellows—whatever the royal decree demands!
The Royal Armoury (Tools & Gadgets)
Every artisan needs their tools. Having the right gear will make executing your princess cake ideas a truly magical experience.
- Round Cake Pans: A set of 8-inch round cake pans is a must-have for tiered or layered cakes.
- Wonder Mold Doll Cake Pan: This is the ultimate shortcut to the classic doll dress cake. The Wilton Wonder Mold Pan bakes a perfect bell shape, so there’s no carving required.
- Master Decorating Tip Set: Don’t skimp here. A good set like the Wilton or Ateco Master Decorating Tip Set with star tips (like the 1M for rosettes), round tips, and leaf tips is your best friend.
- Gel Food Coloring: For vibrant, regal colors that won’t ruin your frosting, you need gel food coloring. Americolor and Wilton are fantastic brands.
- The Sparkle: What’s a princess without her bling? Get some edible glitter, sugar pearls, and shimmering sanding sugar to add that final touch of magic.
Step-by-Step Royal Proclamation (Instructions)
Let us begin this noble quest. Don your apron and prepare for glory!
Part 1: Baking the Foundation

Step 1: Prepare the Royal Court Preheat your oven to 350°F (175°C). Grease and flour your cake pans thoroughly. If using the Wonder Mold pan, make sure to get into every crevice.
Step 2: The Cake Potion In a large bowl, whisk together the flour, sugar, baking powder, and salt. Add the cubes of softened butter and mix on low speed until the mixture resembles damp sand.
Step 3: The Union of Ingredients In a separate bowl, whisk together the eggs, milk, and vanilla. With the mixer on low, slowly pour about half of the wet ingredients into the dry mixture. Once combined, increase the speed to medium and beat for about 90 seconds. Reduce the speed and add the remaining wet ingredients, mixing until just combined. Do not overmix!
Step 4: The Ordeal by Fire (Baking) Pour the batter into your prepared pans. For 8-inch rounds, bake for 30-35 minutes. For the Wonder Mold pan, bake for 50-60 minutes, or until a long skewer inserted into the center comes out clean. Let the cakes cool in their pans for 15 minutes before turning them out onto a wire rack to cool completely.
Part 2: The Royal Transformation (Decorating Ideas)
First, whip up your buttercream by beating the softened butter until fluffy, then gradually adding the powdered sugar and cream. Beat in the vanilla and salt. Now, let’s explore some princess cake ideas.
Idea 1: The Classic Doll Dress Cake Level your cooled cake layers. If using round layers, stack them with a thin layer of frosting between each, then carefully carve the stack into a tapered bell shape. Crumb coat the entire “skirt” and chill. Wrap a princess doll (or the pick from the Wonder Mold kit) in plastic wrap from the waist down and insert it into the center of the cake. Now, using a star tip (like a Wilton #21), pipe ruffles, rosettes, or stars all over the skirt until it’s completely covered.

Idea 2: The Elegant Rosette Ruffle Cake This one looks incredibly fancy but is so easy. Frost a round cake with a smooth base layer of frosting. Fit a piping bag with a large star tip (like the Wilton 1M). Starting at the bottom of the cake, hold the piping bag perpendicular to the cake and pipe a spiral rosette. Pipe the next one right beside the first, continuing all the way around the cake to form a row. Repeat in rows all the way to the top. Top with a tiara or some sugar pearls.
Idea 3: The Tiara & Jewels Cake This is the simplest of our princess cake ideas. Frost a round or tiered cake in a solid color or a soft watercolor blend of two colors. Before the frosting sets, gently press edible sugar gems, pearls, and candy diamonds around the base and sides. Top the cake with a beautiful (non-edible) toy tiara. It’s instant elegance with minimal piping required.
Calories & Nutritional Info

A note from the Royal Accountant’s office.
- Serving Size: 1 slice fit for royalty
- Calories: Such trivialities are not discussed in the presence of Her Majesty. (But if you must know, expect around 550-650 per slice).
- Primary Nutrient: Unadulterated joy.
- Side Effects: May cause spontaneous twirling and singing.
Common Royal Blunders to Avoid
Even a queen can have an off day. Here’s how to avoid a cake catastrophe.
- The Leaning Tower of Princess: Your cake layers are sliding or leaning. You must level your cooled cake layers before stacking! A flat, stable surface is non-negotiable.
- The Mid-Party Meltdown: Your beautiful buttercream ruffles are weeping and sliding off the cake. Your kitchen is too warm, and so is your frosting. If your hands are warming up the piping bag, pop it in the fridge for 10-minute intervals.
- The Color Catastrophe: You used liquid food coloring from the grocery store, and now your frosting is a watery, pastel mess. I repeat: You must use concentrated gel food coloring.
- The Glitter Bomb: Your cake is so sparkly it’s hard to look at. A gentle dusting of edible glitter provides a magical shimmer. Don’t dump the whole container on top unless you’re going for the “disco ball princess” theme.
Variations & Royal Edicts
Once you have the basics down, you can issue your own royal decrees.
- A Wardrobe of Colors: This is the easiest way to customize. Make an Elsa cake with icy blues and white snowflake sprinkles. A Belle cake with golden yellow rosettes. An Ariel cake with seafoam green and lavender. The princess cake ideas are as endless as the Disney vault.
- A Filling Fit for a Queen: Elevate the flavor by adding a filling between the cake layers. A tangy raspberry puree or a sweet strawberry jam pairs beautifully with the vanilla cake and adds a pop of color and flavor.
- The Grand Castle: Feeling ambitious? Take your round cake and “glue” ice cream cones (both regular and sugar cones for different roof shapes) to the top and sides with buttercream. Decorate them with frosting and sprinkles to create a magnificent castle.
Frequently Asked Questions (The Royal Court Q&A)
Her Majesty will now take your questions.
1. What exactly is a princess cake? While a traditional Swedish “Prinsesstårta” is a specific dome-shaped cake covered in green marzipan, the term “princess cake” more commonly refers to any cake decorated with a princess theme, often featuring ruffles, tiaras, castles, or a doll.
2. How do you make a princess doll dress cake? You bake cake layers in round pans or a special bell-shaped “Wonder Mold” pan. You stack and carve them into a skirt shape, frost them with ruffles or rosettes, and insert a plastic-wrapped doll into the top.
3. What’s the best frosting for decorating a princess cake? A sturdy American buttercream (like the one in our recipe) is fantastic. It’s easy to make, pipes well, and “crusts” slightly, which helps the decorations hold their shape.
4. How do I make my cake look sparkly and magical? Use edible glitter! You can get it in spray pumps for a fine mist or as loose dust you can sprinkle on. Lustre dust mixed with a little clear extract can also be painted on for a metallic sheen. And never underestimate the power of sugar pearls and shiny sprinkles.
5. Can I use a regular Barbie or other doll for a doll cake? Yes, you can! Just make sure to clean the doll thoroughly and wrap her lower half tightly in plastic wrap before inserting her into the cake.
6. How can I make a princess cake without any special pans? The “Tiara & Jewels” idea is perfect for this! Bake a standard two-layer round cake, frost it in a pretty color, and use a toy tiara and edible gems to create a stunning look with zero special pans required.
7. What are some simple princess cake ideas for beginners? The easiest approach is the “Tiara & Jewels” cake. Another simple idea is to frost the cake smoothly and cover it in beautiful, high-quality sprinkles in a “princess” color mix. Adding a custom cake topper with a crown or silhouette also works wonders.
A Fairytale Ending
There you have it. You are now fully knighted in the art of princess cake creation. You’ve learned the spells, mastered the potions, and are ready to build a confectionary kingdom that will be the talk of the land. Remember, the goal is to have fun and create a moment of pure, unadulterated magic.
So go forth and bake. Create a masterpiece worthy of the crown. You’ve officially earned your title as the Royal Baker, and frankly, you’ll probably never look at a store-bought cake the same way again.