The Hello Kitty Cake Ideas That Prove Cuteness is a Superpower
She has no mouth, yet she speaks to us all. She is a global icon of cuteness, a beacon of friendship, and the undisputed queen of adorable merchandise. She is Hello Kitty, and today, we are putting her face on a cake. Why? Because you can never have too much cute in your life. This isn’t just a guide to baking; it’s a deep dive into the art of adorable with these Hello Kitty cake ideas.
Forget complicated, multi-tiered fondant monstrosities. We’re going to break down how to create a stunning, instantly recognizable Hello Kitty cake that is so simple, you’ll wonder why you ever bought a cake from a store. Get ready to unleash a level of cuteness so powerful, it might just solve all your problems. (Disclaimer: It will not solve all your problems, but it will definitely make them better.)
Why These Hello Kitty Cake Ideas are Purr-fect
So, why should you dedicate your precious time to crafting this icon in cake form?
First, it is iconically, universally adorable. There is no one on this planet who does not recognize Hello Kitty. Bringing out a cake shaped like her head is a guaranteed way to get a collective “AWWW!” from everyone in the room, from toddlers to your too-cool-for-school teenage cousin. It’s a certified joy-delivery system.
Second, it is deceptively simple. Her design is a work of minimalist genius! Two dots for eyes, a button nose, a few whiskers, and a bow. That’s it! This makes her the perfect subject for beginner cake decorators. You don’t need to be an artist to nail this look.

Finally, we’re pairing it with the perfect flavor. To match the sweet, pink-and-white aesthetic, we’re making a delicious, from-scratch strawberry cake. It’s a crowd-pleasing flavor that perfectly complements the supercute design.
Your Supercute Supply List
To create this masterpiece of Kawaii, you’ll need a few key things.
- For the Pretty-in-Pink Strawberry Cake:
- 2 ½ cups all-purpose flour
- 2 teaspoons baking powder
- ½ teaspoon salt
- 1 cup (2 sticks) unsalted butter, softened
- 1 ½ cups granulated sugar
- 4 large egg whites
- 1 cup buttermilk
- 2 teaspoons vanilla extract
- 1 cup finely chopped fresh or frozen strawberries, pureed
- For the Fluffy White Frosting:
- A large batch of American Buttercream (about 6 cups). It’s stable and perfect for a smooth finish.
- Recipe: 1 ½ cups softened butter, 5-6 cups sifted powdered sugar, ¼ cup milk, 2 tsp vanilla, pinch of salt.
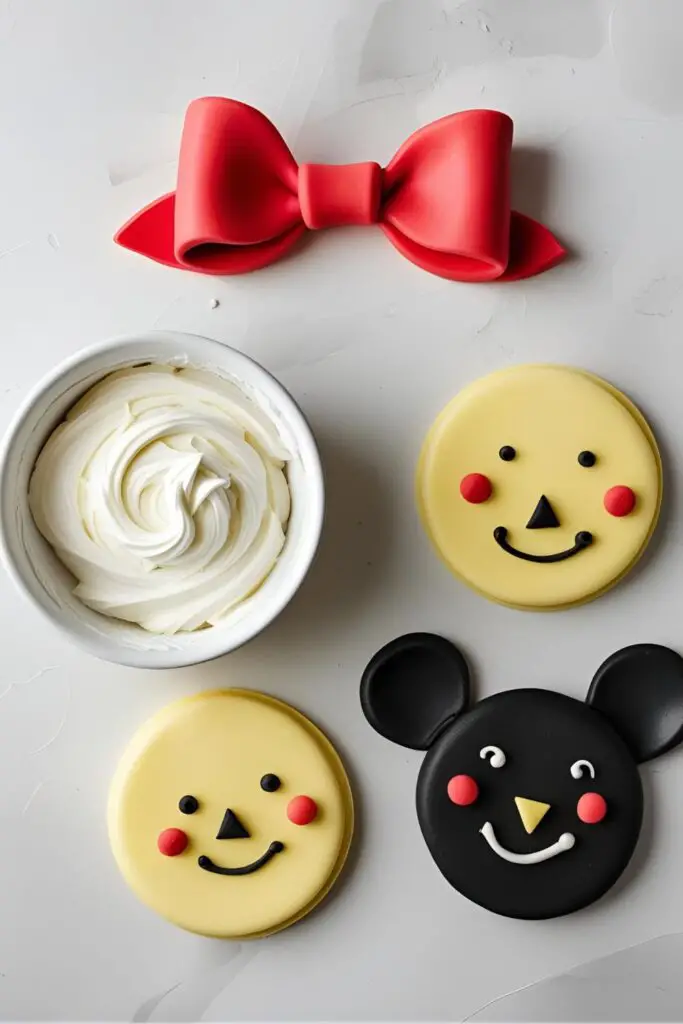
- For the Iconic Details:
- Small amounts of black, yellow, and red (or pink) fondant.
- OR, you can use black, yellow, and red/pink tinted buttercream.
The Kawaii Kitchen Toolbox
You don’t need a whole Sanrio store, just these essential gadgets.
- One 8 or 9-inch Round Cake Pan
- A cupcake/muffin tin
- Parchment Paper
- Stand Mixer or a reliable Hand Mixer
- Cake Turntable
- Offset Spatula and Bench Scraper
- A small, sharp paring knife
- Piping bags and a small round tip (if using buttercream for details)
Step-by-Step Instructions: Hello, Cuteness!
Ready to bring this icon to life? Let’s get started.
H3: Step 1: Baking the Strawberry Cake & “Ears”
- Prep Your Pans: Preheat your oven to 350°F (175°C). Grease and flour your round cake pan and two cups of your cupcake tin. Line the bottoms with parchment paper.
- Mix the Cake: Cream the butter and sugar until light and fluffy. Beat in the egg whites one at a time. In a separate bowl, whisk the dry ingredients. Alternate adding the dry ingredients and the buttermilk to the butter mixture. Finally, fold in the strawberry puree and vanilla.
- Bake: Fill your round cake pan about two-thirds full with the batter. Divide the remaining batter between the two prepared cupcake cups. Bake the round cake for 30-35 minutes and the cupcakes for 15-20 minutes, or until a toothpick comes out clean.
- Cool Completely: Let the cake and “ear” cupcakes cool completely. This is non-negotiable!
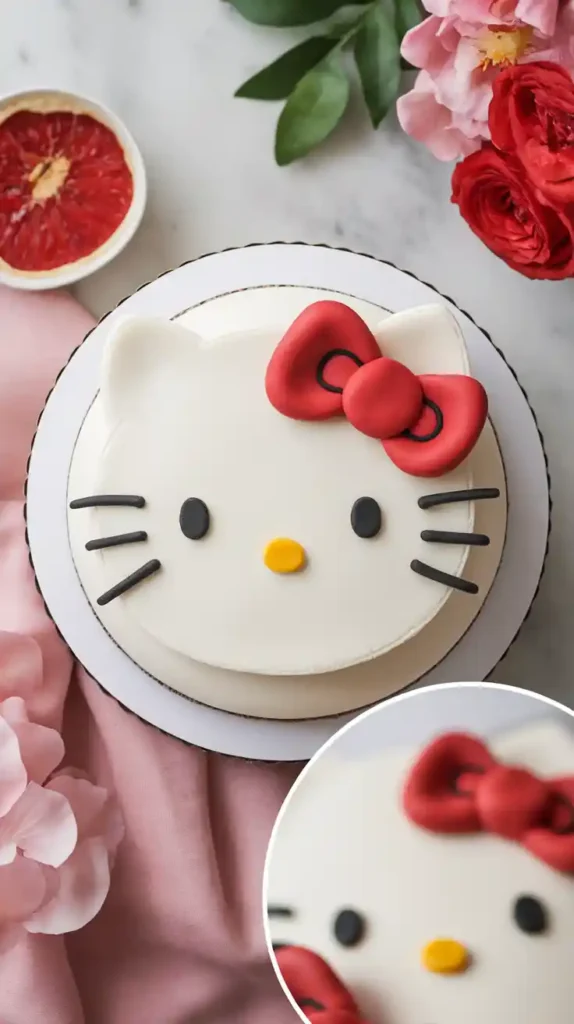
H3: Step 2: Assembling the Hello Kitty Head
- Level and Prep: Level the top of your round cake so it’s perfectly flat. Place it on your cake board or platter.
- Create the Ears: Unwrap your two “ear” cupcakes. With a serrated knife, cut a small, curved slice off one side of each cupcake so they have a flat edge that can sit flush against the round cake.
- Attach the Ears: Use a dab of buttercream as “glue” to attach the flat side of each cupcake to the top of the round cake, creating the iconic ear shape. Ta-da! You have a head.
- The Crumb Coat: Frost the entire assembled cake with a thin layer of white buttercream to trap all the crumbs. Chill in the fridge for 30 minutes until firm.
- The Final Coat: Once chilled, cover the entire cake with a final, generous, and smooth coat of the white buttercream. Use your bench scraper to get the sides as smooth as possible.
H3: Step 3: Creating the Iconic Face & Bow
- The Face: This is where the magic happens.
- Eyes: Roll out your black fondant (or use black buttercream with a round tip) and create two small, vertical ovals for her eyes. Place them on the cake, spaced nicely apart.
- Nose: Use yellow fondant or buttercream to create a small horizontal oval for her nose, placed right between and slightly below the eyes.
- Whiskers: Roll black fondant into very thin ropes or pipe thin lines of black buttercream. Place three whiskers on each cheek.
- The Bow: Roll out your red or pink fondant. Cut out two teardrop shapes and one small circle. Pinch the pointy ends of the teardrops and glue them to the center circle to create a simple, perfect bow. Place the bow on the top of her head, nestled next to one of the ears.
- The Most Important Step: Step back and admire the adorable icon you have just created.
Calories & Nutritional Info
This cake is made of friendship, kindness, and a whole lot of sugar.
- Calories: A friendly slice is around 500-700 calories of pure joy.
- Contains: 100% of your recommended daily intake of “Kawaii.”
- Warning: May make you want to buy a matching lunchbox and pencil case.
Common Mistakes to Avoid (Or, How to Avoid a “Badtz-Maru” Moment)
- Forgetting She Has No Mouth: This is the #1 rookie mistake. People feel compelled to give her a smile. Resist this urge. Hello Kitty has no mouth. This is canon. Don’t break canon.
- A Wonky Face: The simplicity of her face means that symmetry is key. If the eyes are crooked or the whiskers are at weird angles, it will look off. Lightly trace the placement with a toothpick before you commit with fondant or frosting.
- Bleeding Colors: If you’re using buttercream for the details, make sure your white base coat is well-chilled and firm before you pipe on the black. This will prevent the colors from smearing into each other.
- A Droopy Bow: If you’re making a fondant bow, it can be helpful to make it an hour or so in advance and let it air-dry a bit. This will help it hold its shape when you place it on the cake.
Variations & Customizations
Feel like changing up the friendship circle?
- The “Vintage Heart” Hello Kitty Cake: This is a super trendy option. Make a heart-shaped cake. Frost it with a pale pink or white and cover it in elaborate, frilly “Lambeth” piping. Then, create a smaller, simple Hello Kitty face right in the center.
- The Sprinkle Explosion: For a different texture, frost the cake smoothly, then gently press a mix of pink, white, and red nonpareils or jimmies all over the entire cake. Add the simple fondant face details on top of the sprinkles.
- Hello Kitty & Friends Cupcakes: This is perfect for a party. Frost cupcakes in white. Create a bunch of tiny red fondant bows to put on each one. On a few, add the simple eyes and nose to make Hello Kitty. On others, use green frosting for Keroppi, or black and white for Badtz-Maru.
FAQ: Your Supercute Questions, Answered

Let’s clear up some common questions.
H3: How do you get the Hello Kitty head shape without a special pan?
The method described above—using one round cake for the face and two cupcakes for the ears—is the easiest and most effective DIY hack!
H3: What’s the best way to make the whiskers look neat?
Rolling very thin “snakes” of black fondant is often easier and cleaner than piping them, especially for beginners. Make them all the same length before placing them on the cake.
H3: Can I use a stencil for the face?
You can! You can print a simple Hello Kitty face, cut out the eyes and nose to create a stencil, and use it as a guide. You can either lightly trace it with a toothpick or use it for an airbrush or powdered sugar design.
H3: What cake flavor is best for a Hello Kitty cake?
A strawberry cake is a perfect thematic match! But a classic vanilla, funfetti, or a light white cake also work beautifully with the sweet, simple aesthetic.
H3: How do I make the fondant bow?
The easiest way is to cut out two teardrop shapes and one small circle. Pinch the pointy ends of the teardrops to give them some dimension. Use a dab of water to “glue” the pinched ends to the back of the center circle.
H3: Can I make this cake ahead of time?

Yes. You can bake the cake layers and make the fondant details a day or two in advance. Frost and assemble the cake the day before your party and store it in the fridge.
H3: My black frosting is staining the white! What do I do?
Chilling your white base coat until it’s very firm is key. Also, when you place black fondant details, try to handle them as little as possible. If piping with black buttercream, try to pipe in one confident motion without smearing.
Final Thoughts: You Can Never Have Too Many Friends (or Too Much Cake)
You did it. You created a cake that is a pure, concentrated dose of happiness. You’ve proven that you don’t need complicated tools or a fine arts degree to make something that is truly special and full of character.
So go ahead, share your adorable masterpiece. Because as Hello Kitty would tell us (if she could), you can never have too many friends. And you can definitely never have too many Hello Kitty cake ideas.